Jon Tofte
TVWBB 1-Star Olympian
As one of the charter members of our unofficial "Skyline Club" I am pathetically behind in having my own entry completed. Working a job plus two part-time endeavors plus family dynamics makes it hard for me to set aside the kind of time that serious grill restoration seems to take. Plus, those of you who have seen my yard and shed pictures know that I also have to keep working on flip projects.
However, this Thanksgiving weekend I am thankful for many things and not the least of which is that my Skyline is finally done! (Well, I am still waiting on my printer friend to move me up from the bottom of the list so I can replace the tank warning label and the fuel gauge decals...)
It took me so long to get my wood slats done that I was horrified to find that the end caps of my hood needed repainting. The grill was never used, but I guess I didn't paint it well enough and almost a year of sitting outside in the heat with a Weber cover rubbing the metal must have done it in. I disassembled and repainted:

For the wood slats, I used 316 stainless screws from Marsh Fasteners. Others have reported not having much issue with the OEM regular screws, but most of the old grills I have recovered here in Florida have totally rusted out tray Z brackets and screws. I also used stainless steel Z brackets my sheet metal shop friend made for me before he sold his business.

A number of you, with good reason, warned me against trying to use red oak for the slats. I probably will only use up my remaining stock on one more grill and not try this again. But, it was the look that I was after. So, after staining with dark walnut stain (a suggestion I picked up here) the slats were coated with 4 coats of McCloskey Man O War spar varnish (a recommendation from Brian in Atlanta). It IS good stuff, so I am hoping my slats will last a while.
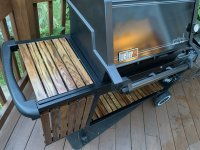
I know many like to find clear cedar with little or no grain for their grills, but I guess I am the opposite. I just love how the red oak grain stands out. I picked some of the best pieces for the top left tray:

I used the more modern slider rail for the left side fold up tray. My sheet metal friend was always promising to make me some right hand slider rails, but never did. After working with it I concluded that all I needed to do was take a grinder to the end of the rod and it would go right in the hole in the frame:

I don't plan to balance a big turkey on the right side, but it does work fine. For the closed position, I went ahead and did some crude fabrication using an already bent tool holder clip.

At this point I don't see any big issue. It doesn't carry much weight and shows no signs of sliding. If it does, I will drill another hole to secure it to the frame. The slider is definitely easier, but with the tank holder in the way, it would be a very tight fit anyway. I also don't expect to use this tray all that much, so the old style way is OK with me:
Here are a few more pictures. I am glad to at last be a full-fledged Skyline Club member


However, this Thanksgiving weekend I am thankful for many things and not the least of which is that my Skyline is finally done! (Well, I am still waiting on my printer friend to move me up from the bottom of the list so I can replace the tank warning label and the fuel gauge decals...)
It took me so long to get my wood slats done that I was horrified to find that the end caps of my hood needed repainting. The grill was never used, but I guess I didn't paint it well enough and almost a year of sitting outside in the heat with a Weber cover rubbing the metal must have done it in. I disassembled and repainted:
For the wood slats, I used 316 stainless screws from Marsh Fasteners. Others have reported not having much issue with the OEM regular screws, but most of the old grills I have recovered here in Florida have totally rusted out tray Z brackets and screws. I also used stainless steel Z brackets my sheet metal shop friend made for me before he sold his business.
A number of you, with good reason, warned me against trying to use red oak for the slats. I probably will only use up my remaining stock on one more grill and not try this again. But, it was the look that I was after. So, after staining with dark walnut stain (a suggestion I picked up here) the slats were coated with 4 coats of McCloskey Man O War spar varnish (a recommendation from Brian in Atlanta). It IS good stuff, so I am hoping my slats will last a while.
I know many like to find clear cedar with little or no grain for their grills, but I guess I am the opposite. I just love how the red oak grain stands out. I picked some of the best pieces for the top left tray:
I used the more modern slider rail for the left side fold up tray. My sheet metal friend was always promising to make me some right hand slider rails, but never did. After working with it I concluded that all I needed to do was take a grinder to the end of the rod and it would go right in the hole in the frame:
I don't plan to balance a big turkey on the right side, but it does work fine. For the closed position, I went ahead and did some crude fabrication using an already bent tool holder clip.
At this point I don't see any big issue. It doesn't carry much weight and shows no signs of sliding. If it does, I will drill another hole to secure it to the frame. The slider is definitely easier, but with the tank holder in the way, it would be a very tight fit anyway. I also don't expect to use this tray all that much, so the old style way is OK with me:
Here are a few more pictures. I am glad to at last be a full-fledged Skyline Club member
Attachments
Last edited:
")

 !
!