What mods are worth the $$$


Don't overdo the notch make it as minimal as possible.
It should go just below the seating surface of the flip the lid rides in so that the wire don't cause the lid to crack
Don't cut it too deep or too wide.

For any kind of cooking on the top grate anything besides the notch is just a PITA
 
I did the notch and it works the best, my WSM has the grommet port but I mounted a spare Weber thermometer (I upgraded the original with a 3" River Country thermometer) in that space using some large flat washers, now I have a reference temp between the lid and the grate level, really helps!
 
As a mod, the notch is way simpler/easier to do than installing a grommet. Takes about 5 minutes with a dremel; 30 seconds with an angle grinder.

So I'd strongly suggest you notch first. Then see if there's any time you feel like you'd want the grommet in addition. My guess is probably not.


Thank you for this. I have both an angle grinder and dremel and am handy with both. I have a diamond wheel for the angle grinder, not a grinding wheel. The notch will be a bit narrower.

Do you lose any heat or smoke via the notch?

I am going to be adding the lid gasket so I may wait to do the notch. Thinking that if I put the seam for the gasket aligned with the notch, I might be able to cut a smaller, less intrusive notch.
 
Here's a video of cutting the notch. Angle grinder is the better tool for this job than the dremel. I'd spring for the $10 for a grinding wheel (if that is what you should use for a task like this).

Sure you will lose a soupcon of smoke through the notch. But who cares? The space created will be one quarter inch square (or less). Located at the top of the smoker which already has three big holes in it under the daisy wheel. So it will make zero difference.


Because there is a lot of play between the grill grate and the inside of the smoker on at least one occasion I have tipped the grate into the fire below. By extending the tabs it helps keep that from happening. A while back I purchased a Hunsaker rib hanger and it had a even bigger problem with tipping. I finally had enough after when a full rack of beef back ribs fell in the fire. I have ditched the Hunsaker and purchased a LavaLock. If you do the mod to the grill straps, the LavaLock fits snugly in the gap between the grill straps and the smoker and no more worries!
^^^^^This by +1,000

I had a rib disaster where the top grate tipped and 3 half racks dropped; 2 into the bowl, but one in the ash below!

To prevent this from EVER happening again I used the mod of buying a longer bolt and adding washers to each grate bracket at the top. Cost was under $5.

WSM-Tab-Mod-1.jpg
WSM-Tab-Mod-2.jpg
 
Hello friends,
Does anyone here using Hunsaker floating hinge for your WSM 18? please provide your opinions.

Thanks, Vincent.
 
Thanks Michael, yes, I saw that post too, but no one talked about Hunsaker floating hinge and same goes for youtube, all about Unknownbbq hinge.
 
Thanks Michael, yes, I saw that post too, but no one talked about Hunsaker floating hinge and same goes for youtube, all about Unknownbbq hinge.

Yep.. that's what I have found. I suppose that is a message, right?
I'm going to purchased the unknownbbq hinge, but I am adding the Hunsaker clip. Kind of concerned about cantilevering the hood off the back of the WSM, leaving it vulnerable to tipping or separating.
 
The only mods I’ve done to my 18 WSM is a BBQ Guru ATC that I use on overnight cooks and some hollow rivets for the grill grates.

I run my wires through the hollow rivets.

I also added a second charcoal grate that runs perpendicular to the first. Keeps coals up and burning longer.
 
The only one i have installed is a guru ATC (party q for now) but that's been a game changer. no more fiddling with dampers endlessly just get it up to temp and stabilized, then switch to the guru and plop some food on.

The other mod i want to do, and probably the last i'll do, is intall a hinge, but i cannot figure out how to drill through the porcelin. not sure if i just need better bits or what the trick will be.
 
Step drill bits. For metal. Painters tape on the area. I’ve put 4 holes for the lid hinge. And recently 4 more for handles and a 3/4 hole in the base for an air burner set up. All without issue. No chipping.

so far as tipping with the hinge. ive always just aligned the hinge with one of the legs. Never had an issue with tipping. Even when empty. Much less with 15lbs of meat loaded in.
 
I personally changed out my thermometers to River Country Thermometers so I can adjust it and added a Cajun Bandit Doors for looks. Adding a felt gasket was good for the initial burns until my my pits burn't in with enough creosote that the need for it was not necessary anymore.
 
Step drill bits. For metal. Painters tape on the area. I’ve put 4 holes for the lid hinge. And recently 4 more for handles and a 3/4 hole in the base for an air burner set up. All without issue. No chipping.

so far as tipping with the hinge. ive always just aligned the hinge with one of the legs. Never had an issue with tipping. Even when empty. Much less with 15lbs of meat loaded in.
Yeah i finally got a new small bit to do the starter holes. got a 2 pack and the first bit was able to do all 8 but went to the trash after the 8th as it was barely able to get the last hole done. Then i slowly drilled up in size until the bolt could fit and the rest of the resizing went super easy without chipping as well. Mine definitely wants to tip over so I did go ahead and order the cylinder locks. the acorn hinge, while cheap, is a pretty solid hunk of metal so i think its just too much weight without locks but we'll see how it does once i get those mailed to me.
 
I think I am finally done with my Covid/Summer project. I started with an almost new WSM 18 on Craigslist for $80, so I figured I had some house money to spend. Since I am no DIY king, I went with commercial/easy mods rather than DIYs that I would likely mess up. Here’s my rundown:

Slot/notch for probe wires. Quick and easy, and a much better option than the Weber grommet (which I will probably never use again).

Handles. I started with the Everbilt garage door handles from Home Depot. But then switched to 2.25 inch thermoplastic screw on knobs, which are better. The garage door handles are a bit awkward when screwed on vertically. They’d be ideal if mounted horizontally, but then you have to start drilling holes.

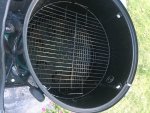
Cajun Bandit extended brackets. $70 (which includes an additional upgraded top cooking grate). Pricey, but screws right on easily and provides three solid cooking grates each spaced 5-6 inches apart. Also provides some additional flexibility when using the WSM for hot/fast and grilling. Gives me four vertical positions to cook from -- 21, 16, 11 and 5 inches (i.e cooking grate on ring) away from the charcoal grate. Most of my grilling is done on the gasser (so no kettle). So it is nice to be able use the WSM as my occasional charcoal grill when I have the time.

FireDial diffuser. I really really like this as an alternative to the water pan (full or empty). I wasn’t a fan of the very deep WSM water pan to begin with, and the CB extended brackets only made the lower space even more cramped. The flat FireDial reclaimed that space and completely eliminates the water pan for me. If I really want to cook with water and/or have a drip pan, a foil pan on the FireDial or lower/middle cooking grate is simpler and easier.

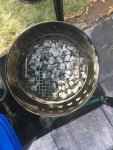
Charcoal basket mod. Added the second grate at 90 degrees and bolted the two grates together with U-bolts as handles. Also wired the ring to the grate. So it is a one-piece unit.

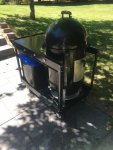
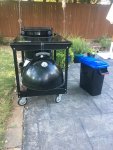
Harbor Freight cart. All around nice way to store the gear and make it easy to take the WSM out and put it away. I cover it with a generic pellet grill cover. Hook on the cart handle eliminates the need for a lid hinge.

Even more extra grate capacity. Bolted together an extra bottom 17” cooking grate and a 14” cooking grate. For max capacity (say like 15 pounds of wings) I can run 5 grates at one time – two grates bolted together on the bottom bracket, one grate on the middle bracket, one grate on the top bracket, and one upside down grate stacked on top. FireDial placed on the charcoal ring keeps it all from going up in flames.

I now need another hobby/project.
 

Attachments

  • wsm mod2.jpg
    wsm mod2.jpg
    155.6 KB · Views: 73
  • wsm mod4.jpg
    wsm mod4.jpg
    194.6 KB · Views: 66
  • wsm mod5.jpg
    wsm mod5.jpg
    176.4 KB · Views: 68
  • wsm mod6.jpg
    wsm mod6.jpg
    174.8 KB · Views: 70
Last edited:
Nice work on the cart! Mine looks so crude by comparison. I love the hooks on the side. Are they magnetic?
 
Magnet hooks from Amazon.

My "nibbling" skills are lousy. So the cart cut out looks cruder the closer you look/get. The rubber edging hides some, but not all, of my metal working mistakes. The original outline was a lot smaller. But then I had to even out one side a bit, then the other a bit, then the other a bit more, etc. Good thing is that if I ever upgrade to a 22, that cut out will already be big enough...

But overall, the cut out was easier than I thought it would be.
 
Last edited:
Magnet hooks from Amazon.

My "nibbling" skills are lousy. So the cart cut out looks cruder the closer you look/get. The rubber edging hides some, but not all, of my metal working mistakes. But the cut out was easier than I thought it would be.
It was easier than I thought, but tough to do well. I have the rubber edging to install, but I need to nibble off some more metal to move the WSM further back in the cart to give my Stoker fan a bit more clearance.
 
In order of utility:
Handles on the middle section.
"Piedmont pan" for waterless cooking.
Slot for probe wires.
Second charcoal grate perpendicular to the original.
Everything else is stock, but I am considering putting wheels on.
 
For those using the HF cart and a nibbler to cut the opening, had you considered using a jig saw with metal blade? You could easily create a circle jig for the saw and make a perfect circle with little effort. It's a technique I have often used with my router and it works dead perfect. No free handing, no cleanup when you're done... Just curious.


Back
Top