You are using an out of date browser. It may not display this or other websites correctly.
You should upgrade or use an alternative browser.
You should upgrade or use an alternative browser.
There's no turning back now...
- Thread starter Steve Hoch
- Start date
Steve Hoch
TVWBB Olympian
Just finished this one
Richard in NS
TVWBB Wizard
Wow, looks Good Steve!
Has anyone a proven method for painting the Stainless Steel Z bars?
Has anyone a proven method for painting the Stainless Steel Z bars?
Steve Hoch
TVWBB Olympian
I'm going to just leave them. I'm certainly no painting expert, but I don't think spray paint would stick too well unless you scuffed them up or used some sort of chemical etching first. Good question though, I wouldn't be opposed to painting them so it looks more original.Wow, looks Good Steve!
Has anyone a proven method for painting the Stainless Steel Z bars?
Timothy F. Lewis
TVWBB 1-Star Olympian
Since you went with Mahogany (non original material) I’d do exactly what you’ve done and stick with it! You might want to put a coat of wax on the SS z bars and touch them up spring and fall.
Eager to see how the sandblasting goes! Probably sometime next week?
Eager to see how the sandblasting goes! Probably sometime next week?
Steve Hoch
TVWBB Olympian
Since you went with Mahogany (non original material) I’d do exactly what you’ve done and stick with it! You might want to put a coat of wax on the SS z bars and touch them up spring and fall.
Eager to see how the sandblasting goes! Probably sometime
I'm supposed to get the cookbox back from the sandblasting place around the middle of the week. The only other thing that I'm not done with is the two bottom tables. Laying out the spacing is a little bit of work to try and get it perfectSince you went with Mahogany (non original material) I’d do exactly what you’ve done and stick with it! You might want to put a coat of wax on the SS z bars and touch them up spring and fall.
Eager to see how the sandblasting goes! Probably sometime next week?
Timothy F. Lewis
TVWBB 1-Star Olympian
As the most talented luthier once told me (a Vince Lombardi quote)
“Excellence can be achieved, perfection cannot.”
I completely understand the frustration wanting to make it a showpiece, I think you are doing excellent work, can’t wait for the finished product! Take your time and do it right, the patience will be rewarded. I rushed some of my resto and I’m paying for it by having to redo some things which would have been easier to have done when it was originally apart.
I like what I’m seeing!
Ed P
TVWBB Honor Circle
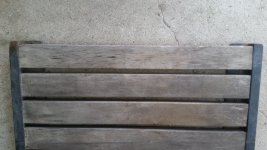
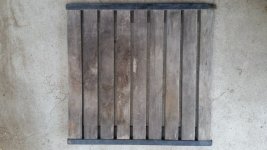
Just a reminder...don't forget to inset the end slats so there is a gap on both ends.I'm supposed to get the cookbox back from the sandblasting place around the middle of the week. The only other thing that I'm not done with is the two bottom tables. Laying out the spacing is a little bit of work to try and get it perfect
Attachments
Steve Hoch
TVWBB Olympian
Yes, that is a great restore!
How did you make the handles?
How much for one? (ha ha, kind of not ha ha) how much would you want for one of those?
I'm stuck with my old, old original wood handle that weighs a little less than a butterfly at this point
My buddy made the handle on his router table. Tell me what kind of wood you want and I'll ask him for a price.Yes, that is a great restore!
How did you make the handles?
How much for one? (ha ha, kind of not ha ha) how much would you want for one of those?
I'm stuck with my old, old original wood handle that weighs a little less than a butterfly at this point.
Steve Hoch
TVWBB Olympian
You're right, that's the key to making those right. Luckily I have another one to use as a template.Just a reminder...don't forget to inset the end slats so there is a gap on both ends.
Steve Hoch
TVWBB Olympian
P.S he already has some made in red oak and mahogany.My buddy made the handle on his router table. Tell me what kind of wood you want and I'll ask him for a price.
Steve Hoch
TVWBB Olympian
My friend is thinking about how he wants to go about selling these. I'll have an answer in the next day or two.I’d be curious about red oak … I just have a hand held router so mine would come out looking like garbage …
Tim Brisson
TVWBB Member
Use a cutoff wheel and slice the nut and bolt off inside the box and then tap the remaining bolt piece out with a punch.Put a vice grips on the inside nut. Then put a 7/16" wrench on the outside head of the bolt and twist it until the bolt comes out or twists off. If it twists off and is frozen inside the cookbox, then you will have to deal with drilling or pounding it out. Some may suggest penetrating oil a few times over several hour or even days, but, in my experience, that won't do anything but delay the inevitable.
Brian B Atlanta
TVWBB Gold Member
I really don't think that matters that much I did an 1100 for a friend and yes think they are indented on each side about an 1/8 inch did a thread on it. Its the penny trick that Dave from KC gets you where you need to be, screw the left and right side down indent or not then the pennies will take care of the spacing and it will be close enough, nobody ever is going to notice this except for us and to be honest I am not sure I would notice it.Just a reminder...don't forget to inset the end slats so there is a gap on both ends.
Ed P
TVWBB Honor Circle
Yeah, I agree...it doesn't matter. If you look at that beautiful picture of the swing table that Steve posted earlier in the thread, he knows all about how to space the slats. I had the table in the house to make a drawing of it and my wife was wanting me to put it back outside, so I snapped a couple of pics on the way.I really don't think that matters that much I did an 1100 for a friend and yes think they are indented on each side about an 1/8 inch did a thread on it. Its the penny trick that Dave from KC gets you where you need to be, screw the left and right side down indent or not then the pennies will take care of the spacing and it will be close enough, nobody ever is going to notice this except for us and to be honest I am not sure I would notice it.
LMichaels
TVWBB 2-Star Olympian
Cast aluminum can shatter like glass. Do not use a punch and hammer on it. I know from personal experience. Some get lucky but if it's the only cook box you have to work with DRILL it out or press it out NEVER use a hammer on thin cast metalUse a cutoff wheel and slice the nut and bolt off inside the box and then tap the remaining bolt piece out with a punch.