INTRODUCING: the "Roto Damper"


I stick pretty close to the (old) stock PID values... For low and slow I set the fan on at Max Only, for medium temps I let the fan run all the while but set the blower Max at about 20%, for high heat pizza cooks I set both blower Max values to 100%. I always leave the blower startup max at 100%.

About two years ago, that was :B=4, p=3, i=0.005, d=5

Where do you keep your top vent?
 
Yah, that's about the PID settings I run, I fiddle with them slightly from time to time. The Fauxmado is a bit leaky, so for below 250 I keep it just cracked, then scale up from there with the temp.
 
Got my Roto Damper yesterday, assembled and adjusted, now working on my burner setup for my WSM 22.5......will post some pics when done.
 
Dave, would love to see what you do with it. I've got an 18.5 but am going to sell it soon and get a 22.5. I'm finally tired enough of briskets and ribs barely fitting.
 
Hey Ralph, this looks great. I have not had a chance to read through this entire thread yet, so I apologize if this is already answered, but are you selling these, if so, how much? Otherwise, is there a link to the stl files in this thread? I have a Kamado Joe 18" classic.

Thanks,
Mike
 
INTRODUCING: the "RD3"

This is the third iteration of my Roto Damper design, the first major departure from the original roto damper configuration.

With the original Roto Damper I concentrated on making a valve that was as tight as possible to control low and slow cooks, while providing an opening that was roughly the same size as the blower output. The design has been a great success, but there is room for improvement in some areas.

Since the addition of the thermocouple pit probe on the HMv4.2 high heat cooking as become more a part of the Heater Meter world. The roto damper, by design, creates a bottleneck for air to travel through to provide the slow trickle that is perfect for low and slow cooking, but it hampers air flow a bit in the high end and so it's not the ideal setup for high heat cooking. On the roto damper I kept the blower and servo on the outside of the valve to make the valve close as tight as possible, but that means the fan itself and the wires from the servo and fan have to be outside of the damper and moving.

When I set out to design the RD3 I adjusted my goals to provide the maximum amount of air flow and eliminate moving parts/wires. I put the blower inside the body and oriented it so the output shoots directly into the grill adapter unhampered to allow as much flow as possible. I used my same roto damper valve design but made the opening much bigger to allow more air to get through. Initially I used the stock HM blower (from Digikey) but found the damper was just too darn big, so I searched Digikey and came up with another blower with the same specs that's just a bit smaller. The RD3 will NOT work with the stock HM blower, you must use model BFB0512VHD blower (Digikey, Mouser), no substitutes. This is one disadvantage the RD3 has compared to the original Roto Damper, with the original RD I can connect a wide variety of blowers while the RD3 will only work with this one blower. Though it is convenient that Mouser stocks this blower (unlike the stock HM blower), so if you're already ordering from Mouser you can save that extra shipping from Digikey.

"and so, without further adieu, I present to you, the "Roto Damper 3"" (Code Name "RD3")


"What a wonderful showing, don't you agree?...." lol

I made the output of the RD3 customizable like the original Roto Damper. In the video I have the 1" conduit adapter shown, the output of the blower matches nicely with the 1" conduit adapter. I have also created a Roto Damper output adapter which will mate the RD3 up with the output cap from an original Roto Damper, so you can use the same grill adapter plate with the RD and the RD3 if you like.

I designed the RD3 so it uses the same RDTC control box as the RD, so the electronics can slide right off the RD and onto the RD3. The control box can be attached from either side so you can choose the orientation. On a kamado the RD3 output will be horizontal with the CAT5 jack coming out the back side, but if you rotate the RD3 so the output is facing up the CAT5 jack faces up and will collect rain and you WILL have trouble. So in this instance you can attach the control box from the other side so the CAT5 jack will face directly downward. Either way it works out nice, the wires are completely enclosed in the case, and there are no moving parts other than the damper disc. I have a control box made for the RDTC board as well as a hand wired box that would use the CAT5 jack from Home Depot and the (optional) panel mount probe jacks.

Here's a couple pics of the RD3 parts:

RD3Parts.jpg


RD3Parts2.jpg


...and a handsome shot of the RD3 assembled and ready for action...

RDv3.jpg


I have been experimenting with prototype versions of the RD3 for a while now, have shared one with my Uncle and one other member of the forum, all of us confirm the RD3 performance is outstanding! It allows a bit more flow than the RD and so it can stoke a fire hotter and faster, and the valve clamps down tight to control low and slow cooks really great as well, it seems to have all the bases covered.... Today I finally got the arrow and scale designed which were the finishing touch that come after all of the critical design work has been completed. At this point it's official, the RD3 is finally ready for prime time...
 
Last edited:
Well due to a wrong click on the shipping collection i now have the new blower. hhmm bad when you end up paying twice as much as the device in shipping. oh well.
 
Yep Ralph. I hate the way that digikey site dosnt tell you what the shipping option costs in the total.

Have got my extension board working kind of by putting the 10k resister back on the main board and just using a normal pit probe. Will do until i get the parts to build a new one.
 
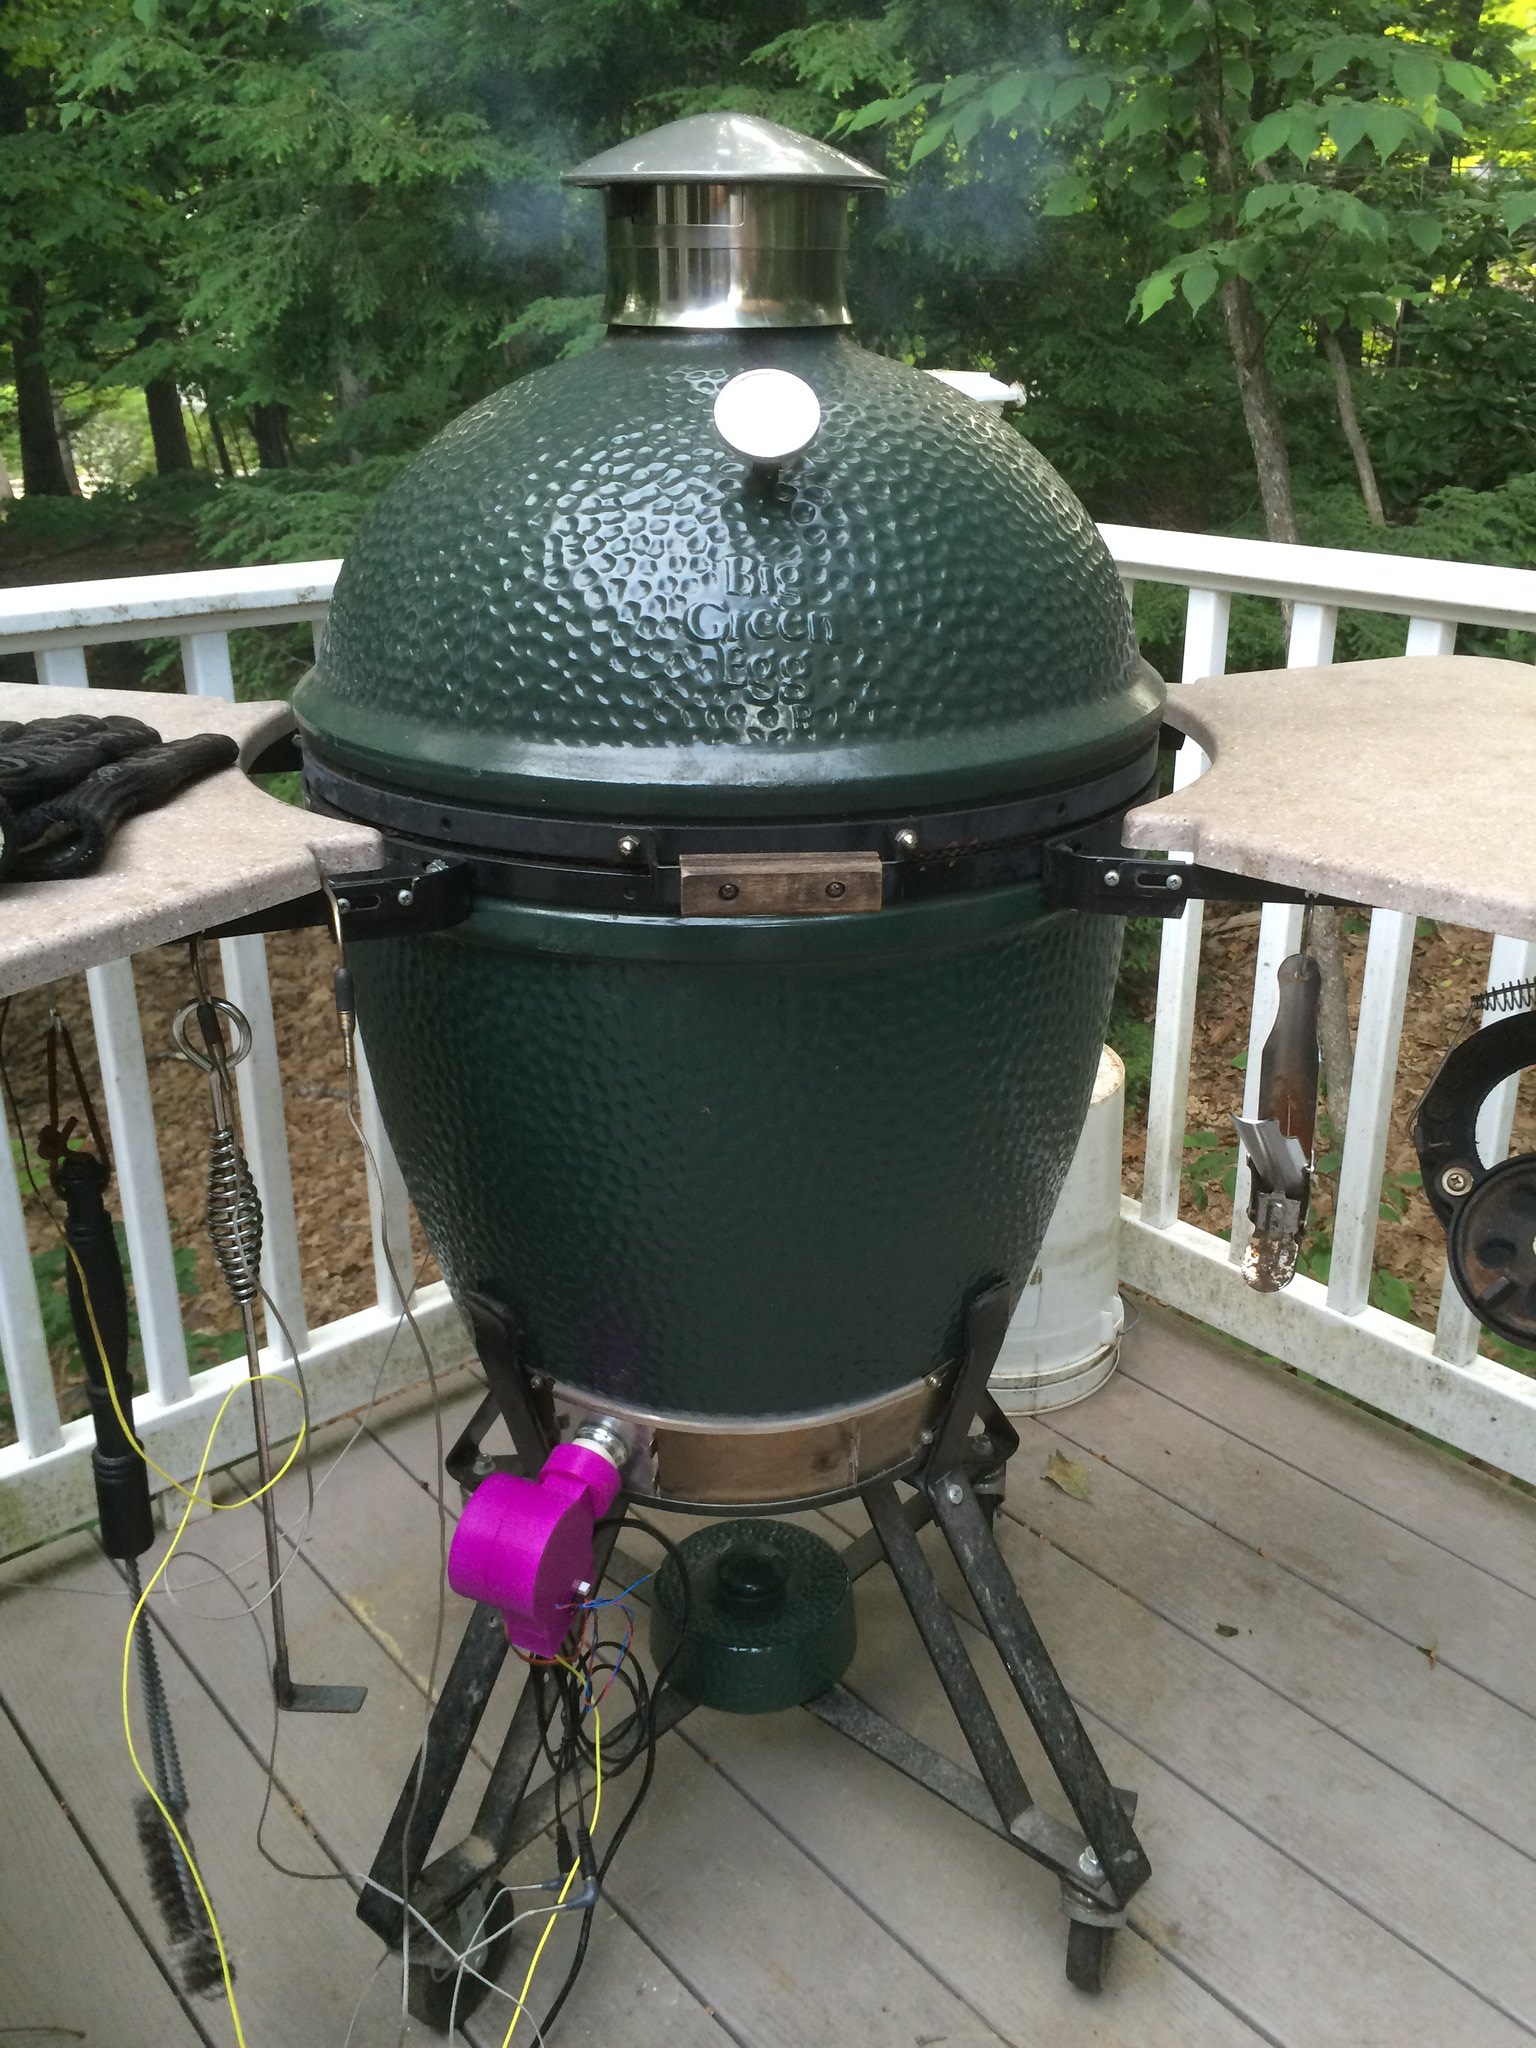
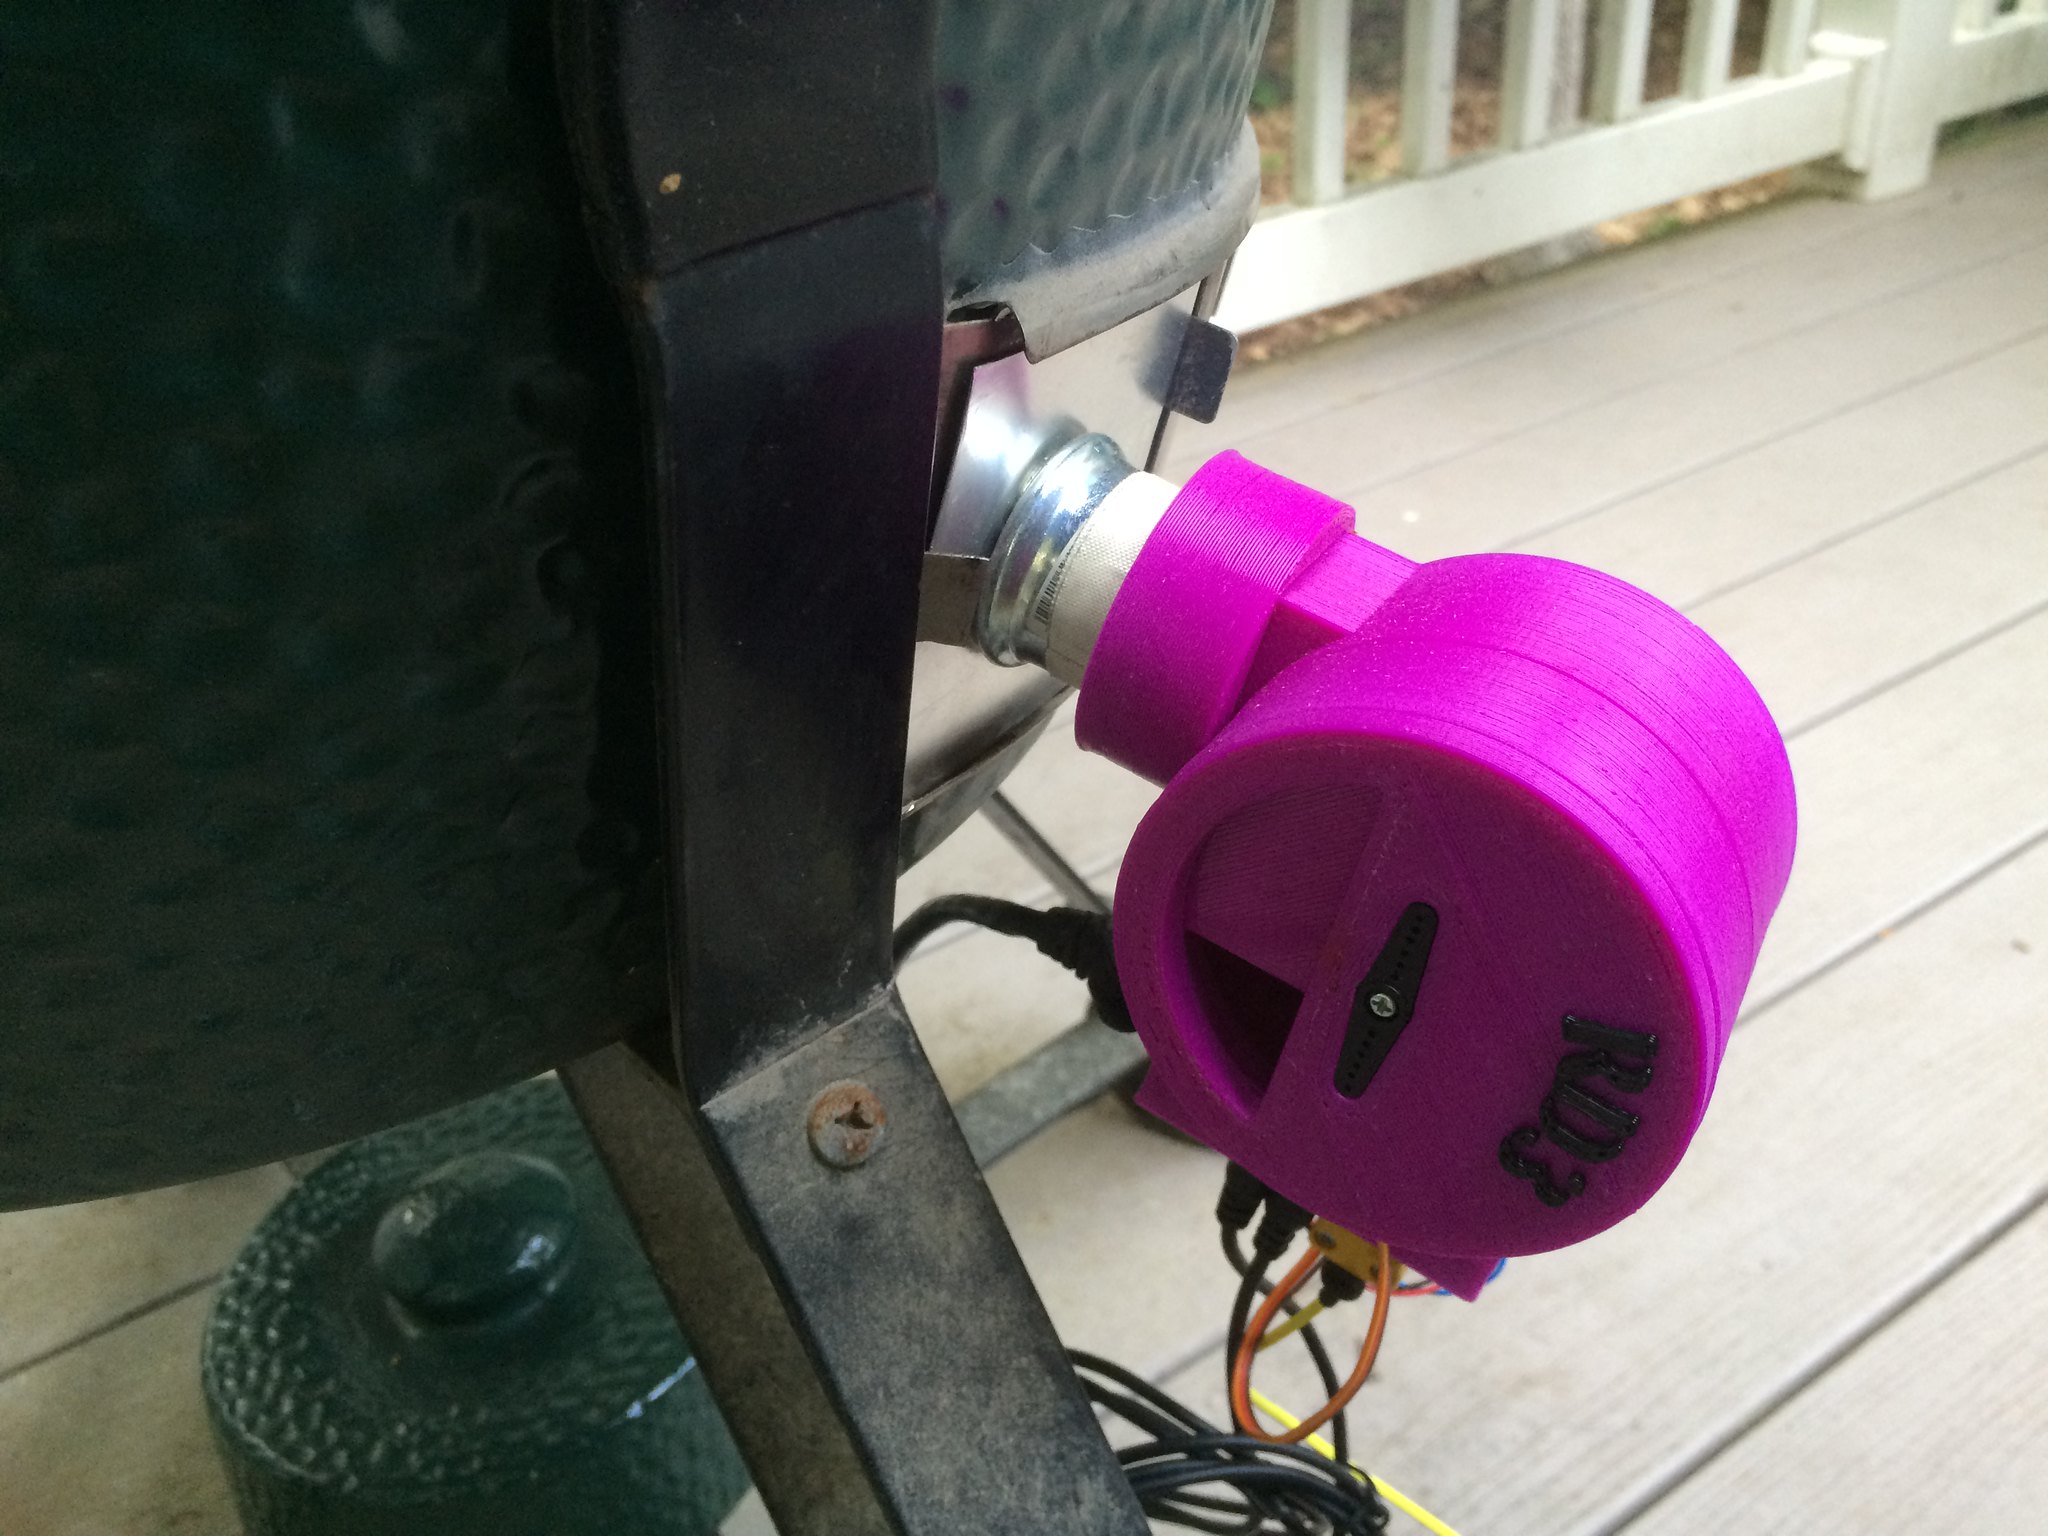
I've had some people asking how the low and slow performance is with the new RD3 so I did a real world test cook tonight.

I started the "fauxmado" with half a weber starter cube under a pile of Royal Oak lump coal pushed to the back half of the burn plate. (the coals had been burned previously, ash shaken off and lit back up)

The HM is running the (old) stock PID settings, fan Startup Max 100%, Min 0% and Max 10%, Fan on at MAX ONLY.

I waited until the smoke from the starter cube went away and then closed the lid, leaving the top vent open only a crack.

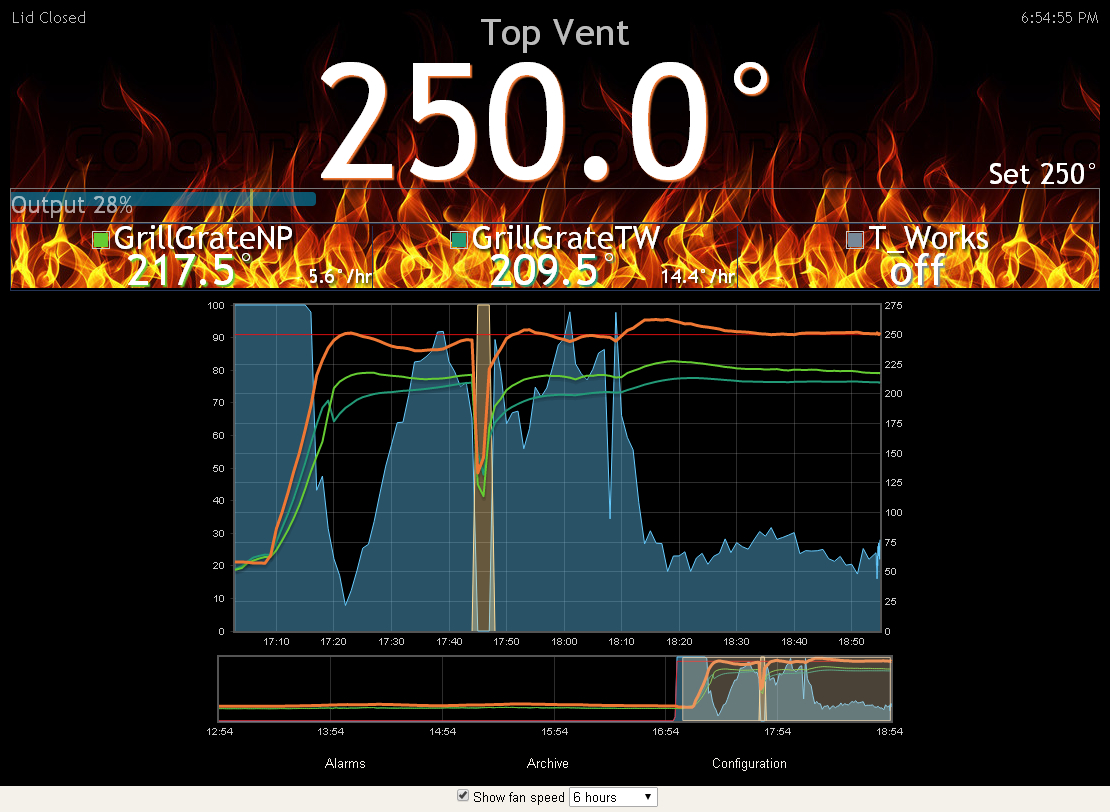
The pit rose rapidly to the target of 250F, as it approached the setpoint the HM reacted by backing down the output. When the output moves from 100% to 99% (or below) the fan goes off completely and the damper takes control.

The RD3 hit the setpoint almost exactly, followed by a slight dip in temp as PID adjusted to the lack of blower output.

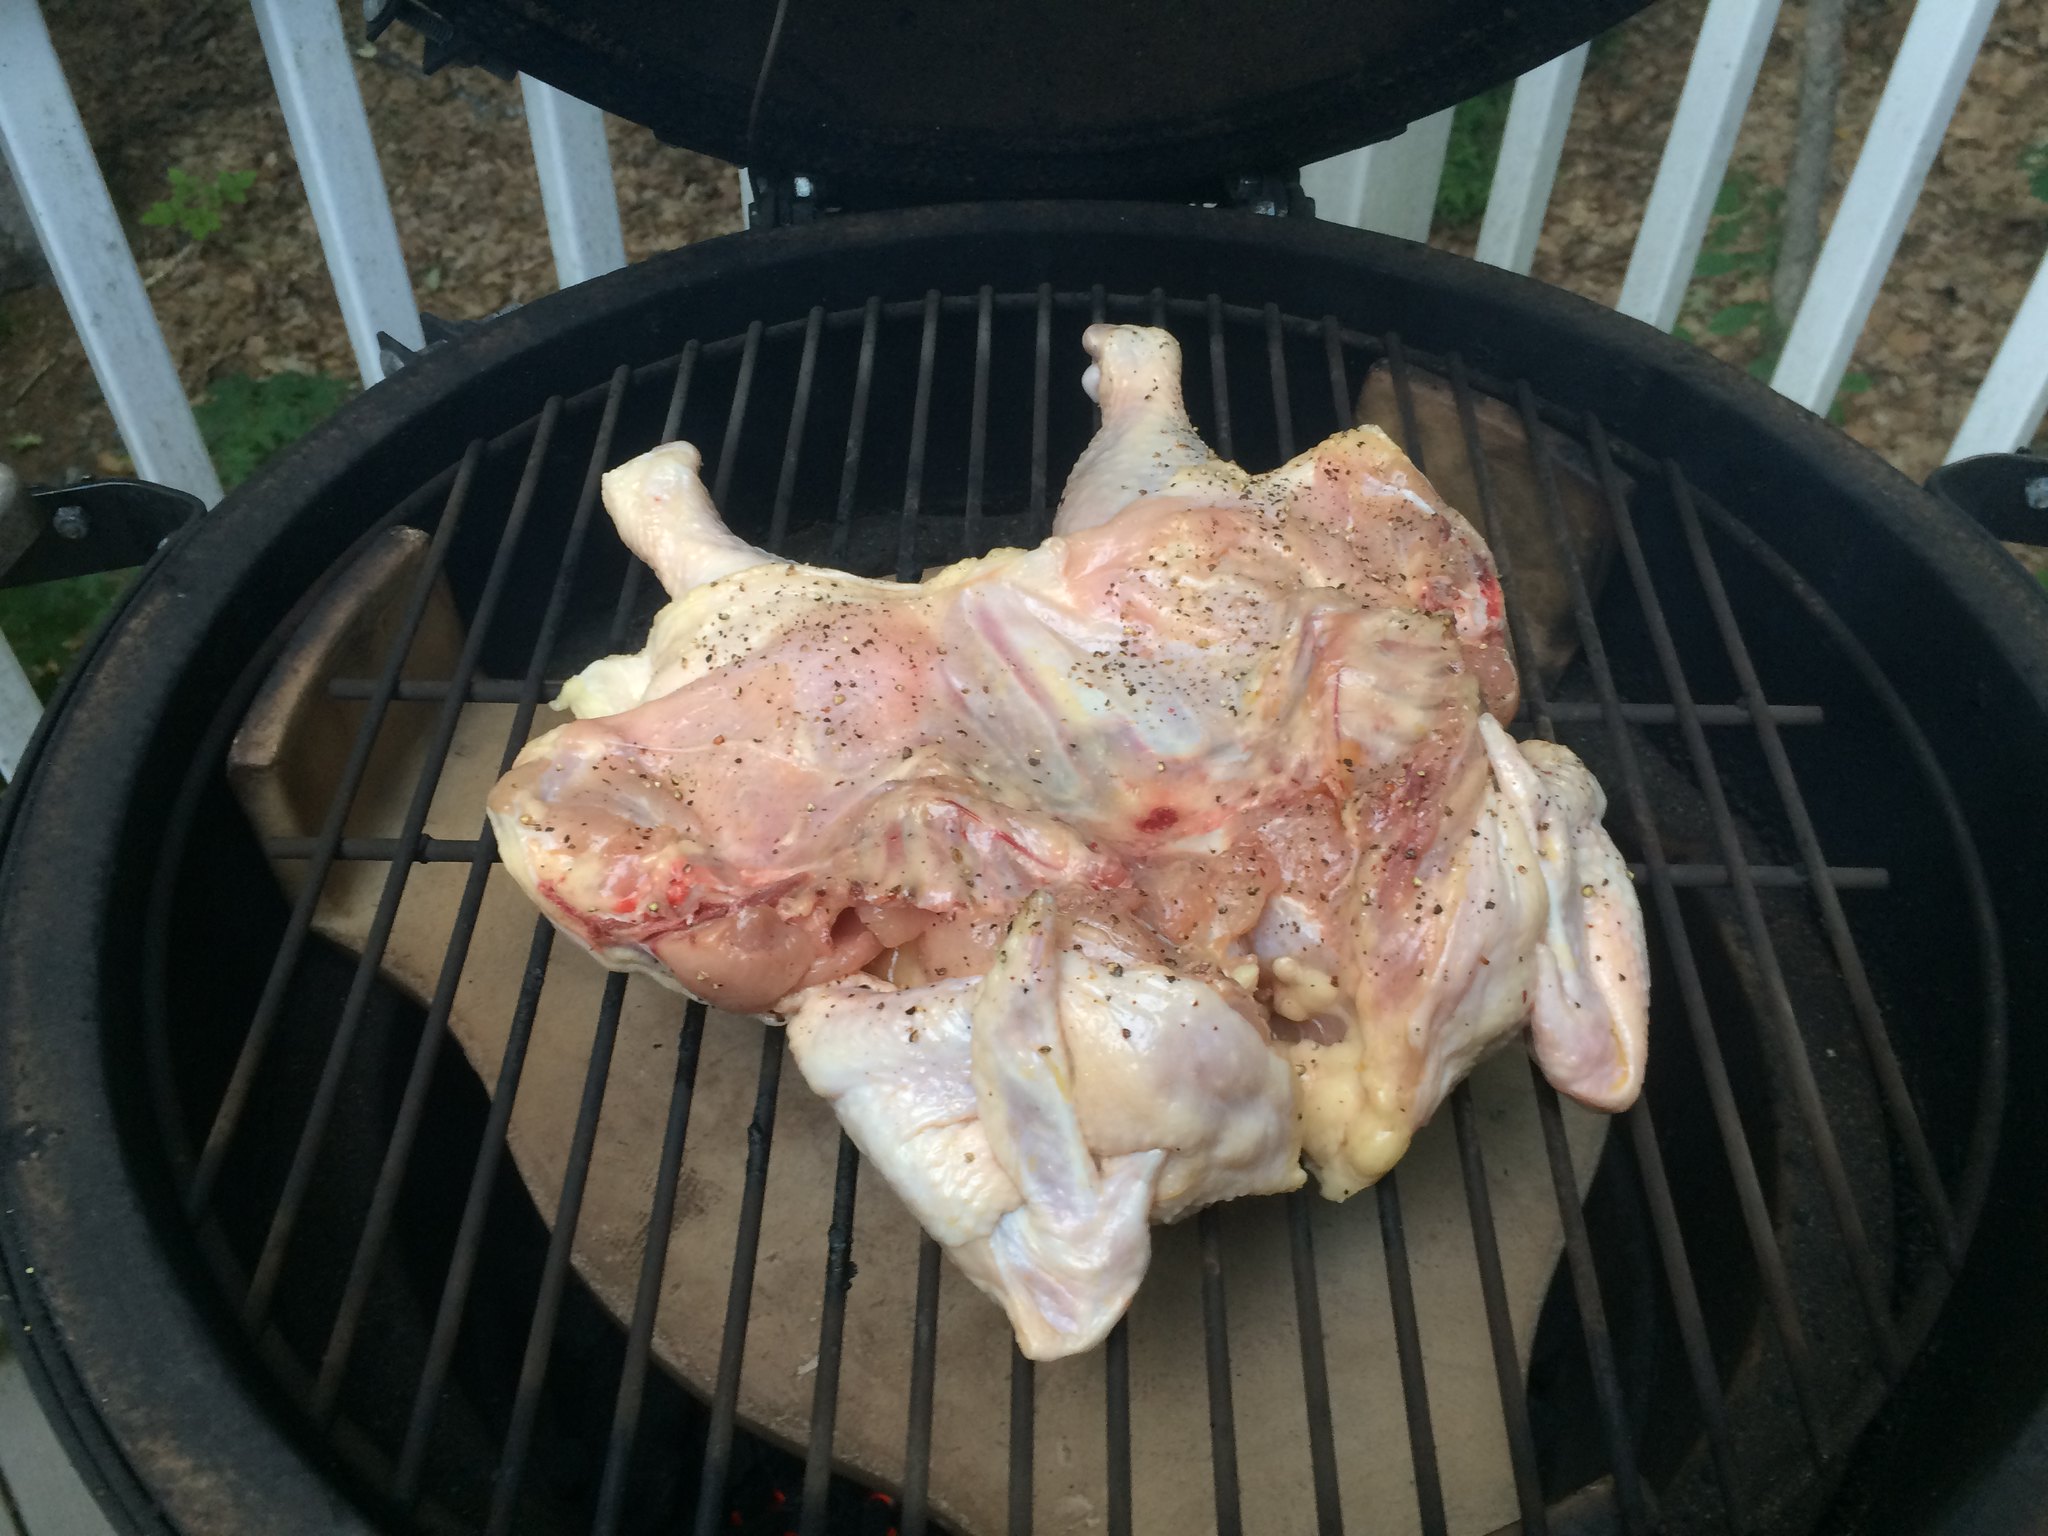
As the pit approached the setpoint again I opened it up and threw on a rack of baby back ribs, a couple cups of mopping sauce in a bowl and threw a couple chunks of cherry wood on the fire and closed the lid.

The RD3 hit the setpoint pretty tight again, slight overshoot and was heading for undershoot... From the blower graph I can see the damper is running way high, in the 80% range, indicating the air flow is a bit restricted by the top vent being set to a small crack... so at 18:10 I open up the top vent a nice bit more. The pit has an initial overshoot reaction to this adjustment and then settles nicely on the setpoint with the damper open about 25-30%.... PERFECT! All tuned up and ready for the long haul...

RDv3LS.jpg


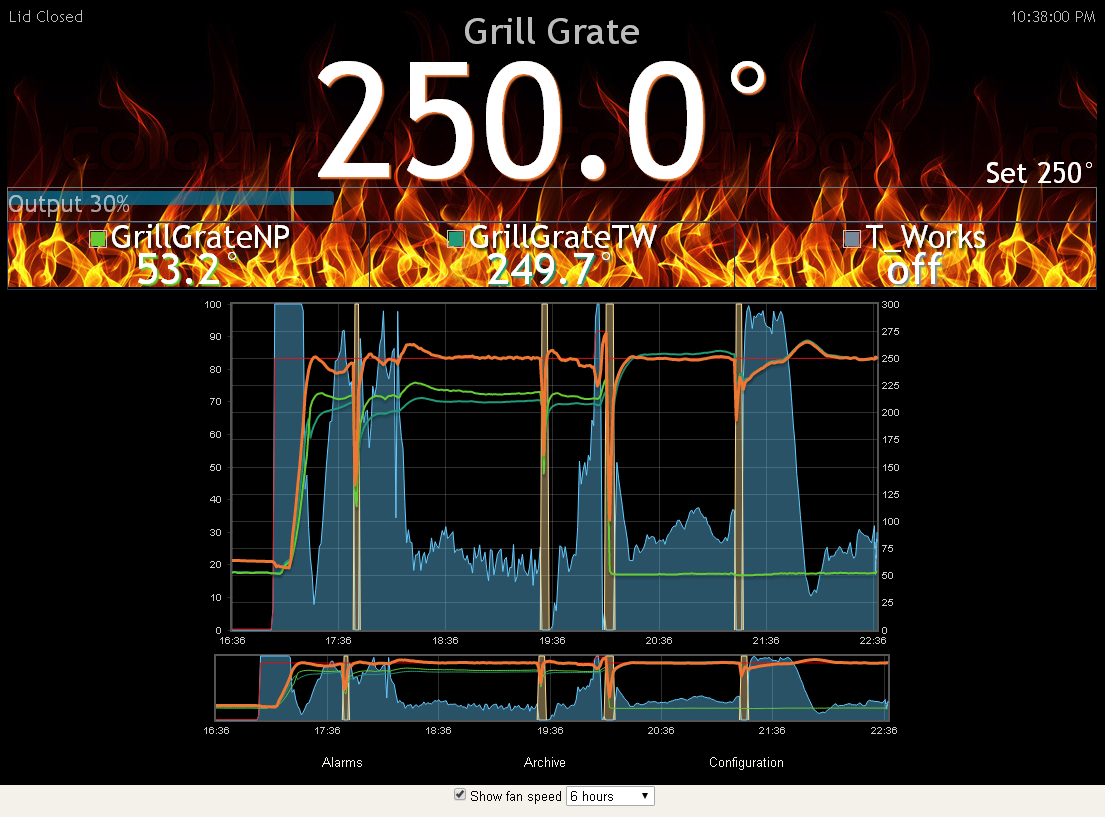
As most of us know already, one of the hardest ways to do low and slow is with frequent lid openings for basting. These ribs I did with a mop sauce and opened the grill every hour or so to mop. The HM and RD3 did an excellent job keeping temps in check after opening the lid to mop. Since I am using the offset method, with the fire in back and ribs in the front, the mop sauce was not running of onto the fire and slowing it down.

RDv3LS4.jpg


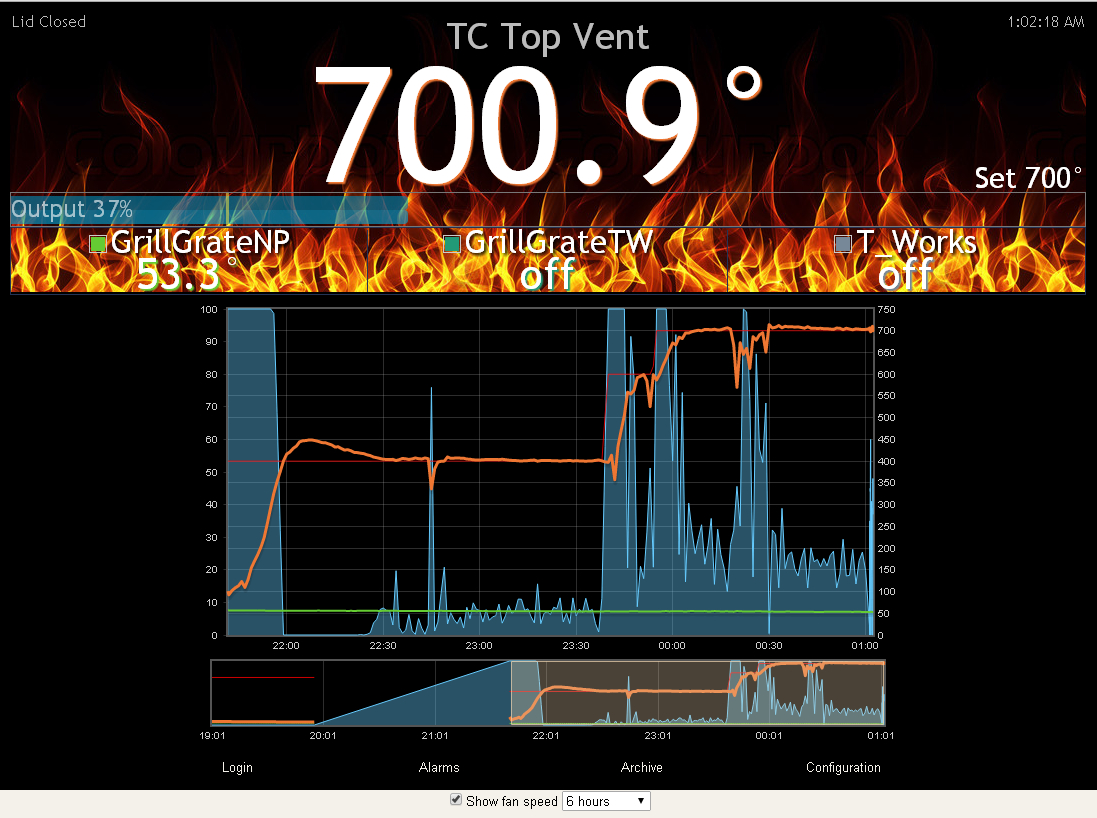
I did mention this was a "real world" cook, right? So right at about 20:00 mother nature threw her hand in the process and hit us with some cold wind and rain. I was running the pit with my Thermoworks thermocouple, which is a long thin needle, stuck down into the top vent. Part of the needle was hanging out of the pit and the cold rain hitting it started to effect the pit reading (note the dip in temp around 20:00)

At first I compensated by boosting the pit temp to 275F, because my grill grate temp was lagging a bit and running around 215F and I thought it was time to speed things up a little bit anyway. Then I decided it was probably best if I just move the pit probe down to the grill grate, so it is fully inside the grill, and let the HM pull the grill grate area up to a setpoint of 250F. You can see where I make that change on the graph, during the lid opening where the "GrillGrateNP" probe gets tossed out of the grill to the chilly ambient temp in the lower 50's.

From that point on the TC pit probe and the grill grate probe track almost exactly on top of each other. At this point I think it is worth mentioning that the RD3 and these probes are all being run over a 50Ft+ long CAT5 cable using the RDTC board in the RD3, in the rain.... The temps are super stable and the whole rig is working great!

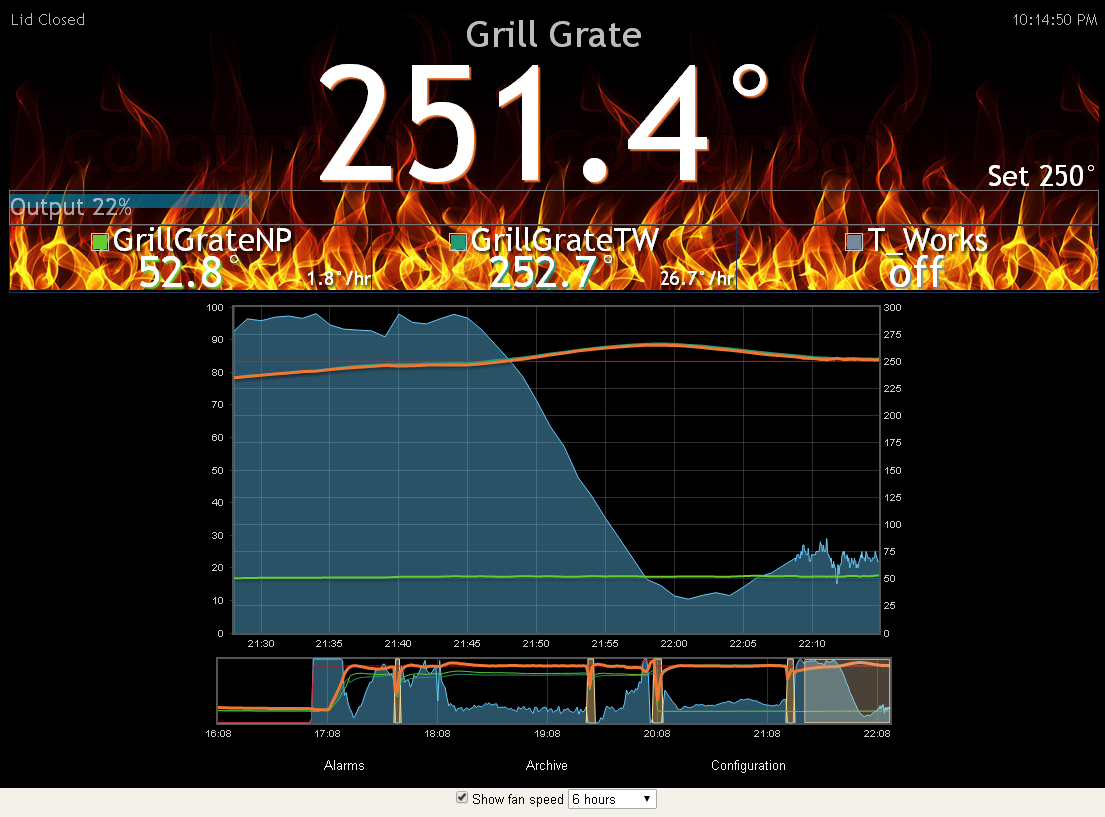
After the final basting I notice the damper is running a bit high again, up in the 90% range, so I crack the top vent open some more. At this point the top vent is about 40% open, which is pretty wide for a low and slow on the "Fauxmado". The pit reacts to this with initial overshoot (same as the with the first vent adjustment) and then settles down right on the setpoint again... "Good pit".... I love it when they behave! LOL

You can see on the graph, even through the brief periods of overshoot the HM is not completely closing down the damper. I much prefer this compared to setups where the temp overshoots and the damper completely shuts down. A complete shut down is choking the fire and possibly causing the less desirable more bitter type of smoke to be produced, and at the same time is restricting flow in the pit to hold that smoke inside the pit and around your food. With the damper only setup (fan on at Max Only) the HM adjustments are more subtle, the HM isn't being thrown off by peaks in temps while the air flow is choked, and then thrown off again by the rush of cold air when the blower kicks on.

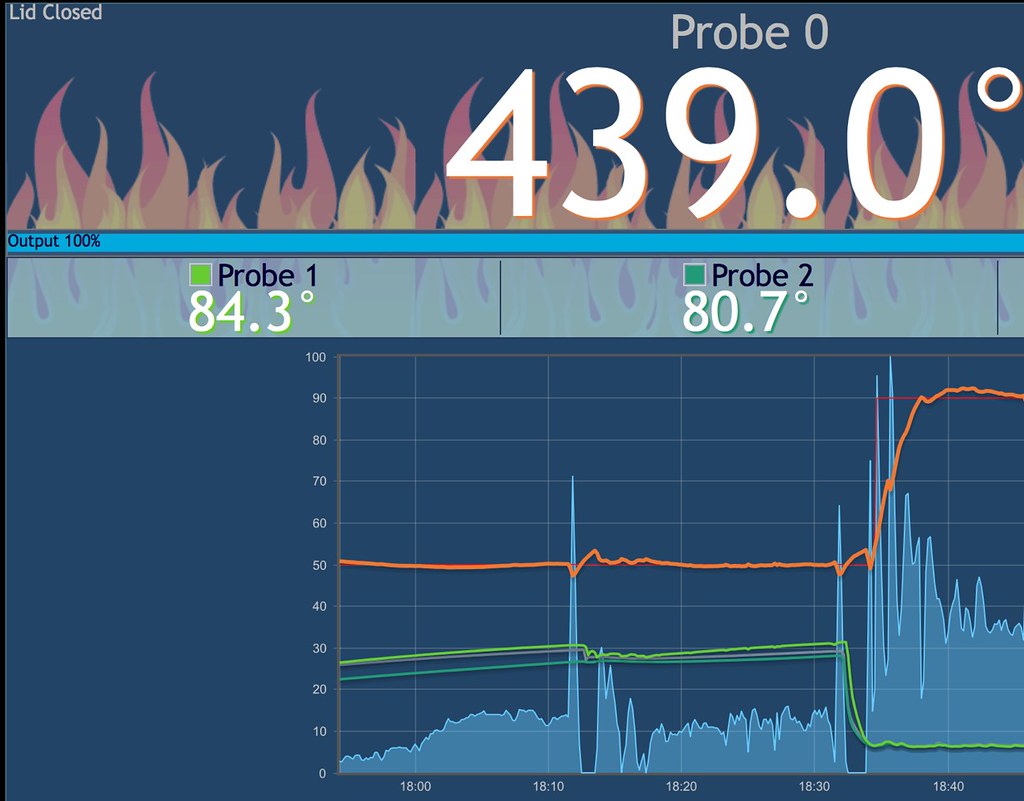
Below is a close up showing the graph during the largest period of overshoot, after the second vent adjustment. Notice how even though the pit temp is above the setpoint the HM isn't completely choking off the fire...

RDv3LS3.jpg


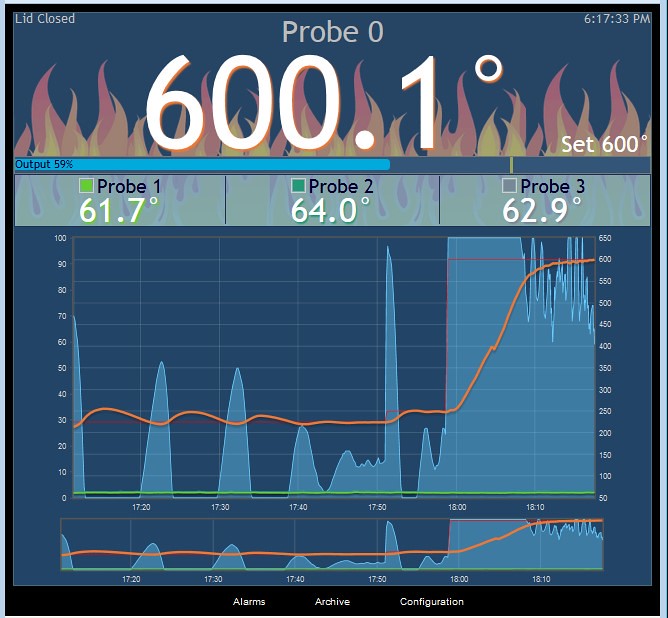
I am completely thrilled with the low and slow results using the RD3, as you can see from the graphs it had complete control over the pit even through lid openings and dicey weather. The night before I did searing at 600F and that went great as well. For the high heat cook I remove the "on at Max Only" setting and set both the Max and Startup Max to 100% for the fan and allow it to stoke the he!! out of the fire, running the top vent fairly wide at 50-75% open. I didn't get any screen captures of that because high heat cooks go so fast and the next thing you know it's time to eat! Next time I will try to remember to make a screen capture during a high heat searing or pizza cook....
 
Last edited:
Spatchcocked Chicken with RD3, also step change tests to 439 and 600 degrees

I did some spatchcocked chicken with my new RD3 tonight.
Chicken
Spatchcocked chicken by webdove, on Flickr

Big Green Egg
Spatchcocked chicken by webdove, on Flickr

RD3
Spatchcocked chicken by webdove, on Flickr

Temperature curve
Untitled by webdove, on Flickr

I did some PID tuning for the egg a while ago. Bias=0, Proportional=1, Integral=.01, Derivative=2.
There is not much overshoot and not much noise. You can see the disturbances when I opened the egg and the decay curve after I removed the blower for shutdown.

Here is a slightly older test to 439 degrees with the RD3.
RD3 test 439 degrees by webdove, on Flickr

That is taking about 35% fan speed.
Lastly, here is a test to 600 degrees before I did the PID tuning.
RD3 test 600 degrees by webdove, on Flickr

It looks like it is taking about 80% fan to keep that temperature, but you can see the tuning is off from all the high frequency noise.

The RD3 works great for a broad temperature range!

Web
 
Last edited by a moderator:
I wish I could understand why wrapping these url's with img's did not make the images appear :)

Make the images appear in the post? Click the "insert image" button and put the picture URL in there instead...

Thanks for the feedback... I have high heat adventures planned in my near future, in fact, should be making pizza dough now...
 
I just received the RD3 from Ralph and it looks excellent. Hopefully I will get to use it in the next few weeks. Ralph is a top notch guy to do business with and if you have a question just ask him and will answer back very quickly.
 
Hi Ralph, awesome design work there fella. Are you making these to order or is that not something you're untested in doing at this stage? If you are is it kit form only or fully assembled units?
Cheers
Dave
 
Did someone say HIGH HEAT?

I've done a couple high heat experiments over the past couple days with great success....

For the setup on this burn I put a large load of Royal Oak lump coal in the "Faumado" over a lit Weber starter cube, no heat deflector at all, my Thermoworks TC Pit Probe is in at grate level. I set the blower on the HM to Startup Max 100%, Min 0% and Max 50% (because in previous experiments I found Max 100% to be too much air flow, I also found servo open/closed only mode has less control).

Here is a screen shot of the burn:

RDv3HighHeat2.jpg

I set the pit to 400F at first, after some overshoot I let it settle in for a good bit. Did a lid opening and had great recovery.

Then I bumped top 600F, achieved that nicely, did a lid opening to test recovery, which was spot on.

So I finally moved up to 700F. The RD3 was able to achieve and hold 700F nicely. I did a series of lid openings to see if it would lose the ability to recover at that high temp put it did great, right back to 700F and holding perfectly....

This was all done with the 6.7CFM blower running at MAX=50%. You don't need massive air flow to achieve high heat, in fact, increased air flow will make the pit struggle to achieve and hold higher temps due to the massive amount of cool air you are pumping into the pit.

I stopped at 700F because it had gotten late, and I don't think I need to be hotter than that! Ruth Chris has those fancy high heat searing ovens that go up to some ungodly temp, but I'm pretty sure it's right around 700F or so where the meat is sitting...

The couple days prior I had done Pizza cooking. The setup for that was similar to the above, except I used a deflector plate between the fire and the grill, then the pizza stone on the grill and put the TC Pit Probe in the top vent. First time around I did the pizza at 650F, it was just too hot... As much as we want a kamado to be a "wood fired pizza oven", it's not... The wood fired ovens have the fire off to the side or way down below, not directly below the pizza stone. With a fire hot enough to nail 650 in my "Fauxmado" the pizza stone was too hot, the timing of cooking the top vs the crust was not right... So next time around I ran the same setup with a setpoint of 550F, PERFECTO! Crust and toppings done just right....

I am very satisfied with the high heat performance of the RD3, again, 6.7CFM blower set at MAX=50%... So for those of you that seem to need to go to "11", I'm only running at 5 and can nail 700F easy!
 
Last edited:


Back
Top