Looking good...
Here's a couple more tips...
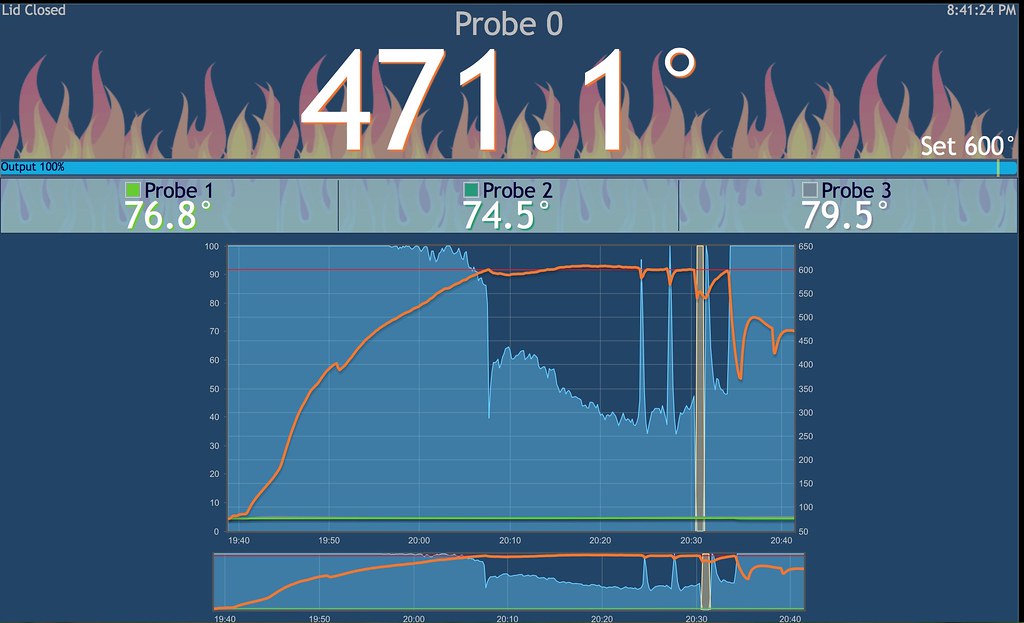
First of all, you did a great job posting about your setup, it's nice to have real info to work with. I see from your first graph you have some overshoot initially, which is to be expected, but there are reasons it happens and ways to manage it.
What you are looking at there on the graph is the transition period between the active fan driven mode and the passive damper controlled mode. The whole dynamic of the system is different for active VS passive modes, and the setup varies slightly between them, the major difference being how you manage the top vent.
When the HM is running with the blower on the top vent needs to be clamped down more to prevent overshoot, in servo only mode you can leave the top vent open much wider.... but you have BOTH things going on in that graph, blower first and servo only past mid way....
So, for low and slow cooks I recommend that you light a small fire (I use 1/2 a Weber starting cube to start my low and slow fires), I usually let the smoke from the starter cube subside and then close the lid, leaving the top vent open just a crack. The blower will force air through the pit and smoke will come out of the small openings in the top vent like an angry dragon, but when the blower turns off the fire will deescalate rapidly due to the small top vent opening. Your temp should land pretty much right on your target setpoint rather than giving you that bit of overshoot (which is really no big deal though, cause I am sure it has settled in on the setpoint for you by now anyway, but I just like to nail the temps as best as possible)
Now that you have achieved your setpoint the blower is off and you are firmly in damper only territory. If you leave the top vent open just a crack the convection flow will be very minimal and your RD will start to open wider and wider until it hits 100%, at which point the blower will kick in and the dragon is back in town... but you don't want this to happen... So, AFTER the pit has come to temp with the vent just cracked open, at this point is when you should set your top vent to about 20% open. Now watch the RD, I like to see mine run about 30-40% open. If you see the RD opening more, like up to the 70-80% range, that means the top vent is restricting flow a bit much, so open the top vent wider. As you open the top vent wider you will see a tiny bump of overshoot and then the HM will close down the RD a bit and you will see the HM start running the RD open a smaller percentage. Conversely, if you see the RD almost closing down then the top vent is too wide (or your grill has a lot of air leaks), so close down the top vent a bit. Each grill is gonna be a bit different, so watch the HM % and adjust your vents until your RD is running at a nice low to mid position where it has plenty of opportunity to open up and boost the temp or close down and lower it.
You could avoid the whole two vent settings scenario if you either stoke the pit without the blower (let the servo only control the period before the setpoint is achieved for the first time so the air flow scenario never changes) or run the blower all the time (without on at Max Only selected). There's good and bad with both, I prefer using the damper only during the cook because there is less air flow to dry out the food, as a result it burns less coals and saves money (I cook all the time on my "fauxmado" and hardly ever have to buy lump), and with damper only the top vent can run wider open and there is less choking of the fire during the cook. These last couple items are the reason why I am in the damper only camp, I don't like to choke a fire and hold that smoke around my food, I prefer the more open flow of a convection setup that lets the smoke keep moving out of the pit before it gets stale. I do the Max Only option because I do like the way the blower stokes the pit, I never have to pay attention, just light the starter cube and I KNOW the fire will take off. And since you are always there right after the setpoint is achieved to put the food on the grill, opening up the top vent for damper only mode is not a problem.
Now, you mentioned high heat and pizza cooking... Your proposed setup for that looks pretty good, but one setting you should also look at is the lid mode timing. It's not that hard to get a fire raging to hit pizza temp in your grill with the RD3, but the hardest part of doing a short hot cook like pizza is getting that grill to recover that high temp the moment you throw that pizza in and close the lid. Lid mode is great for low and slow, it prevents overshoot pretty good, but with pizza cooks you will be fighting UNDERSHOOT. So lid mode is working against you there... I overlooked this setting for a while but found myself manually toggling off lid mode in attempt to make temps rebound quicker. This made me realize I don't want or need lid mode for high heat cooks. Let the blower stoke the hell out of the fire while you have the lid open to throw the pizza on, this way when you close the lid the temp in the hood will bloom and achieve your setpoint right away. Overshoot has never really been a problem for me on high heat cooks since it takes so much energy to maintain these temps, the HM will likely shut down the flow when it sees the rapid rise of the pit temp when you close the lid, but a few seconds later it will resume stoking the pit to maintain the high temp.
Now for some specific notes on your Akorn cooker...
They leak, all over! LOL But it's nothing you can't fix with a little attention....
First check behind the handles on the ash pan for cracks, mine were both cracked. Seal with high temp RTV. I see you have already tackled the bottom vent with nomex gasket, good job! Some Akorns seem to have an RTV sealer on that vent and others not, if your has RTV seal I wouldn't mess with it, if it's just metal on metal I would go with the nomex gasket or seal with RTV.
Next check the ash pan for cracks all around the edge with the sharp bend. If you do not see cracks now, check again later, particularly if you start having trouble controlling low and slow. Mine was good at first but next season it was cracked all around. I thought about using RTV to seal it but settled on aluminum tape, which might not look the best but worked really great.
Finally, check to be sure the clamps are pulling the ash pan up tight to compress the gasket a bit all around. If not, then first try loosening the screws on the clamp and bracket, move them as far in the opposite direction and retighten the screws. It it still isn't pulling the ash pan up tight enough you can either bend the metal links of the clamp a bit so they are shorter (this is what I did) or you can wrap something around the link where it goes into the bracket so it pulls up a bit harder when you clamp it down.
The rolled oven like gasket is pretty good, at least at first. I think it is mainly due to some of my high heat experiments (I've had it into the 900F range), but the gasket eventually started getting stiff. It's held in by little retainer clips every couple inches and I found the gasket would kinda bow away from the grill lid between those clips and leave little air cracks all around the lid. So this year I pulled that gasket from the grill and replaced it with Nomex. The Nomex is thinner, but after you put Nomex on the top and bottom surface it works out to be the same as the oven gasket on the top only.
After I got the Nomex gasket on the grill and sealed up the above mentioned areas other leaky areas started to reveal themselves. I now see that the where the inside shell meats the outside shell on the bottom half of the grill (under where the Nomex gasket will go) is also a leaky point. I realized after the Nomex gasket was on that I should have either spread a little RTV over that junction to seal it before I put the Nomex gasket on the bottom half, or I should have paid attention to make sure the Nomex gasket went over the top of that junction to seal it off a bit. At this point I have excellent low and slow control so I haven't messed with it, but next time I have to change the Nomex gasket I will make sure to pay attention to this....
Oh, and BTW, the trick to find your leaks is an easy and fun experiment... Light your self a nice smokey fire and let the HM stoke away (with the blower on full blast) and close the lid and close off all your vents (this works with any grill) The blower will be forcing air into the pit but it will have nowhere to escape but through the cracks. So you will see right away all your leaky areas in the grill, they will be the places where the smoke is streaming out.....
I guess this got kinda long, but I have thrown out a lot of tips that I have picked up along the way that I think lots of people should find helpful, regardless of what grill you are cooking on...


