INTRODUCING: the "Roto Damper"


The threads look great, have to be careful when starting to screw in initially, but works like a charm!

I may get an adapter to put in between so I don't have to screw/unscrew every time. I would hate to cross thread even once!

Being the first guy with a threaded output on a RD your feedback is much appreciated. In retrospect I guess it would have been better if I had made a female threaded output for you, this way you could use a small metal pipe nipple between your RD and the ball valve, so you could leave the nipple threaded into your RD and thread out the pipe part from the ball valve.

I just got done designing my first couple of female threaded output caps for the RD3, haven't printed/tested any of them yet, but I see no reason they shouldn't work out like the male threads I've printed so far....
 
Here is my latest RD3 Large Green Egg cook: 600 Degree burgers, tailing off after I disconnected the blower.
vLV3Vh

https://flic.kr/p/vLV3Vh
My latest PID parameters are:
Bias=0 Proportional=1 Integral=.005 Derivative=2

You can see that it is only taking about 40% from the blower to hold 600 degrees!
 
Last edited:
Nice, thanks for the additional feedback. That's right along the same line that I've been getting on my "fauxmado" for blower speed vs pit temp.... It seems this little blower in the RD3 is more than adequate for high heat cooks in a kamado.
 
BTW, All I see on the post for the embedded image is a circle with a line through it.
I used embed image and used the url right below and it does not seem to work.
I am hoping there is some caching delay and if I wait long enough the image will appear :)

Sadly I had a nice 10 hour 225 degree brisket cook on the fourth and forgot to take a screen shot :(
 
Ralph,

Do you sell completed Roto Dampers?
If not, could you share with us the parts list and CAD files to 3D print?
I was going to design my own but yours is pretty close to what I envisioned.
I'm pretty good with CAD design work so I'll see if I can contribute to the community in the near future.

I just got my RD3 from Ralph yesterday and have been putting it together. It comes as parts that need to be pressed together. Plus you have to add your own fan and servo motor. So he basically does the R&D plus 3d printing for us, and we assemble it ourselves. It's pretty easy to assemble though. Parts are all available at your local Home Depot.
 
I finally decided to upgrade my HM and decided to step up to the RD3. I never had a case for my HM either.

Here's my original setup. I used cardboard to connect the fan to my big green egg. It's wrapped in bacon duct tape!

4GuEJqZh.jpg


Starting to fall apart though and I'd always overshoot my target temps. Ordered the RD3 and case from Ralph. Here it is. Love the blue and orange together. The conduit adapter and aluminum sheet were super cheap from Home Depot to make the connector to the BGE.

BLp8g6Gh.jpg


Here's a little video that shows it working. Similar to Ralph's video on page 39 of this thread.

Still need to install LEDs.

Did a beer can chicken at 300 and it held steady like a champ. Thanks Ralph. Not only for the case and RD3 but for answering my questions along the way.

:coolkettle:
 
Thanks a ton to Ralph.

Taking the maiden voyage of my new RD3 now on my also new Akorn Kamado aka Fauxmado as Ralph likes to call it :) No issues except 2 of the 4 servos in the 4 pack were seized up.. how nice of them.

Gathered settings from this thread, currently testing out low and slow. The top vent is open about 20%.


Using "Old" stock pid settings: B=4, p=3, i=0.005, d=5

Low and slow tips:
On at max only: On
Startup max: 100% (I probably should have lowered this)
Max fan: 20%


then I may pump it to high heat later when it is pizza time, we'll see.

High heat:
On at max only: off
Startup max: 100%
Max fan: 50%


Also took the opportunity to seal up the Akorn with some nomex gasket like others have suggested. The printed threaded adapter works awesome. Just pieced together an adapter from some scrap metal and some connector I found.


20150731_140706.jpg


Here's graph so far. Interesting to watch it recover from the overshoot without opening the lid. Keeping an eye on it

hm5-300x293.png
 
I had the same problem with the 4 pack of servos I ordered from amazon. Sucks, but I hear these things aren't exactly known for quality. Or at least, you should often buy many if you need one, because you'll have to pick the best out of the pack to work with. The first one I grabbed didn't work, it just clicked. The 2nd one works fine, and I'm using it, but it is loud and makes some clicking noises sometimes. I've thought about trying the other two, but didn't feel like rewiring it since it works now. And I'm not usually hanging out by the pit when it's running anyway.

Ralph, I did my first cook with mine last night and had terrific results. I didn't touch any of the settings on my heatermeter, I just plugged in the RD3 and let it go. We did a chicken last night and it held nice and steady for me, with no overshoot. So between how awesome the HM is, and how awesome the RD3 is, I'm in heaven! The only thing I want now is to make me a new case out of wood. I wasn't happy with my first attempt. I may be getting a CNC router machine soon, and if so I may be able to whip myself up one with that.
 
Looking good...

Here's a couple more tips...

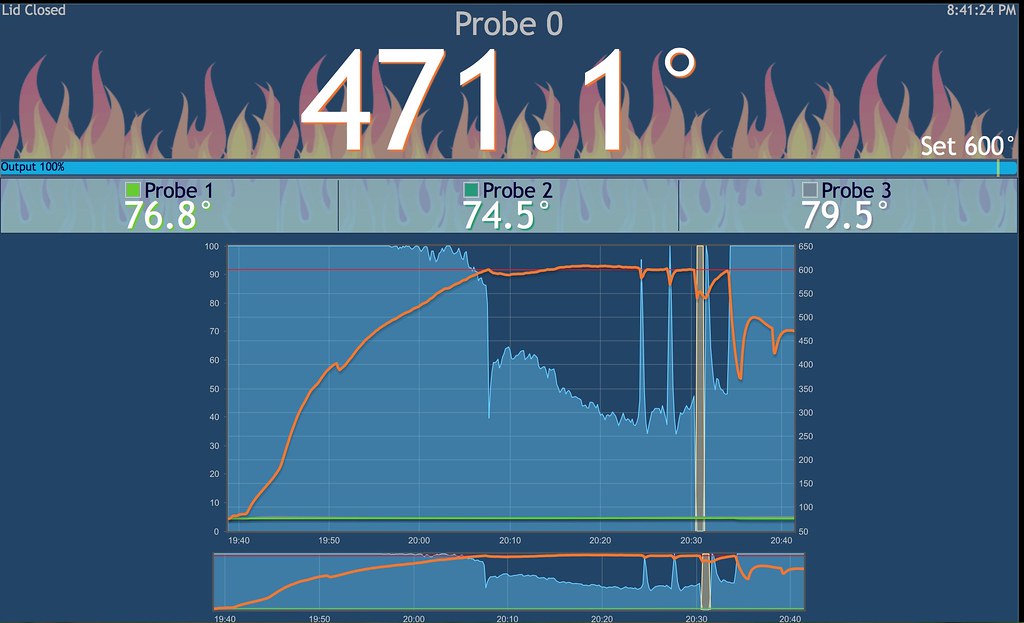
First of all, you did a great job posting about your setup, it's nice to have real info to work with. I see from your first graph you have some overshoot initially, which is to be expected, but there are reasons it happens and ways to manage it.

What you are looking at there on the graph is the transition period between the active fan driven mode and the passive damper controlled mode. The whole dynamic of the system is different for active VS passive modes, and the setup varies slightly between them, the major difference being how you manage the top vent.

When the HM is running with the blower on the top vent needs to be clamped down more to prevent overshoot, in servo only mode you can leave the top vent open much wider.... but you have BOTH things going on in that graph, blower first and servo only past mid way....

So, for low and slow cooks I recommend that you light a small fire (I use 1/2 a Weber starting cube to start my low and slow fires), I usually let the smoke from the starter cube subside and then close the lid, leaving the top vent open just a crack. The blower will force air through the pit and smoke will come out of the small openings in the top vent like an angry dragon, but when the blower turns off the fire will deescalate rapidly due to the small top vent opening. Your temp should land pretty much right on your target setpoint rather than giving you that bit of overshoot (which is really no big deal though, cause I am sure it has settled in on the setpoint for you by now anyway, but I just like to nail the temps as best as possible)

Now that you have achieved your setpoint the blower is off and you are firmly in damper only territory. If you leave the top vent open just a crack the convection flow will be very minimal and your RD will start to open wider and wider until it hits 100%, at which point the blower will kick in and the dragon is back in town... but you don't want this to happen... So, AFTER the pit has come to temp with the vent just cracked open, at this point is when you should set your top vent to about 20% open. Now watch the RD, I like to see mine run about 30-40% open. If you see the RD opening more, like up to the 70-80% range, that means the top vent is restricting flow a bit much, so open the top vent wider. As you open the top vent wider you will see a tiny bump of overshoot and then the HM will close down the RD a bit and you will see the HM start running the RD open a smaller percentage. Conversely, if you see the RD almost closing down then the top vent is too wide (or your grill has a lot of air leaks), so close down the top vent a bit. Each grill is gonna be a bit different, so watch the HM % and adjust your vents until your RD is running at a nice low to mid position where it has plenty of opportunity to open up and boost the temp or close down and lower it.

You could avoid the whole two vent settings scenario if you either stoke the pit without the blower (let the servo only control the period before the setpoint is achieved for the first time so the air flow scenario never changes) or run the blower all the time (without on at Max Only selected). There's good and bad with both, I prefer using the damper only during the cook because there is less air flow to dry out the food, as a result it burns less coals and saves money (I cook all the time on my "fauxmado" and hardly ever have to buy lump), and with damper only the top vent can run wider open and there is less choking of the fire during the cook. These last couple items are the reason why I am in the damper only camp, I don't like to choke a fire and hold that smoke around my food, I prefer the more open flow of a convection setup that lets the smoke keep moving out of the pit before it gets stale. I do the Max Only option because I do like the way the blower stokes the pit, I never have to pay attention, just light the starter cube and I KNOW the fire will take off. And since you are always there right after the setpoint is achieved to put the food on the grill, opening up the top vent for damper only mode is not a problem.

Now, you mentioned high heat and pizza cooking... Your proposed setup for that looks pretty good, but one setting you should also look at is the lid mode timing. It's not that hard to get a fire raging to hit pizza temp in your grill with the RD3, but the hardest part of doing a short hot cook like pizza is getting that grill to recover that high temp the moment you throw that pizza in and close the lid. Lid mode is great for low and slow, it prevents overshoot pretty good, but with pizza cooks you will be fighting UNDERSHOOT. So lid mode is working against you there... I overlooked this setting for a while but found myself manually toggling off lid mode in attempt to make temps rebound quicker. This made me realize I don't want or need lid mode for high heat cooks. Let the blower stoke the hell out of the fire while you have the lid open to throw the pizza on, this way when you close the lid the temp in the hood will bloom and achieve your setpoint right away. Overshoot has never really been a problem for me on high heat cooks since it takes so much energy to maintain these temps, the HM will likely shut down the flow when it sees the rapid rise of the pit temp when you close the lid, but a few seconds later it will resume stoking the pit to maintain the high temp.

Now for some specific notes on your Akorn cooker...

They leak, all over! LOL But it's nothing you can't fix with a little attention....

First check behind the handles on the ash pan for cracks, mine were both cracked. Seal with high temp RTV. I see you have already tackled the bottom vent with nomex gasket, good job! Some Akorns seem to have an RTV sealer on that vent and others not, if your has RTV seal I wouldn't mess with it, if it's just metal on metal I would go with the nomex gasket or seal with RTV.

Next check the ash pan for cracks all around the edge with the sharp bend. If you do not see cracks now, check again later, particularly if you start having trouble controlling low and slow. Mine was good at first but next season it was cracked all around. I thought about using RTV to seal it but settled on aluminum tape, which might not look the best but worked really great.

Finally, check to be sure the clamps are pulling the ash pan up tight to compress the gasket a bit all around. If not, then first try loosening the screws on the clamp and bracket, move them as far in the opposite direction and retighten the screws. It it still isn't pulling the ash pan up tight enough you can either bend the metal links of the clamp a bit so they are shorter (this is what I did) or you can wrap something around the link where it goes into the bracket so it pulls up a bit harder when you clamp it down.

The rolled oven like gasket is pretty good, at least at first. I think it is mainly due to some of my high heat experiments (I've had it into the 900F range), but the gasket eventually started getting stiff. It's held in by little retainer clips every couple inches and I found the gasket would kinda bow away from the grill lid between those clips and leave little air cracks all around the lid. So this year I pulled that gasket from the grill and replaced it with Nomex. The Nomex is thinner, but after you put Nomex on the top and bottom surface it works out to be the same as the oven gasket on the top only.

After I got the Nomex gasket on the grill and sealed up the above mentioned areas other leaky areas started to reveal themselves. I now see that the where the inside shell meats the outside shell on the bottom half of the grill (under where the Nomex gasket will go) is also a leaky point. I realized after the Nomex gasket was on that I should have either spread a little RTV over that junction to seal it before I put the Nomex gasket on the bottom half, or I should have paid attention to make sure the Nomex gasket went over the top of that junction to seal it off a bit. At this point I have excellent low and slow control so I haven't messed with it, but next time I have to change the Nomex gasket I will make sure to pay attention to this....

Oh, and BTW, the trick to find your leaks is an easy and fun experiment... Light your self a nice smokey fire and let the HM stoke away (with the blower on full blast) and close the lid and close off all your vents (this works with any grill) The blower will be forcing air into the pit but it will have nowhere to escape but through the cracks. So you will see right away all your leaky areas in the grill, they will be the places where the smoke is streaming out.....

I guess this got kinda long, but I have thrown out a lot of tips that I have picked up along the way that I think lots of people should find helpful, regardless of what grill you are cooking on...
 
Last edited:
Yah, the servo's are cheap, both in cost and quality. That is why I always recommend that you buy the 4 pack, so you can just move on if you get a dud.... Plus you can usually get 4 servo's for about twice the price of 1, and the cost is so low it doesn't make sense to gamble ordering one and hoping it just works great IMHO. Franky I get the feeling that the majority of the servo's are knock-off's of some sort, some better than others.

Though I should throw out the caution as well, it is very easy to jam the servo's if you rotate them too far by hand or set the SPD setting to move them beyond their range of motion. So try to avoid doing that. When testing the servo's motion by hand be careful not to have it moving too fast as it approaches the end of the line to make sure you don't jam it up...
 
Hi Ralph,
Thanks so much for the post. I try to be transparent and give as much info, as you deserve to have it after all the hard work. Regardless of all the questions I promise I am not lazy and do try to read as much as possible before posting.. :) and share as much as possible to help people.

For this low and slow, I did use 1/2 a weber cube, I saw that you mentioned that in a previous post. I definitely had the top vent open way too far, which is what I figured, even before reading your response. I actually just woke up from a disco nap (love days off :) ) and saw that the temps hadn't subsided, so, closed the lid to barely a crack. Fan at max only is enabled, has been the entire time.

Great info all around on the leaks. Went through similar stuff with the CG and the UDS, so, I'm all over that. Guessing I definitely have leaks considering the higher desired temps. Only the second cook, the gaskets were the big thing to try first. There was barely any RTV under my vent, so, glad I did.

Got plenty of time to figure out low and slow -- most of the time when I smoke, I do so much, that I'll use the UDS -- for now, it is pizza time in the Akorn :) Amazed how little fuel it uses.


In this pic, I opened the lid twice, those are the quick dips.

About to crank up to high head now.

hm11.png
 
Fresh out of the box I found the fauxmado wanted to come to rest around 275F no matter what I did... It seemed somehow tuned to that temperature range for some reason. After closing off a good deal of the leaks I was able to hit and hold 225 reliably.

Having the top vent open 20% while the HM blower is running 100% will stoke the fire up beyond what you need for low and slow pretty fast, next time try starting out with the top vent just opened up to the dimple while stoking the fire. You could also reduce the Startup Max setting for the blower which would reduce the airflow from the blower and allow you to leave the top vent open a bit more during the initial warm up.
 
Thanks, that was near my plan. Definitely a learning curve with these as they are such a different type of cooker than what I'm used to. Can't wait to get the experience under my belt and use it effectively.

I just turned everything off, closed, and it's slowly dying out. Not feeling well, will try again another day.

275 isn't the end of the world. Just means that's the hot and fast cooker when necessary :)
 
Just make sure you check over your Akorn for leaks in the areas I pointed out and you should be able to do low and slow even below 200F if you want. The Akorn is a nice grill and can be tweaked to work about as well as a real ceramic kamado, but being a double shell of metal there are lots of joints and bends where you can get little cracks of air coming through that you would never have to worry about with a real ceramic kamado.

One of the major lessons in the kamado cooking learning curve is that you only need a TINY fire to stoke that pit up to 250F, hell, the sun alone on a hot day can get the pit half way there! So you need to get used to lighting less coals when you start out otherwise you will be dealing with overshoot. Most of us grew up grilling on weber kettles or those round flat burn pan type grills where you just build a rip-roaring fire and have at it. An insulated grill is a whole new ballgame, once you've got it dialed in you will love it, and love not burning through a whole bag of charcoal after just a couple cooks....

Next time you fire up the pit close the lid right away with the top vent cracked just a bit. Wait for the thick stream of smoke to come out of the vent (blower on 100%) and then close the top vent completely. Now take a look around the grill and see where smoke is streaming out, these are the places where you have issues....
 
Last edited:
Ralph has engineered an excellent product, and I was very close to purchasing one when my frustration set in. but, the purpose of having a printer is to print not purchase. so I took the challenge to use sketch up and do my own. I will admit it is sloppy on the clearances, but it is my first attempt. it gave me a lot of respect for the time that Ralph has taken to design and support the RD3.
 
Last edited:
I could be wrong, but I'm pretty sure Ralph is offering his 3D files for free, he just doesnt post them to a public download spot like Tom does.


Back
Top