RalphTrimble
TVWBB Diamond Member
I'd never heard of the weber starting cubes until a couple years ago I was camping with a cousin and she lit her camp fire with one. I saw "Weber" on the box and thought "what's that?" When I got the "fauxmado" I bought them for the first time and have been using them ever since. I use half a cube for starting low and slow fires and a whole cube for starting fires for higher temp cooking. With whole box costing only a couple bucks, and so many cubes in it, they last forever even if you don't cut them in half. I think they're great.
The mid/high temp cook test went really well last night indeed.... After I watched it for a while I tried a lid opening. The recovery went pretty well though the HM did hit 100% at which point the blower turned on for a bit (at the MAX speed of 20% as per my settings). This brought up a topic I have raised multiple times over the past year, a feature request that I think would be a nice improvement in HM operation.
I would like to see the HM config have, instead of "On at Max Only", I would like to see the config have blower "On above XX %", where the blower speed would ramp from the MIN value at XX% to the MAX value at 100%. Take a look at the graph below and the lines I have added to it.
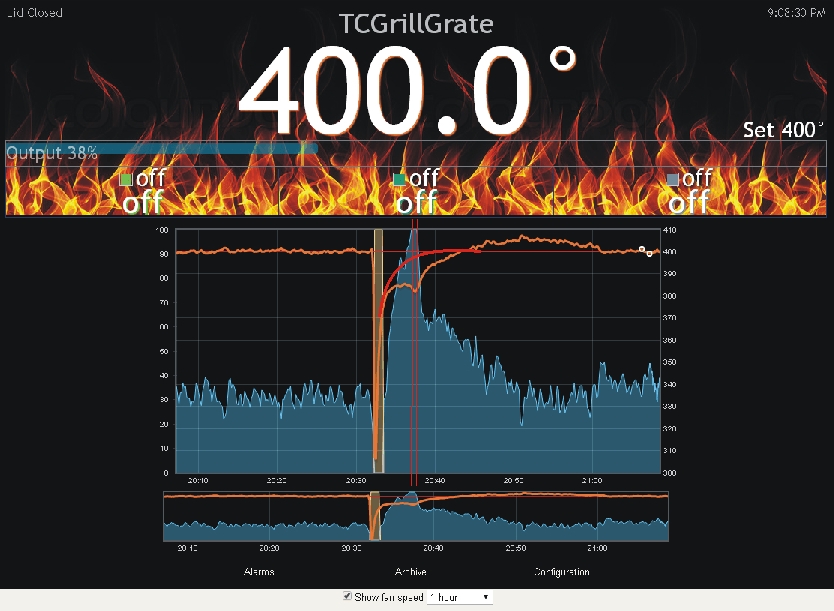
I guess it would be more visible if the graph were focused around the dip a little more... but what happens is when running the blower on at "Max Only" the transition between the nice stable convection air flow to the active flow from the blower, even set low like 20%, is pretty drastic for the pit. As the rush of air from the blower is forced in the pit temp drops rapidly and then rises rapidly. This usually results in overshoot, for low and slow the overshoot will be more severe and last longer. The area between the two red lines is the time period when the blower comes on (at MAX speed), note the rapid drop in pit temp followed by the rapid rise into overshoot.
Here's a shot of the graph more focused on the recovery period I am talking about. Note the check mark shaped portion of the pit temp line that I circled. This is the typical rapid dip followed by rapid rise that happens when the blower kicks on "at Max Only".
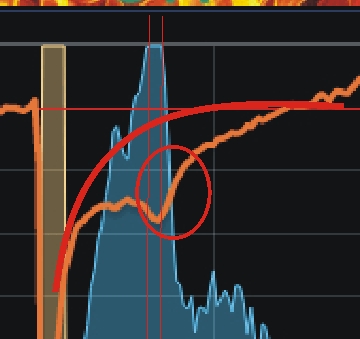
In my proposed scenario instead of on at Max only I could choose to start the fan blowing at some % lower than 100%, and the blower would not come on full blast, but rather ramp up from Min to Max. So, for instance in the graph above... If I was able to set the blower "On above 60%" as the HM % reached 60% during the recovery from lid opening the blower would start up but at a trickle pace. As the HM % continued to increase the blower speed would also increase, but gradually, not from off to MAX in one step. This gradual increase in air flow I believe would be a much more gentle and effective way to recover the target temp than waiting until the HM hit's 100% and then starting the blower at full blast. I think the recovery graph above would follow much closer to the red arc I added to the graph instead of the dip and bump into overshoot that happens with the Max Only setting. I think the HM would likely never hit 100% during recovery because the added trickle of flow would help the pit recover and not allow it to flounder there a bit like you see on the graph while the HM % inches up to 100% and then blower kicks on at full blast, giving you that check mark dip/bump scenario.
I have found whether cooking high heat or low and slow the same PID settings will work great but you just need to (manually) scale the blower speed properly to the target temp. I believe the above change in settings would make the HM much more forgiving of the blower Max speed setting, you could leave it higher and as the HM ramped up the % gradually the blower speed would also raise gradually, which would have a more gradual effect on the pit temp and not give you that dip and bump as in the graph.
I know you (Bryan) had commented that I could tweak PID settings to achieve something like this, but I think we're looking at something different here, a feature much easier to control and understand than PID settings. I also find the solution of tweaking PID settings to be a non-solution because depending on the cook scenario, be it low, medium or high temp, I need to adjust the blower MAX speed settings and would likely need to have different PID settings for each type of cook to accomplish this with PID settings alone. If the blower could be "On Above XX%" and scale up from there I think one set of PID settings and one (higher) blower MAX setting would work great for any temp cook....
Ok, off the soap box... LOL
The mid/high temp cook test went really well last night indeed.... After I watched it for a while I tried a lid opening. The recovery went pretty well though the HM did hit 100% at which point the blower turned on for a bit (at the MAX speed of 20% as per my settings). This brought up a topic I have raised multiple times over the past year, a feature request that I think would be a nice improvement in HM operation.
I would like to see the HM config have, instead of "On at Max Only", I would like to see the config have blower "On above XX %", where the blower speed would ramp from the MIN value at XX% to the MAX value at 100%. Take a look at the graph below and the lines I have added to it.
I guess it would be more visible if the graph were focused around the dip a little more... but what happens is when running the blower on at "Max Only" the transition between the nice stable convection air flow to the active flow from the blower, even set low like 20%, is pretty drastic for the pit. As the rush of air from the blower is forced in the pit temp drops rapidly and then rises rapidly. This usually results in overshoot, for low and slow the overshoot will be more severe and last longer. The area between the two red lines is the time period when the blower comes on (at MAX speed), note the rapid drop in pit temp followed by the rapid rise into overshoot.
Here's a shot of the graph more focused on the recovery period I am talking about. Note the check mark shaped portion of the pit temp line that I circled. This is the typical rapid dip followed by rapid rise that happens when the blower kicks on "at Max Only".
In my proposed scenario instead of on at Max only I could choose to start the fan blowing at some % lower than 100%, and the blower would not come on full blast, but rather ramp up from Min to Max. So, for instance in the graph above... If I was able to set the blower "On above 60%" as the HM % reached 60% during the recovery from lid opening the blower would start up but at a trickle pace. As the HM % continued to increase the blower speed would also increase, but gradually, not from off to MAX in one step. This gradual increase in air flow I believe would be a much more gentle and effective way to recover the target temp than waiting until the HM hit's 100% and then starting the blower at full blast. I think the recovery graph above would follow much closer to the red arc I added to the graph instead of the dip and bump into overshoot that happens with the Max Only setting. I think the HM would likely never hit 100% during recovery because the added trickle of flow would help the pit recover and not allow it to flounder there a bit like you see on the graph while the HM % inches up to 100% and then blower kicks on at full blast, giving you that check mark dip/bump scenario.
I have found whether cooking high heat or low and slow the same PID settings will work great but you just need to (manually) scale the blower speed properly to the target temp. I believe the above change in settings would make the HM much more forgiving of the blower Max speed setting, you could leave it higher and as the HM ramped up the % gradually the blower speed would also raise gradually, which would have a more gradual effect on the pit temp and not give you that dip and bump as in the graph.
I know you (Bryan) had commented that I could tweak PID settings to achieve something like this, but I think we're looking at something different here, a feature much easier to control and understand than PID settings. I also find the solution of tweaking PID settings to be a non-solution because depending on the cook scenario, be it low, medium or high temp, I need to adjust the blower MAX speed settings and would likely need to have different PID settings for each type of cook to accomplish this with PID settings alone. If the blower could be "On Above XX%" and scale up from there I think one set of PID settings and one (higher) blower MAX setting would work great for any temp cook....
Ok, off the soap box... LOL
Last edited:
")