• Enter the TVWB 27th Anniversary Prize Drawing for a chance to win a Weber Traveler Portable Gas Grill! Click here to enter!

HOW TO: Paint a Weber Genesis Cook Box the fast and easy way


Not sure. I've had it a long time and I picked it up used.
It's probably one of those things that was built well to begin with and there was no need to change it, more importantly, probably not cheapened up over the years. As for your comment about airless sprayers having a lot of overspray you are 100% correct. The last time I used mine was to repaint a ceiling that I had to repair the popcorn finish on in a large area due to removing two skylights. I spent far more time hanging plastic and covering the floor than actually painting. The upside is that it does a fantastic job and you only need one coat of paint if you sort of know what you're doing.
 
o A rectangular piece of paneling or similar thin plywood that is approx 3/4" to 1" wider each way than the actual bottom hole on the Genesis cook box that will be painting. It will be different, for Genesis 1000 deep boxes, Silver B, E3xx and so on.
o Something to stand the grill on up off the ground.
These two tips are worth double the price of admission. Thanks @Bruce !
 
I forgot to mention the higher end gravity HVLP guns use a lot less air volume and get even more paint on with less over spray. One advantage is the less air they use you get more paint on site and less in the air as over spray. But for an occasional spray person as myself, the Hazard Fraught ones are totally adequate and honestly do an amazing job. They make me better than I am :D
 
Yah, Larry, I think I would probably go with a $39 HF gun for my needs as well. I am not painting houses after all, just cook boxes, frames and end caps. I don't have a $350 need. I only have a couple months of rehabbing though and it seems like sales are already starting to slow even with the weather looking like it has no intention of giving way to the Fall seasons. I may wait until next spring at this point.
 
Yah, Larry, I think I would probably go with a $39 HF gun for my needs as well. I am not painting houses after all, just cook boxes, frames and end caps. I don't have a $350 need. I only have a couple months of rehabbing though and it seems like sales are already starting to slow even with the weather looking like it has no intention of giving way to the Fall seasons. I may wait until next spring at this point.
Nice thing about HF is you can get into that style at VERY low cost. Yeah you're not gonna turn out show car finishes but, that's not what you're painting either
 
Nice thing about HF is you can get into that style at VERY low cost. Yeah you're not gonna turn out show car finishes but, that's not what you're painting either
It seems from the reviews that it is like most HF products and if you go into not expecting professional quality, you are fine. The people that seem to have bad impressions are the ones that think they are going to repaint their '63 Corvette and have it look like a body shop did it.

Even if a guy gets to a point that he feels the need to upgrade, the HF gun is a minimal investment and great way to get some experience and learn.
 
Timothy, if I was just rehabbing a couple grills a year for myself or friends/family, I would have the blaster guy just slap on some high heat powder coat as well.
Thanks Bruce, I was feeling like I was being lazy but, now I feel like, since it’s JUST mine, that I’m being more “cost efficient!”
I will probably do that next year.
 
WHAT: This HOW TO will show you how I paint my Genesis grill Cook Boxes. This does not cover prepping the cook box or anything like that. That is a whole other discussion. I am just showing you the method I use to actually paint the cook boxes.

WHY: I have painted well over 100 Genesis cook boxes over the past 6 years or so and this is the method I developed that is the quickest and most effective.

What You Need:
o A cleaned and prepped Genesis cook box.
o A can of Rustoleum High Heat or similar spec'ed spray paint.
o A 5 gallon bucket
o A rectangular piece of paneling or similar thin plywood that is approx 3/4" to 1" wider each way than the actual bottom hole on the Genesis cook box that will be painting. It will be different, for Genesis 1000 deep boxes, Silver B, E3xx and so on.
o Something to stand the grill on up off the ground.
o For best results, read and follow painting recommendations for the paint you are using and make sure it is not a windy day.
o Paint rated filter mask (Do what I say, not what I do).

General Overview: First, place the cook box on the stand and paint the upper ridge of the cook box from the outside in. Keep in mind the direction of the over spray so that it isn't hitting the inside of the cook box directly. After that, remove the cook box, then place the 5 gallon bucket upside down on the stand, then place the rectangular board over that upside down. Center it so the board is fully under the cut out for the grease tray in the bottom of the cook box. Now paint the rest of the outside of the cook box without worry of getting any inside. Watch the video provided for more detail.

VIDEO: This video is full demonstration of the process I use to paint my Genesis grill cook boxes. Enjoy. If you have any questions, let me know.

Bruce, thank you for all the videos and how to's you've done. Excellent help.

Do you have a go-to on how to prep the outside of the cook box? From other discussions it sounds like the inside is just moreso, "clean it the best you can, use an oven cleaner, and move on", but how "smooth" or clean does the outside have to be for the paint to be effective?
Careful with oven cleaners, as some such as easy off can actually eat away at the aluminum. I don't recall the name of the active chemical that does it.
 
You can use oven cleaner on the cookbooks. The chemical is sodium hydroxide. That hurts aluminum, but it will not hurt the aluminum. If you use it and then rinse it off right away. Sand blasting is definitely the best way to prep for painting. But you can certainly grind the cookbox off with the angle, grinder and wire cup brush. Then use a good cleaner like simple green and wash the bare aluminum before you paint it.
 
You can use oven cleaner on the cookbooks. The chemical is sodium hydroxide. That hurts aluminum, but it will not hurt the aluminum. If you use it and then rinse it off right away. Sand blasting is definitely the best way to prep for painting. But you can certainly grind the cookbox off with the angle, grinder and wire cup brush. Then use a good cleaner like simple green and wash the bare aluminum before you paint it.
How much of the original paint do you need to remove for the new paint to adhere and work properly?
 
It is best to remove all the paint on a cook box before repainting. If you don't, it wont look too good and any left over paint might start peeling later on. Having the cook box sand blasted is the best option and can usually be done for around $25.
 
Last edited:
How much of the original paint do you need to remove for the new paint to adhere and work properly?
How much of the original paint is on the cook box? If there are large areas of missing paint you pretty much need to strip it all off or it won't look good as Bruce mentioned. I have had cook boxes where all the old paint was present and I was able to just clean the surface well and repaint, but that doesn't happen too often.
 
How much of the original paint is on the cook box? If there are large areas of missing paint you pretty much need to strip it all off or it won't look good as Bruce mentioned. I have had cook boxes where all the old paint was present and I was able to just clean the surface well and repaint, but that doesn't happen too often.
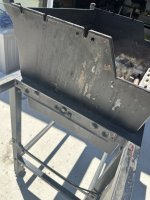
Most of the original paint is still in tact. This is the only spot where it isn’t.

IMG_7414.jpeg
 
Alex you're not selling the grill are you? If not and it's your own, just degrease it really well with some lacquer thinner, (or some other non oily non water type solvent. Wipe it down well and shoot it with some paint. If it flakes off a bit now and then so what? Just retouch it. But really the biggest reason people may have trouble with paint not sticking to the other paint is not prepping it well.
If you degrease it really well, let it dry well, the new paint will stick just fine. I've done it on my personal old Weber's and have not had it peel


Back
Top