You are using an out of date browser. It may not display this or other websites correctly.
You should upgrade or use an alternative browser.
You should upgrade or use an alternative browser.
Genesis Platinum C
- Thread starter Roy-Parallax
- Start date
TomRc
TVWBB Pro
One of the end panels is brand new. The other will be remediated. I cut the bottom of the back panel down to get it back to clean metal and treated the bare edge. Then I used a piece of flat stock aluminum as a support filler. I’m sure the visual is tough to imagine. I’ll make sure to document that better with some photos at final assembly.Tom. I assume those are the orginal side and back panels. Did you have to do rust remediation on them?
Last edited:
TomRc
TVWBB Pro
@Bruce, I had a brain sprinkle sitting here in my recliner which prompted a quick run out to the shop. I remembered having some gusseted aluminum corner braces that I bought a few years back for another project and it occurred to me that they would be perfect for tying in the shortened back panel to the frame and decking for a super sturdy connection. I’ll need to drill a hole through the back panel and gusset on each and attach it with a 10/32 SS machine screw and nut. Beyond that, it’s just a simple matter of attaching each of the corner angles to the frame and decking respectively. I set one in place for a quick picture so you can see what I’m thinking. This eliminates the bar stock I had planned which will help in keeping with an original look. Personally, I think these look great and will make for a very clean looking project.
Brackets linked as follows:
https://www.amazon.com/dp/B078MLWJ6K/?tag=tvwb-20
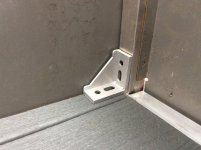
Brackets linked as follows:
https://www.amazon.com/dp/B078MLWJ6K/?tag=tvwb-20

Roy-Parallax
TVWBB Pro
Very nice. Too bad the stainless back panel from my Summit wouldn't fit.
TomRc
TVWBB Pro
The thought of modifying a Summit panel had crossed my mind as I looked at your photos. Without having one on hand to measure or mull over, I had to move on.Very nice. Too bad the stainless back panel from my Summit wouldn't fit.
Roy-Parallax
TVWBB Pro
I'm happy to measure it. The shipping probably wouldn't be cheap though.
TomRc
TVWBB Pro
I’m good with my current plans but since you have both grills, it might not be a bad idea to take a measure and share the info for others that might come along later in search of help or an idea.I'm happy to measure it. The shipping probably wouldn't be cheap though.
Roy-Parallax
TVWBB Pro
The platinum is 36.5 inches wide. The back panel on the Summit is 29.25 inches.I’m good with my current plans but since you have both grills, it might not be a bad idea to take a measure and share the info for others that might come along later in search of help or an idea.
Roy-Parallax
TVWBB Pro
My Platinum is getting darn close to being fully done.
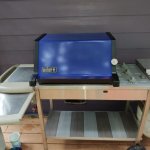
Waiting for Steve's friend to prepare and send me a new mahogany handle. I'm fixing another one but it will go on the 2000. Really like the way the lid turned out and the way the bottom deck blends the gray of the side panels together with the color of the lid. My wife says it's a masculine design. I thought that appropriate.
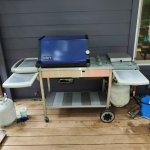
Here it is from a few feet back. Pardon the mess on the deck. With five grills in various stages of restoration, things are not tidy. Still trying to clean it up a bit. The sideboards and looking better. The wheels still look like hell. Would love to know how hard it is to take them off. I'd like to soak them in bleach overnight. Please let me know how it's done.
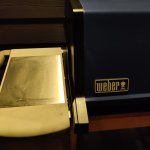
A few closeups to show how beautiful the end caps turned out, courtesy of Tom's gift of high temperature paint. The firebox too, though none of my photos are shot from an angle which would show that.
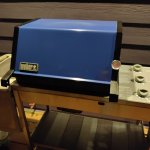
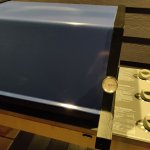
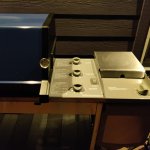

Waiting for Steve's friend to prepare and send me a new mahogany handle. I'm fixing another one but it will go on the 2000. Really like the way the lid turned out and the way the bottom deck blends the gray of the side panels together with the color of the lid. My wife says it's a masculine design. I thought that appropriate.
Here it is from a few feet back. Pardon the mess on the deck. With five grills in various stages of restoration, things are not tidy. Still trying to clean it up a bit. The sideboards and looking better. The wheels still look like hell. Would love to know how hard it is to take them off. I'd like to soak them in bleach overnight. Please let me know how it's done.

A few closeups to show how beautiful the end caps turned out, courtesy of Tom's gift of high temperature paint. The firebox too, though none of my photos are shot from an angle which would show that.


DanHoo
TVWBB 1-Star Olympian
Looks great Roy.
A cover will dress up the propane tank.
Weber 7137 Tank Cover https://www.amazon.com/dp/B077GDYMCX/?tag=tvwb-20
A cover will dress up the propane tank.
Weber 7137 Tank Cover https://www.amazon.com/dp/B077GDYMCX/?tag=tvwb-20
Roy-Parallax
TVWBB Pro
Though I'm going a bit off topic, I'll mention (parenthetically) that I've started work on the 2000. Here's the lid, again courtesy of Tom's gift of paint. It didn't turn out as well due to imperfections in the end caps. I tried to sand it but it's still very uneven. At the same time, I kind of like the effect, as a bit of ruggedness seems appropriate on such an old grill.
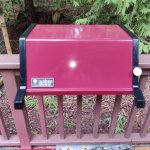
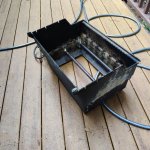
Here's the 2000 firebox, washed down and ready for paint (once I get into town to buy another can of the stuff). Since it's gonna be a working grill, I have no interest in sandblasting the inside. Cleaned it out well enough.
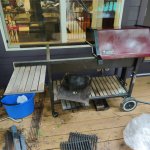
Here's the frame. I'm going to cut new planks to stain and finish. Plan to use cedar, which holds up as well as any wood to our PNW weather. Tom sent me a can of regular temperature paint that I've not cracked open yet so I could have gotten to work on the frame. But wasn't up for the challenge today. Got another frame I'm trying to take apart and it was not cooperating. Hit the bolts with PBBlaster and it's sitting for now. This one mostly just needs the wheels off and the scale sticker masked but I need to figure out how to pop off wheels.

Here's the 2000 firebox, washed down and ready for paint (once I get into town to buy another can of the stuff). Since it's gonna be a working grill, I have no interest in sandblasting the inside. Cleaned it out well enough.

Here's the frame. I'm going to cut new planks to stain and finish. Plan to use cedar, which holds up as well as any wood to our PNW weather. Tom sent me a can of regular temperature paint that I've not cracked open yet so I could have gotten to work on the frame. But wasn't up for the challenge today. Got another frame I'm trying to take apart and it was not cooperating. Hit the bolts with PBBlaster and it's sitting for now. This one mostly just needs the wheels off and the scale sticker masked but I need to figure out how to pop off wheels.

Roy-Parallax
TVWBB Pro
Thanks Dan. When I started this project, I would have said I have no need for a tank cover. But looking at the photos, I see that I do. The consequences of doing a pretty nice job on this new version of the Platinum. Buying one now.Looks great Roy.
A cover will dress up the propane tank.
Weber 7137 Tank Cover https://www.amazon.com/dp/B077GDYMCX/?tag=tvwb-20
Steve Hoch
TVWBB Olympian
Looking good Roy. The little caps that hold the wheels on will come off with pliers, just pull on them until they pop off. As far as your painting, it's all in the prep work as far how nice it looks. The end caps have to be pretty much paint free to start with or it will look blotchy when you're done. Ambient temperature, cleanliness of the pieces to be painted are also factors. Worst case scenario, the paint will flake off when you use the grill. If it doesn't, consider it a success even if it doesn't look perfect!
Samuel
TVWBB Emerald Member
I would suggest you put that bracket on from the bottom side up so not affect the integrity of the clean uniform look.@Bruce, I had a brain sprinkle sitting here in my recliner which prompted a quick run out to the shop. I remembered having some gusseted aluminum corner braces that I bought a few years back for another project and it occurred to me that they would be perfect for tying in the shortened back panel to the frame and decking for a super sturdy connection. I’ll need to drill a hole through the back panel and gusset on each and attach it with a 10/32 SS machine screw and nut. Beyond that, it’s just a simple matter of attaching each of the corner angles to the frame and decking respectively. I set one in place for a quick picture so you can see what I’m thinking. This eliminates the bar stock I had planned which will help in keeping with an original look. Personally, I think these look great and will make for a very clean looking project.
Brackets linked as follows:
https://www.amazon.com/dp/B078MLWJ6K/?tag=tvwb-20
View attachment 46210
Roy-Parallax
TVWBB Pro
Thanks Steve. Now I can get the wheels close to perfect. Yeah, my prep on the end caps for the burgundy lid was deficient. The blue lid was easier. There wasn't any flaking paint to deal with.Looking good Roy. The little caps that hold the wheels on will come off with pliers, just pull on them until they pop off. As far as your painting, it's all in the prep work as far how nice it looks. The end caps have to be pretty much paint free to start with or it will look blotchy when you're done. Ambient temperature, cleanliness of the pieces to be painted are also factors. Worst case scenario, the paint will flake off when you use the grill. If it doesn't, consider it a success even if it doesn't look perfect!
Roy-Parallax
TVWBB Pro
Thanks Bruce. This has turned out to be a communal effort. Your blue lid, Samuel's clean controller panel plate, Tom's paint. I agree that the blue lid makes it spectacular. I could not be more pleased.Roy, that Blue lid on the SS grill looks really good. I may have to put a blue lid on my SS Platinum.
Richard in NS
TVWBB Wizard
Roy, I heat those plastic wheel caps slightly with a heat gun and then pry them off with a large screwdriver. This leaves the grip ring to be pried off as well. I have been able to reuse the plastic caps this way because when I used pliers I damaged the plastic too badly.Though I'm going a bit off topic, I'll mention (parenthetically) that I've started work on the 2000. Here's the lid, again courtesy of Tom's gift of paint. It didn't turn out as well due to imperfections in the end caps. I tried to sand it but it's still very uneven. At the same time, I kind of like the effect, as a bit of ruggedness seems appropriate on such an old grill.
View attachment 46272
Here's the 2000 firebox, washed down and ready for paint (once I get into town to buy another can of the stuff). Since it's gonna be a working grill, I have no interest in sandblasting the inside. Cleaned it out well enough.
View attachment 46274
Here's the frame. I'm going to cut new planks to stain and finish. Plan to use cedar, which holds up as well as any wood to our PNW weather. Tom sent me a can of regular temperature paint that I've not cracked open yet so I could have gotten to work on the frame. But wasn't up for the challenge today. Got another frame I'm trying to take apart and it was not cooperating. Hit the bolts with PBBlaster and it's sitting for now. This one mostly just needs the wheels off and the scale sticker masked but I need to figure out how to pop off wheels.
View attachment 46273
The emphasis is on “ heat slightly” as you can melt them easily. Good luck on whichever method you use.
Roy-Parallax
TVWBB Pro
Would be super helpful if someone's done a video on pulling them off. I'm wondering if anything's out there.
