Very nice! Well done. I actually have only been using lump charcoal so far in my kamado, even though I do have a bag of briquettes in the garage. I haven't found a solution with lump charcoal so far on how to get the desired amount of smoking wood burnt in the process. Even when I place my hickory chunks right on top of the spot where the charcoals are lit, I still end up with the hickory chunks largely unburned, and the smokiness of my cooks has been rather mild. I do realise this might be easier to control on a WSM as it burns more fuel and therefore you have better likelihood on catching fire on the smoking wood chunks, too, but anyway, if you come up with any pointers for this with your experiments with lump charcoal, I would be interested to hear.
You are using an out of date browser. It may not display this or other websites correctly.
You should upgrade or use an alternative browser.
You should upgrade or use an alternative browser.
Airburner - HeaterMeter Success!
- Thread starter David Pagels
- Start date
AlexKendall
New member
I definitely don't have that problem using briquettes in the WSM. I could potentially see the issue happening using lump charcoal, we'll see! Have you considered trying the wood chips instead of the big wood chunks? Something like this: Wood chipsVery nice! Well done. I actually have only been using lump charcoal so far in my kamado, even though I do have a bag of briquettes in the garage. I haven't found a solution with lump charcoal so far on how to get the desired amount of smoking wood burnt in the process. Even when I place my hickory chunks right on top of the spot where the charcoals are lit, I still end up with the hickory chunks largely unburned, and the smokiness of my cooks has been rather mild. I do realise this might be easier to control on a WSM as it burns more fuel and therefore you have better likelihood on catching fire on the smoking wood chunks, too, but anyway, if you come up with any pointers for this with your experiments with lump charcoal, I would be interested to hear.
RalphTrimble
TVWBB Diamond Member
Have you tried the minion method of setting up your charcoal? This is basically setting up a trail of coals that burn a little at a time rather than lighting a big pile of coals, can be accomplished with a number of setups... with this method you can set wood chunks or chips along the burn path so they ignite periodically throughout the cook....I haven't found a solution with lump charcoal so far on how to get the desired amount of smoking wood burnt in the process. Even when I place my hickory chunks right on top of the spot where the charcoals are lit, I still end up with the hickory chunks largely unburned, and the smokiness of my cooks has been rather mild...
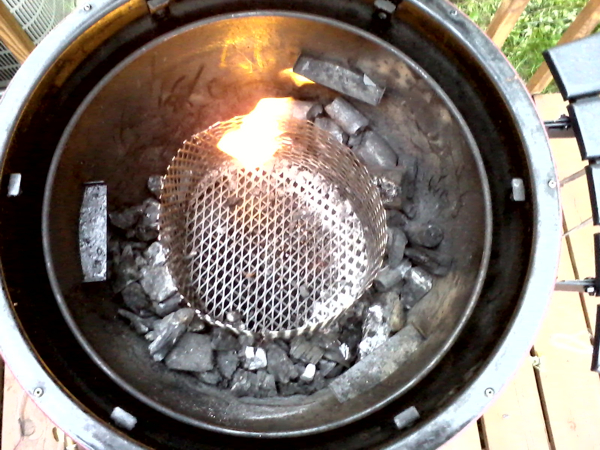
In a kamado I've used what I call the "ring of fire" minion method where I put a circular steel mesh in the center with coals arranged on the outside. Here is a picture of this setup.
Troy Louwerse
New member
Y'all inspired me to build my own airburner for my 22.5" WSM.
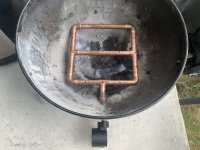
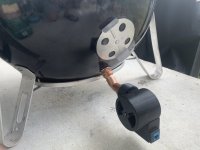
Did a test run with some beef ribs yesterday. I adjusted the fan output based on some of the recommendations I've read on here and left the PID settings at their default. I'm pretty happy with the results, but if you've got any recommended tweaks, let me know.
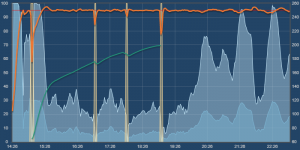


Did a test run with some beef ribs yesterday. I adjusted the fan output based on some of the recommendations I've read on here and left the PID settings at their default. I'm pretty happy with the results, but if you've got any recommended tweaks, let me know.


David Pagels
New member
Troy - Since you're running a 22" with a lot more volume, 30% max fan speed might be too low to get full control. For 250, see if 50% does any better. Also you may have to increase the max fan speed even more when cooking at higher temps.
David, nicely done! I have popped in here a few times in over the last few years. I am convincing myself to dive in this time and go all in on the Heater Meter. (Side Note - No disrespect to CapnBry, I think he should have called it the Heater MEATER!!!) Sorry, ADD moment. Anyhow, really nice job!
I have a curious question: Has anyone tried, or thought of trying soft copper pipe? Similar to what they used way back when for ice makers or what they use on HVAC units. https://www.homedepot.com/p/Everbil...-Soft-Copper-Coil-Tubing-3-4-L-60RE/203654783 It comes coiled already and seems like it would be slick and easy to accomplish this. I am a complete newb to this idea, so I am looking for understanding. Would this work? Why or why not?
I have a curious question: Has anyone tried, or thought of trying soft copper pipe? Similar to what they used way back when for ice makers or what they use on HVAC units. https://www.homedepot.com/p/Everbil...-Soft-Copper-Coil-Tubing-3-4-L-60RE/203654783 It comes coiled already and seems like it would be slick and easy to accomplish this. I am a complete newb to this idea, so I am looking for understanding. Would this work? Why or why not?
RalphTrimble
TVWBB Diamond Member
Somebody did experiment with flexible copper, I think the main issue is that most stores only have small diameter flexible copper on the shelf... and when you reduce the diameter of the tubing you decrease the amount of air flow (or would need more static pressure to force the flow), so it doesn't work out very well. When you do find flexible copper in larger diameter most stores make you buy an expensive box with a lot more than you need. That said, if you can find 3/4" flexible copper by the foot at a local store that should work just fine...
Thanks for the response Ralph!Somebody did experiment with flexible copper, I think the main issue is that most stores only have small diameter flexible copper on the shelf... and when you reduce the diameter of the tubing you decrease the amount of air flow (or would need more static pressure to force the flow), so it doesn't work out very well. When you do find flexible copper in larger diameter most stores make you buy an expensive box with a lot more than you need. That said, if you can find 3/4" flexible copper by the foot at a local store that should work just fine...
So being a little more curious here.... If you have this air burner sitting directly below your charcoal. And sad air burner looks a lot like a gas burner.....I'm thinking this could easily be used to ignite your charcoal and then remove gas source and insert blower. I am having visions of a large fire ball experience if this were not to work as expected. I am just wondering if anyone has tried something like that with any success.
Bryan Mayland
TVWBB Hall of Fame
All I know is this sounds like something I want to see now. Either success or fireball, I think I'll enjoy the outcome.So being a little more curious here.... If you have this air burner sitting directly below your charcoal. And sad air burner looks a lot like a gas burner.....I'm thinking this could easily be used to ignite your charcoal and then remove gas source and insert blower. I am having visions of a large fire ball experience if this were not to work as expected. I am just wondering if anyone has tried something like that with any success.
I accept your challenge!All I know is this sounds like something I want to see now. Either success or fireball, I think I'll enjoy the outcome.
Steve_M
TVWBB Guru
Settle down, Elon!All I know is this sounds like something I want to see now. Either success or fireball, I think I'll enjoy the outcome.
RalphTrimble
TVWBB Diamond Member
Sounds like something you would see on the moonshiners show! lol My opinion, not the best idea, but not just because of the fireball potential....
First of all, I think pushing fire out of all those air burner holes would light your fire too much too fast... for low and slow you don't need a rip-roaring fire...
Secondly, when I built the first air-burner it surprised me how easily I could light the pit with it. To amuse and amaze my guests I would rip a small piece of the charcoal bag, crumple it up and place it under some coals.... light up the paper and turn on the heatermeter and the next thing you know the pit is rolling. No fuel, no nothing... just little bit of paper and some lump coal.
Perhaps on a larger pit the gas would be good though, when you need to start a larger fire. I had also thought about the air/gas burner initially, but was thinking more along the lines of running a gas pit with wood for smoke, kinda like an electric smoker. Never moved in that direction 'cause I like using real coals and wouldn't use the gas. That said, my water heater went out a couple months ago and I did pull the burner out before I tossed it for some strange reason.... it's got an igniter and everything.....

Thanks for the response Ralph!
So being a little more curious here.... If you have this air burner sitting directly below your charcoal. And sad air burner looks a lot like a gas burner.....I'm thinking this could easily be used to ignite your charcoal and then remove gas source and insert blower. I am having visions of a large fire ball experience if this were not to work as expected. I am just wondering if anyone has tried something like that with any success.
Wow! What a GREAT idea! Anything that involves, BBQ, fire, gas AND a possible explosion? That's my kinda fun weekend experiment! Hold my beer... I'm trying this.
Tom
James_Brouillette
New member
Ok , i Just got my HeaterMeater assembled and havent' even done the first test . but i like this idea of a Air burner way more then this crappy cat bowl i assembled .
A few questions , Can someone give more detail on what they use though the vents ? seems to be 3/4" to 1 inch ? then attached to a 1 inch threaded pipe to the roto dampeners threaded piece ?
I need more detail if you could give it on that part of the assembly , the rest is all various 3/4" copper pipe and fittings and seems simple enough . but the whole toggle bolt and reducer is throwing me a curve ball , and also how it then attaches to the Roto Dampener which lists its a " (1-3/8" ) and Adapter_1inNPT (1" NPT threaded 1.315" actual) output , per the store page , I had it all pre printed and assembled . I'd love for the pipe on the outside to then thread into the threaded 3d printed roto damper piece . Picture attached to better explain my hangups
Thanks so much , I can't wait !
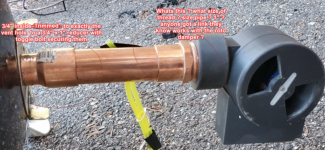

Last edited:
James_Brouillette
New member
OK so i figured it all out , and had an absolutely perfect first run ( like ever with heatermeater and airburner ! ) , thank you to the person that came up with this and all the details throughout the thread !
Anyone looking to do this , just do it ! i didn't even solder my pieces and it still worked perfectly (at a bit higher max speed set to 60 percent )
Best ribs EVER ! . Thank you guys for all that you do !
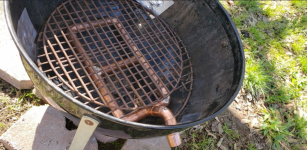
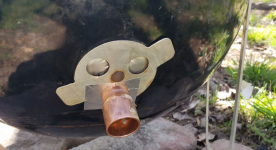
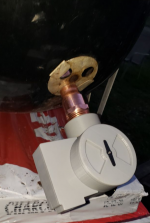
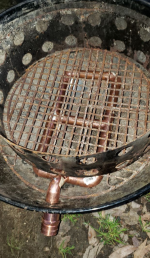
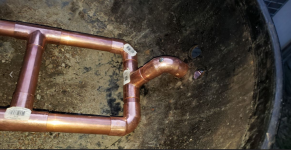
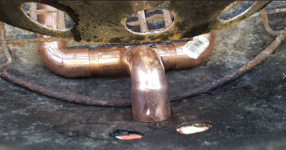
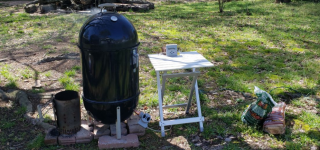
There is 0 way i would have been able t do all this without all the helpful posts on his forum , and all the hard work that went into both the software and hardware side , THANKS !
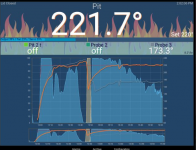
I can't wait to solder this thing and do a longer cook ! and make the seal around the smoker better ! ^ not the whole cook forgot to take a snap before i unplugged it i was hungry !
Anyone looking to do this , just do it ! i didn't even solder my pieces and it still worked perfectly (at a bit higher max speed set to 60 percent )
Best ribs EVER ! . Thank you guys for all that you do !


There is 0 way i would have been able t do all this without all the helpful posts on his forum , and all the hard work that went into both the software and hardware side , THANKS !

I can't wait to solder this thing and do a longer cook ! and make the seal around the smoker better ! ^ not the whole cook forgot to take a snap before i unplugged it i was hungry !
Last edited:
Bryan Mayland
TVWBB Hall of Fame
Looks flippin' awesome, and that temperature is holding nice and steady. Success all around!I can't wait to solder this thing and do a longer cook ! and make the seal around the smoker better ! ^ not the whole cook forgot to take a snap before i unplugged it i was hungry !
RalphTrimble
TVWBB Diamond Member
My first experience with the HM was with a generic bullet smoker... I was finding the pit would overshoot the target temp and hang there, the HM was helpless to control it because servo dampers hadn't been implemented yet. So the HM would monitor the pit just waiting for it to cool down so it could kick in. When it did kick in cold air would rush in and pass right by the fire and rapidly cool the cooking area and the oscillation would begin.
That got me thinking... what if I focused the air directly on the fire and reduced the amount of air I pushed into the pit to avoid the cooling effect? Next stop was the hardware store, a handful of copper fittings later and the first air burner was born! I was pretty astonished at how well it worked TBHWY. Even without a servo damper, if you tune the hole size/number right an air burner will control a bullet like magic. I soon realized the jet effect the holes were having on the fire and started lighting the pit with just a piece of the charcoal bag because the air jets stoked the fire so well. Like a fire bellows...
Anyhow, glad to see people enjoying it and creating new and innovative implementations.
Nice work, congrats!
PS I did solder mine, but later built another and didn't solder... you prob don't need to solder IMHO
James_Brouillette
New member
My first experience with the HM was with a generic bullet smoker... I was finding the pit would overshoot the target temp and hang there, the HM was helpless to control it because servo dampers hadn't been implemented yet. So the HM would monitor the pit just waiting for it to cool down so it could kick in. When it did kick in cold air would rush in and pass right by the fire and rapidly cool the cooking area and the oscillation would begin.
That got me thinking... what if I focused the air directly on the fire and reduced the amount of air I pushed into the pit to avoid the cooling effect? Next stop was the hardware store, a handful of copper fittings later and the first air burner was born! I was pretty astonished at how well it worked TBHWY. Even without a servo damper, if you tune the hole size/number right an air burner will control a bullet like magic. I soon realized the jet effect the holes were having on the fire and started lighting the pit with just a piece of the charcoal bag because the air jets stoked the fire so well. Like a fire bellows...
Anyhow, glad to see people enjoying it and creating new and innovative implementations.
Nice work, congrats!
PS I did solder mine, but later built another and didn't solder... you prob don't need to solder IMHO
Thank you so much , yes i have a 18inch WSM , its absolutely magic ! the only overshoot i've had is i had the lid opened to long late in the cook , and it got to max 245f , (not that bad lol ) and i was ready to carnalize the sause on the ribs at that point so it was fine haha !
I never even used the heatermeater without the "airburner" , it just seemed the way to go !
I may never solder mine , its nice to be able to more easly move it around and rotate it as needed . I just feel there is a bit of pressure and head loss without solder. When running (60% max set in settings ) it tends to run at near 100 percent fan lots of the time , but thats also prob cause i started with only 3 lit coals
Again thanks so much for the plans / idea ! Its going to get a nice long test this weekend on a Pork Shoulder !
Last edited:
David Pagels
New member
Sorry guys, it looks like I stopped getting notifications when people replied at some point  I'm really happy to see so all the success and fun people have been having with this write-up! I'm glad you got it all figured out James. Happy smoking, all!
