AT LONG LAST...
Well, I didn't exaggerate when I said that this would be long drawn-out thread. After being bogged down with many other problems and using what little time I had for grill projects on my "Platypus" Platinum One-Touch, I have finally resumed working a little here and there on my dream of reviving this classic 1st generation Summit I bought from Larry -
@LMichaels.
Finally have most of the black pieces painted gloss black over the rust treatment, and I have put some of the frame bottom together. I think these pictures might help those who have never seen one of these first - and by far best - Summits appreciate the rugged construction Weber used over 20 years ago. (I hope Weber will go back to this drawing board and incorporate that ideal when they develop the next Summit.)
You can see here that Weber used double thick pieces for the vertical frame pieces and unlike the Genesis used a fair amount of round tube framing as well. The weld is for the integrated side frame piece; the two side frame pieces connect with round tubes using bolts. Note the reinforcement bracket Weber used to help allow for a tight fit without bending the frame piece. (I replaced regular bolts with stainless):

Although the frame is regular - albeit thick - steel, the cabinetry panels are 304 stainless. Weber used a wire rack for the bottom. This allows the cabinet to drain readily and stay dry, although it does limit what you can store in the bottom. I don't expect to put much in here, but I will be looking for a couple Rubbermaid plastic boxes to hold anything I do store underneath.

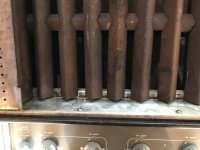
One oddity this grill had was that the front tube that holds the weight of the two doors no longer had the internal plugs to bolt the tube to the frame side. It had been replaced with a long, threaded metal piece that allows you bolt both sides.
@LMichaels do you remember the story on this? While I don't like the look as well, it does allow you to put more tension and help support this tube that has to do double work. This is before bolting on, so the tube is not centered:

Bolts attached and doors hung. I like that these doors have a twist mechanism with pins that holds them firmly in place so that they don't pop open unwanted as later ones that rely on magnets so often do. Only problem is that these pin pieces were made of plastic - not a great choice - and one is broken. I am eventually going to try to make a replacement, hopefully out of stainless. Since there is a top and bottom pin and only one is broken, the door still stays shut right now.
(Yes, that is part of my crazy toy collection in the background. You can see my prize Seaview submarine from the 1960s show
Voyage to the Bottom of the Sea. This toy was made by Remco and came in the "window box" that you can see part of. It was my absolute favorite Christmas toy!

I worked with a printer to faithfully reproduce these boxes, piece by piece. Another money loser project...)

Closer look at the door and my replacement decal. The lighting makes it look too light, but it is actually very close to the original which had faded away after over 20 years. I made this decal starting with the graphics that another member shared for the regular Genesis gauge decal and which I modified and stretched for use on these Summits and some early Platinum and Gold grills that also used this frame. I do sell these and some others, so if you need any decals PM me for details.

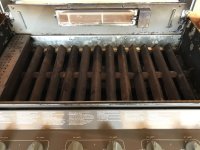
Working on the top of the cart and then it will be on to the firebox and hood. If I am lucky, maybe before Christmas I will finally get to grill on a classic, 1st generation Summit!
STAY TUNED


 !) Note the wire rack bottom for this cabinet grill. This allowed the cabinet to breathe rather than trap and pool water like later painted steel flat bottoms do. This design may not be as "handy" since small things could fall through, but it is much better for preserving the life of the grill. Wire racks are a pain to redo, but this one seemed, at least, to be thicker and better made. It did not have a great deal of rust on it, probably because of being inside the cabinet rather than being continuously exposed like on open cart grills with wire racks.

")
 !
!  …
… I know what you mean by co-mingling... I store things where they fit. So I literally have grill parts with truck parts, lawnmower parts, and all sorts of other things.