You are using an out of date browser. It may not display this or other websites correctly.
You should upgrade or use an alternative browser.
You should upgrade or use an alternative browser.
2nd Chance for a True Weber Classic: A 1998 1st Generation Summit 450
- Thread starter Jon Tofte
- Start date
-
- Tags
- restored summit
Joe Anshien
TVWBB Honor Circle
Nice job Bruce - Meticulous as always! I may have missed it but were you able to source metal shop for your SS sandwich?
LMichaels
TVWBB 2-Star Olympian
Jon is doing his best imitation of Jesus bringing back LazarusJoe, you mean "Jon", not me. He is the Summit reserrector. But, I do believe he sourced a shop to make his SS panels.
Jon Tofte
TVWBB 1-Star Olympian
Joe,Nice job Bruce - Meticulous as always! I may have missed it but were you able to source metal shop for your SS sandwich?
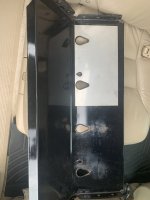
If you go back a few pages, there is an explanation of how I finally found a shop that was interested and willing to make the stainless parts for me. Without those, restoring this grill - or any 1st generation Summit with even the beginnings of fire box rust - would be ultimately useless. It’s one reason this project has languished for so long.
Here is a quick picture of what I was able to have fabricated:
Last edited:
Joe Anshien
TVWBB Honor Circle
Thanks, I found it at the bottom of page 3. I don't know how I missed it. That is some thick hunk of SS! I would think just 1 of those on the inside would last a life time of grilling! The price was also amazing.Joe,
If you go back a few pages, there is an explanation of how I finally found a shop that was interested and willing to make the stainless parts for me. Without those, restoring this grill - or any 1st generation Summit with even the beginnings of fire box rust - would be ultimately useless. It’s one reason this project has languished for so long.
Here is a quick picture of what I was able to have fabricated:
View attachment 58655
Jon Tofte
TVWBB 1-Star Olympian
Yes, I found the perfect shop that took a real interest in helping me and doing it right. They had that stainless leftover in stock, so I got a good deal. They were also very fair on the labor. Someday, I am going to try them on some other grill part fabrication projects.
Stainless cabinetry for several models such as the Genesis Platinum would be really cool!
Stainless cabinetry for several models such as the Genesis Platinum would be really cool!

Jon Tofte
TVWBB 1-Star Olympian
A LITTLE HERE, A LITTLE THERE...
I work fifteen minutes here and 20 minutes there on this 1st generation Summit dream, as I am able. It is at least starting to look like something:
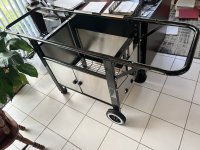
I am assembling in my home office, which is a glassed-in, air-conditioned Florida(?) room. The clean parts are fine in here, and this is the best I can do to provide a place for the paint to continue to fully cure.
I have installed all the 304 stainless cabinet parts. The back and left rest directly on the frame, and the large, heavy back piece has curves on top and bottom to loop around the two round frame tubes. No bolts used at all! Installing required loosening the bottom frame tube and then reinstalling it.
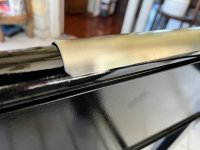
To protect from metal against metal scratching, the original design included some kind of rubber strips. Most of these were no longer useable, so I am using nomex felt, since some of the locations will be high heat.
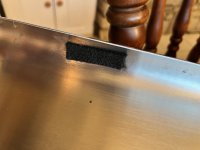
I have been replacing the hardware with stainless in almost all locations:
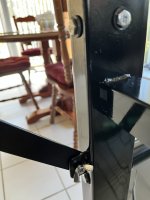
The original scale had seen a lot of use over the last 24 years, including time just sitting outside unused. It was time for a refresh using one of my own decals based on the graphics work of a member Joel Young who I don't believe is active right now. I have seen a couple extraordinary restores of these scales on our board here. So impressive for someone to completely disassemble, carefully sand and perfectly repaint. I admit I wasn't up for that and settle for cleaning, lubricating and repainting.
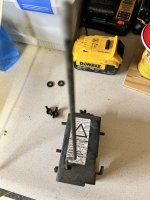
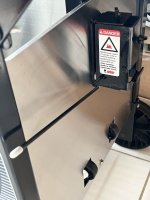
Notice the wheels above. This Summit used the same tank slider mechanism that the earlier Genesis 1-5 and x000 grills used. It gets cleverly hidden behind the stainless panel. Weber ditched this design in favor of simpler (cheaper) rubber bumpers. I still think these wheels were the classy way to ensure free movement. Unfortunately, they were also a rust magnet, so everything has two sides. I was able to find exact fitting white caps at my local Ace to replace the broken cap on one side and the badly faded one on the other. The white tip on the pointer was found on Amazon:
Well, soon I hope to clean up the rest of the stainless trays and start working on the gas connection and the side burner. Then it will be on to rebuilding the firebox and redoing the hood.
Little by little!
I work fifteen minutes here and 20 minutes there on this 1st generation Summit dream, as I am able. It is at least starting to look like something:

I am assembling in my home office, which is a glassed-in, air-conditioned Florida(?) room. The clean parts are fine in here, and this is the best I can do to provide a place for the paint to continue to fully cure.
I have installed all the 304 stainless cabinet parts. The back and left rest directly on the frame, and the large, heavy back piece has curves on top and bottom to loop around the two round frame tubes. No bolts used at all! Installing required loosening the bottom frame tube and then reinstalling it.

To protect from metal against metal scratching, the original design included some kind of rubber strips. Most of these were no longer useable, so I am using nomex felt, since some of the locations will be high heat.

I have been replacing the hardware with stainless in almost all locations:

The original scale had seen a lot of use over the last 24 years, including time just sitting outside unused. It was time for a refresh using one of my own decals based on the graphics work of a member Joel Young who I don't believe is active right now. I have seen a couple extraordinary restores of these scales on our board here. So impressive for someone to completely disassemble, carefully sand and perfectly repaint. I admit I wasn't up for that and settle for cleaning, lubricating and repainting.


Notice the wheels above. This Summit used the same tank slider mechanism that the earlier Genesis 1-5 and x000 grills used. It gets cleverly hidden behind the stainless panel. Weber ditched this design in favor of simpler (cheaper) rubber bumpers. I still think these wheels were the classy way to ensure free movement. Unfortunately, they were also a rust magnet, so everything has two sides. I was able to find exact fitting white caps at my local Ace to replace the broken cap on one side and the badly faded one on the other. The white tip on the pointer was found on Amazon:
YEJI 100 Pcs #8 White Screw Thread Protectors: Amazon.com: Industrial & Scientific
YEJI 100 Pcs #8 White Screw Thread Protectors: Amazon.com: Industrial & Scientific
www.amazon.com
Well, soon I hope to clean up the rest of the stainless trays and start working on the gas connection and the side burner. Then it will be on to rebuilding the firebox and redoing the hood.
Little by little!
Last edited:
Jon Tofte
TVWBB 1-Star Olympian
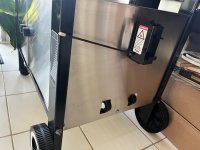
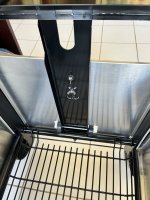
Oh, I am so forgetful!! A shout out to our moderator @Chris Allingham for kindly providing me with pictures that helped me get past the confusing schematic and properly reassemble the right side of the cabinet with the tank scale.


Joe Anshien
TVWBB Honor Circle
Your paint job is excellent. Way better than I do. How many coats you use?Attention to details. I see you going the extra mile like always Jon. SS wing nuts. Did you already repaint the entire frame?
Jon Tofte
TVWBB 1-Star Olympian
Thanks, Bruce. I know it was a little overboard, but why not? I repainted some of the black wing nuts and plan to at least use one on the tank scale holder clip. They are a lot easier on your fingers then the stainless ones!Attention to details. I see you going the extra mile like always Jon. SS wing nuts. Did you already repaint the entire frame?
Frame is painted and all the stainless parts except the small front piece are cleaned and installed.
I am getting some advice from @LMichaels regarding the two manifolds he included when he sold me this grill. I am trying to get it back to LP setup, since Larry had converted it to NG many years ago. After that it is rebuilding the firebox, including gluing in my stainless plates with the "food grade" RTV I bought. Finally, the hood cleanup and installation. It may actually happen!
Jon Tofte
TVWBB 1-Star Olympian
Joe,Your paint job is excellent. Way better than I do. How many coats you use?
If I gave you some less flattering pictures, you would see my mess-ups. Even with Rustoleum 2X I am not much of a spray painter!
I tried to deal with the limited rust and then used Rustoleum Rust Converter almost as a primer, covering a lot of the black frame metal. I let that cure way longer than needed because I was too busy, but finally applied the 2X Gloss Black. I guess you could say that most metal had two coats in one application, but not all. The handle ends were hard and had to be done and redone a couple times. I had to sand off bad application spots and do them again. Most of the rest of the tube frame parts will be all concealed, so I was primarily interested that they had good coverage and didn't worry about some runs and errors
Bruce
TVWBB 2-Star Olympian
Jon, I put those SS wing nuts on the tank scales some times. When the black ones are missing or trashed, I grab a stainless one. I have several in my parts containers from some of the older Genesis grills that I have parted out. They used those on a lot of the manifolds on older Genesis grills. Weber probably save $.05 per grill by using the cheap stamped steel ones on the tank scales.
LMichaels
TVWBB 2-Star Olympian
Jon, if you're doing a lot of spraying do yourself a favor (if you have a compressor) and buy a small gravity feed spray gun at Harbor Freight. I learned trying to do the Kubota. It's the way to go to get REALLY good results even if you're not a good painter. I also have a small suction feed gun. They have more over spray but oddly I am actually better with that gun than the gravity feed gun. But, I used the gravity feed during the Kubota work because with a couple accessories it's easier to clean up and less mess

 www.harborfreight.com

 www.harborfreight.com

 www.harborfreight.com
These items for not a lot if $$$ will make you look like Earl Scheib
  seriously, you will be amazed at the quality and speed of work you will turn out

20 oz. HVLP Gravity Feed Spray Gun
Amazing deals on this 20Oz Hvlp Gravity Spray Gun at Harbor Freight. Quality tools & low prices.

Universal Paint System Starter Kit, 17 Pc.
Universal Paint System Starter Kit, 17 Pc.

Spectrum Paint System Adapter
Amazing deals on this Paint System Spectrum Adapter at Harbor Freight. Quality tools & low prices.
