2nd Chance for a True Weber Classic: A 1998 1st Generation Summit 450


Jon Tofte

TVWBB 1-Star Olympian
This thread will probably die down and get revived as I try hard to carve out even a little time here and there to work on the 1st generation Summit I bought from @LMichaels. Yes, those of you who have been on TVWBB for some time probably know the problematic story behind this grill. While probably the best gas grill ever made by Weber (other than the legendary unicorn Vieluxe), the 1st generation Summit shares an Achille's heal with all Summit models. Perhaps to allow grease to flow more freely, Weber designed the firebox with a porcelain coated steel front and back piece that folds down to create a sloped path for grease to run into the long catch pan. (This is not too unlike what Weber did with the SmokeFire pellet grill where they used stainless steel on the side flavorizer bars but opted to go with porcelain coated steel on the main one over the firepot. They did that because grease moves faster off porcelain than stainless - and presumably it would be a lot faster than cast aluminum.)

The problem, of course, is that given enough time the porcelain cracks from heat expansion and cooling contraction, not to mention hot grease and salts from cooking. Once cracks develop one of these pieces (usually the front one) will start rusting. As Larry says, "In no time it will be Swiss cheese."

Weber provided a generous warranty but didn't back it up with support parts when Larry's Summit experienced this issue. I believe he was able to extend the life of this Summit by obtaining a nice used replacement front, but soon enough that too failed. Larry has obvious reasons for frustration, and eventually parked the Summit until one day he was kind enough to sell it to me.

This will be a keeper of keepers grill for me. I am taking my time (whether I like that or not because of so many other issues in my life). So far, the grill is completely disassembled. I have started only the beginnings of cleaning, painting or otherwise restoring parts. I have the front firebox piece pretty much cleaned and hope to take it to some sheet metal shops to see what I would be looking at to make plates with holes matching the burner and igniter openings. I would like to "sandwich" them on both sides of the vulnerable metal using small bolts. Plate and bolts all to be stainless steel of course. I think if this could be realistically done it would buy many years of future use for this beautiful grill.

I say beautiful, because I think this first Summit was the pinnacle of Weber's design while Weber was still completely the real deal. The advertisement for the introduction of this first Summit really captures the classiness of this particular Weber:

 
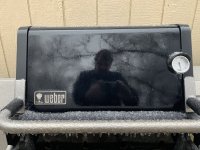
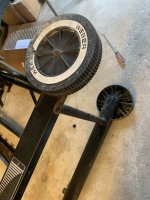
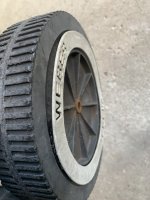
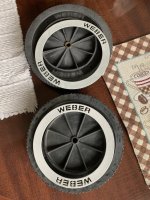
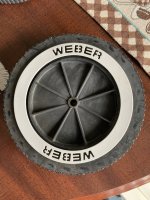
So here is one thing I worked on. The original Weber wheels were looking pretty tired after so many years and especially just sitting in both Larry's yard and my yard:

Summit covered with ice.jpeg

Wheel BEFORE.jpegWheel Closeup BEFORE.jpeg

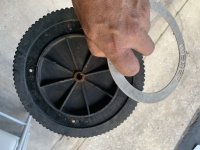
I had to replace the one wheel with the broken whitewall using an otherwise equally sad looking old wheel from my inventory. I figured I would start by carefully removing the whitewalls:

Wheel removing whitewall BEFORE.jpeg

Hint about removing these whitewalls: use a punch or maybe small screwdriver to very carefully push the pins of the whitewall out. The plastic gets very brittle and this removal has to be done cautiously. These wheels looked pretty rough. The whitewalls were very deteriorated from sun and weather with a rough finish as a result.

I gently sanded the white walls and cleaned them and the wheels. They looked a good bit better, but it was still obvious to me that I wasn't going to get the look I wanted even if I smothered them in 303 Protectant (which is good stuff, by the way, for plastic not so far gone.)

Wheel FIRST STEP 1.jpeg

Wheel FIRST STEP 2.jpeg

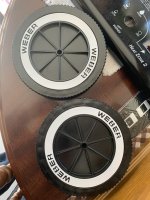
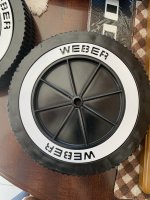
The next step warrants a shout out to @Brian B Atlanta who used and demonstrated its effectiveness some time ago. I used Krylon Fusion satin black spray paint and I believe a Rustoleum white spray to breathe new life into these parts:

Wheels AFTER.jpeg

Wheel Closeup AFTER.jpegf

Another hint about this process: If you go with painting, some is going to get into the holes where the pins go. I used a little bit of thin oil to lightly lubricate the pins and with that they popped back in.

I know that paint won't last forever on plastic, but the outer edges of these wheels really don't get much in the way of direct contact, so I think this was a great way to go. Thanks, Brian, for the idea!(y):coolkettle:
 
So here is one thing I worked on. The original Weber wheels were looking pretty tired after so many years and especially just sitting in both Larry's yard and my yard:

View attachment 53458

View attachment 53451View attachment 53452

I had to replace the one wheel with the broken whitewall using an otherwise equally sad looking old wheel from my inventory. I figured I would start by carefully removing the whitewalls:

View attachment 53453

Hint about removing these whitewalls: use a punch or maybe small screwdriver to very carefully push the pins of the whitewall out. The plastic gets very brittle and this removal has to be done cautiously. These wheels looked pretty rough. The whitewalls were very deteriorated from sun and weather with a rough finish as a result.

I gently sanded the white walls and cleaned them and the wheels. They looked a good bit better, but it was still obvious to me that I wasn't going to get the look I wanted even if I smothered them in 303 Protectant (which is good stuff, by the way, for plastic not so far gone.)

View attachment 53454

View attachment 53455

The next step warrants a shout out to @Brian B Atlanta who used and demonstrated its effectiveness some time ago. I used Krylon Fusion satin black spray paint and I believe a Rustoleum white spray to breathe new life into these parts:

View attachment 53456

View attachment 53457f

Another hint about this process: If you go with painting, some is going to get into the holes where the pins go. I used a little bit of thin oil to lightly lubricate the pins and with that they popped back in.

I know that paint won't last forever on plastic, but the outer edges of these wheels really don't get much in the way of direct contact, so I think this was a great way to go. Thanks, Brian, for the idea!(y):coolkettle:
Looks good to me, new ones are almost $30 each now.
 
I suppose with an unlimited budget anything can be fabricated. It is a complex piece with bends including a round curve where it rests on the Summit’s top round frame tube plus all those holes. Everything would have to be to fairly tight tolerances. I guess that’s what led me to thinking about much smaller flat pieces that could reinforce the original front.

I will post a couple pictures tonight so you all can see more clearly the issues.
 
Had that been feasible (at least withing some reasonable cost) Jon would have never gotten the grill :D It would still be on my deck. I shopped a couple local fabricators and all turned me down
 
The Infamous Front Piece of a 1st Generation Summit - AND a Possible Fix

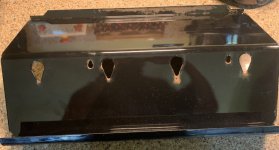
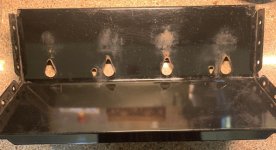
So here is the front piece from my Summit. You can see that the rust monster has already started its work. You could safely use this piece for a little while, but it is inevitable that the holes will get larger making the grill no longer safe to use:

OUTSIDE
Front Piece with Rust.jpeg


INSIDE
Front Piece with Rust Inside.jpeg
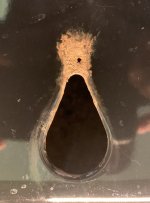
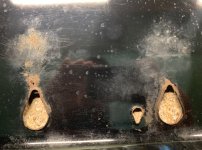
You can see that the damage is the worst above the burner holes where heat rises and tries to escape through the openings. The other side of the firebox is also made of porcelain coated steel. It can rust, too, but this is not nearly as common since there are no openings for the heat to pour through.


Here are some close-ups:

Front Piece with Rust CLOSEUP.jpeg

Front Piece with Rust Inside CLOSEUP.jpeg

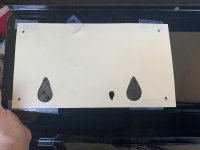
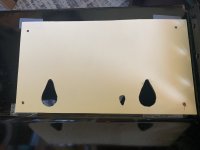
My proposed fix is a stainless-steel plate with cutouts to accomomdate two burner and one igniter hole. They would be interchangeable left and right and for use on the front and back. You would use 4 of them on this 4-burner grill to "sandwich" the affected areas. Presumably, you could add another set of two to do the same thing for a 6-burner Summit:

Proposed Fix Plate applied to outside.jpeg

Proposed Fix Plate applied to inside.jpeg
By keeping this part a simple 11" X 6" rectangle and limiting the cutouts to just these three (plus bolt holes, easily drilled) I am hoping to make this a more realistic project that just maybe I can find a sheet metal shop to take on. It would also lend itself to a higher volume bringing down the per unit cost. I will see what I can find out when I can get time off to take these to some places in Terre Haute. If no luck there, I will try expanding my search.
 
Last edited:
Thanks for a terrific start on this write-up, Jon! Good luck as you continue your project. I may have asked on another occasion what I'm about to ask here. What are thoughts about using a few of these (or strips thereof) as a shield for the porcelain section, and possibly just butting it against the metal without even fastening it? Could that be a possibility? Or is there a health risk? I ask not because I feel it's a better approach than what you brainstormed but I have a new S-670 where I'm not so interested in a substantial mod at this time.

https://www.homedepot.com/p/OATEY-9-in-x-12-in-Hands-Free-Solder-Heat-Shield-314002/100345508

1655850775044.png

Or perhaps there's something similar that's sized more appropriately for cutting a preferred size, such as this: https://www.ebay.com/itm/384757543757
 
Last edited:
Jon I have Zero experience with Summits, but being on this board I do see this exact issue over and again. I do like your idea for sandwiching the weak porcelain coated area with Stainless. Would you consider maybe running a bead of high temp RTV along the outline of the stainless panels, and around all of the holes? If it were me, and I was trying to get to a long term solution, while I had that piece of porcelain coated steel out, I would sand that rust down and hit it with POR, then a few coats of high heat paint. I know it may still rust, but if you have stainless front and back, seal the whole thing up with high temp RTV, it may not rust as quickly. The stainless will help keep temperature down too just due to the mass of metal present.

Just a few thoughts.
 
Thyde, those are some interesting suggestions. The RTV is only rated to 600 degrees I think, so that would be pushing it I think. Por15 might not handle the heat too well either, but It seems regular paint can take more heat than one would expect as well so maybe. If you could get the POR15 to hold up, that would be a great thing with a coating of High Temp over it before putting on the SS Shields.

I would not try those soldering sheilds. First off, they will gunk up quick with grease and since they are not designed to be food safe, my guess is that they would give off some toxic fumes.
 
Bruce, I think the RTV would be OK. I've had my emblem glued on to my lid with RTV for years without any problem. Plus, that part of the firebox probably doesn't get as hot as the top does. This would be an interesting experiment to do with one of those laser thermometers to see how hot that part of the Summit box gets. Heat rises, so I'm guessing maybe a couple hundred degrees, but I'd also bet lower temps than the lid or the parts of the grill that are above the flames. I think if he could seal the stainless panels to the existing box with RTV, and coat the rust with POR and topcoat with high termp paint, he's have a winner for at least several years.
 
Yah, I use the red RTV on my rehab Weber badges too. I also wonder just how hot that panel might get during use. But, I think the Red RTV would hold up under a bit higher than 600 degrees anyway.
 
I think the RTV idea would work fine. I often wondered if you went after the whole rusted out area with the angle grinder and simply cut it away, then fabricated an outer and inner stainless shield, after cutting away all the bad metal, no screws BTW as it's now another rust point but simply "gluing" everything together with the red RTV if that would do the trick? It was on my "think tank" list back when I owned the grill. BTW that red RTV is really good stuff and holds up to far more than you might imagine. Plus if it's used in that manner it's really not getting as hot as you might think
 
So maybe ... maybe make just two stainless panels, one for the inside and one for the outside, RTV all around the edges and around the holes, then clamp to the porcelain overnight to minimize edges and places for water to sit. I would clamp and cure one panel at a time so I could get it precisely where I wanted it.

Jon this is pure brainstorming, and it's fun because I don't have to actually do any of these things :)
 
OK, guys, some good and interesting ideas.

Larry, I had definitely thought of - and was concerned about - the issue of drilling new holes into the porcelain and introducing more potential rust points. I guess I didn't think about any possibility of using RTV to just glue the pieces on, although I did think about that something would be needed to seal off the edges. I suppose every method has pros and cons.

Would this be a good example of the product you are talking about? I notice this one claims to be "food safe" and for use up to 650 degrees:


Will this really act like a very strong glue and hold metal to metal in grill conditions?


Back
Top