Weber Genesis Gold C (00-01)


That is what I use to strip mine unless I take them to a sandblaster to have them do it. The angle grinder and wire wheel should work well.
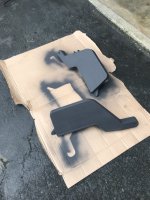
So I've wheeled this all the way down on the exterior and just gave it a solid scraper on the interior (not planning on going any further inside).

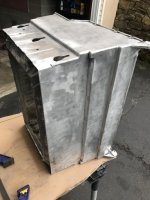
Question on the exterior. Will I need to buff the wire wheel marks out with some fine grit sandpaper or will the paint be sufficient to cover these up? It's hard to tell on the bare metal if they are deep, but they feel smooth.

If further sanding for the finished product to look smooth and not swirly, what grit sandpaper do you suggest?

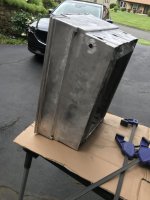
Also posted some update photos of the sides after 2 coats of high heat. I didn't have to sand those all the way down since I was able to clean them up with very minimal coating dmg.
 

Attachments

  • IMG_4769.jpg
    IMG_4769.jpg
    150 KB · Views: 7
  • IMG_4768.jpg
    IMG_4768.jpg
    121.7 KB · Views: 7
  • IMG_4767.jpg
    IMG_4767.jpg
    125.8 KB · Views: 7
For the exterior, I would put one coat of paint on them, and if you don't like what you see then I would sand that. You'll probably be OK without additional sanding, but like I said I'd put a coat on first and see what you think. It's easier to sand paint than metal. Of course, you'll have to wait a day or two before sanding, unless you like what it looks like and then you can just recoat for two or three light coats according to your paint's instructions.

Looking good!
 
Your endcaps look great! I'm sure the cookbox will as well. It looks like you're doing something right for sure.
 
Looks great! Did you avoid sanding?

The outside of my cook box got about that much paint several years ago and it holds up well. Mine just needs a good cleaning. You should be all set!
 
Looks great! Did you avoid sanding?

The outside of my cook box got about that much paint several years ago and it holds up well. Mine just needs a good cleaning. You should be all set!
I ended up going over each side really quick with 150 on an orbital. Provided a nice consistent surface profile to grab onto.
 
So this is the only high temp grease my local automotive store sold. Should this be ok to clean up the manifold when I disassemble it? 890C07B0-7F37-41C7-AAAB-F321FAA367D4.jpeg
 
The stuff normally recommended is brake lube. It is usually sold in tiny packets in auto parts stores for a buck or so. Many times it is blue colored.
 
That grease should be fine. Be careful removing the little screws from the valves, they strip out easily.
 
You can also get the brake lube in what looks like an oversized toothpaste tube. As long as you don’t lose the tube you are good for years, even if you do your own brakes too.
 
Can anyone tell me if it matters how open these end caps/covers are? I didn’t take note of this while disassembling.

Also, the snap for one of the plastic “covers” (don’t know the term) broke so I can’t secure it. Is this an issue? Can I use a wire tie and secure it? Not sure if the replacement part. 1C15B0D1-2BA1-4C63-8281-40491DE83779.jpeg8D6963D6-C6EC-4B7D-A21E-4472AE91B96E.jpeg
 
Those old plastic "spider guards" were used before they changed the design of the burners to include a mesh over the opening. You don't want your old-style (it appears) burner to be unprotected. Spider and some other bugs sure do like burner tubes!

I don't see any reason why a wire can't be used to hold it on. If you someday replace your burners with a new set, you won't even need those plastic guards anymore.
That makes sense.

Any advice on how "open" the metal covers should be? I assume this is for controlling airflow but did not take note of position when I disassembled.
 
I would set them about 1/2" open. Then try them out. You may have to adjust them open or closed to get the good even flames with no more that a little yellow/orange tip on the flames.

In your top photo, it looks like the top burner is too closed. The lower burner shutter is probably close to where it should be.
 
You can just zip tie the plastic bug screen on. They are made of plastic, so there is no reason why a zip tie, also plastic, would be a problem. It doesn't get super hot there.
 
Could anyone confirm whether this is the correct ignitor kit for my model? I was cleaning up the old one today and not sure that it is going to work as the ground broke off plus it looks like there are some loose pieces inside the igniter switch.


Back
Top