Restoration Newbie - Genesis 2000


Thank you everyone for your positive feedback and tips! I finally disassembled my grill and started the cleaning process.

In the spirit of my friend @AHymel , I laid everything out as I took the grill apart.

View attachment 15773

The flavorizer bars are looking the worse for wear... More on that later...

View attachment 15774

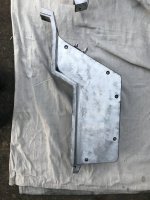
The frame is looking great! It was a pain to get the swinging side table off, but I got it! There are only a few problem spots - see following pic.

View attachment 15775

There are a couple of spots that look like this. I assume that this will be fixed after a good sanding and paint job?

View attachment 15776

Here are some parts I have questions about:

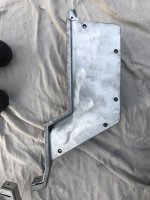
Fuel scale assembly:

View attachment 15777

Flavorizer bars:

View attachment 15778View attachment 15779

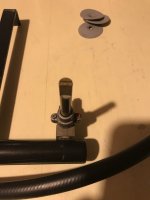
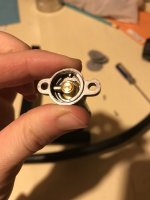
Igniter:

View attachment 15780

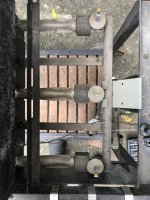
Burner tubes:

View attachment 15781

Questions:

1. Problem spots on frame: sand and paint? I've already read over @PaulD 's "Drab to Fab" and bought:
- 400 grit sandpaper - for sanding the metal
- Rustoleum high heat ultra
- Rustoleum high heat

2. Fuel scale assembly: what is the protocol for cleaning this? The spring inside is fairly rusted. Is it handy/do I really need it, or can I nix it?

3. Flavorizer bars: They're all pretty crusty. Rust has eaten holes in a few - can I get away with keeping these or should I purchase new?

4. Igniter: It works, but it's not pretty. Is it a good idea to install a new one?

5. Burner tubes: I have not tested these, so I don't even know if they work... I read @Chris Allingham 's post "Spring Cleaning for Your Gas Grill" where he recommends "brush[ing] off the burners and punch[ing] out any clogged holes with an opened paper clip or small eyeglass screwdriver." Would that be enough to get my burner tubes freshened up?

Thank you for your help! I can't wait to work on my grill more tomorrow!

For your questions -

1. Problem spots on frame: - sand and paint if you can

2. Fuel scale assembly: Don't know. In my opinion the scale part is more for show. You do want to hang the tank on the hook for safety reasons.

3. Flavorizer bars: Surface rust is OK. Holes are not. Consider new ones. If you can find some used ones you can use a few of yours and some of the used ones to get by for a while.

4. Igniter: Get new one on Amazon - around $10

5. Burner tubes: The burner tubes will clean up. The little cross burner tube should be replaced at a minimum.
 
"brush[ing] off the burners and punch[ing] out any clogged holes with an opened paper clip or small eyeglass screwdriver." Would that be enough to get my burner tubes freshened up?
To me, that's more of a "cleaning" approach. Your burners need rehab! Maybe what's shown in this video or similar would make quicker work of it. You'll only know when you put them back in and fire it up. If you're getting nice blue-tipped flames from all holes, you're set. If not...maybe replace?

 
If you can rehab your burners to full functionality, well that would be great. However, there have been some really good deals on new aftermarket parts on Amazon. I think maybe a few if the Asian companies are trying to dump some accumulated inventory:

https://www.amazon.com/gp/product/B07SS7WP63/?tag=tvwb-20

https://www.amazon.com/gp/product/B07RGSX82G/?tag=tvwb-20

When I posted these, both were offering 30% off of a decent price to begin with.

For an igniter, Weber's was on sale at the time I posted this:

https://www.amazon.com/gp/product/B000WEOQC2/?tag=tvwb-20

There are even cheaper aftermarket ones, but the reviews include some comments about them not fitting properly. This is a rare example of where the OEM may be a better choice, especially at a good sales price.

For the fuel scale, I think I would just spray some WD-40 or a rust remover on the internal spring and repaint the outside. They are really only a rough guide of how much LP you have, but you need it to hang your tank on and for the grill to look complete. If you need new replacement decals for the tank holder and for the frame leg (E-F) let me know. I had some of these printed on a vinyl peel off sheet a long time ago, but they got lost in my moving. I am pretty sure I can find them now and get you a set for a very modest price.
 
Last edited:
To me, that's more of a "cleaning" approach. Your burners need rehab! Maybe what's shown in this video or similar would make quicker work of it. You'll only know when you put them back in and fire it up. If you're getting nice blue-tipped flames from all holes, you're set. If not...maybe replace?

This video is so helpful! Thank you so much. I will definitely try this out with my burner tubes.
 
If you can rehab your burners to full functionality, well that would be great. However, there have been some really good deals on new aftermarket parts on Amazon. I think maybe a few if the Asian companies are trying to dump some accumulated inventory:

https://www.amazon.com/gp/product/B07SS7WP63/?tag=tvwb-20

https://www.amazon.com/gp/product/B07RGSX82G/?tag=tvwb-20

When I posted these, both were offering 30% off of a decent price to begin with.

For an igniter, Weber's was on sale at the time I posted this:

https://www.amazon.com/gp/product/B000WEOQC2/?tag=tvwb-20

There are even cheaper aftermarket ones, but the reviews include some comments about them not fitting properly. This is a rare example of where the OEM may be a better choice, especially at a good sales price.

For the fuel scale, I think I would just spray some WD-40 or a rust remover on the internal spring and repaint the outside. They are really only a rough guide of how much LP you have, but you need it to hang your tank on and for the grill to look complete. If you need new replacement decals for the tank holder and for the frame leg (E-F) let me know. I had some of these printed on a vinyl peel off sheet a long time ago, but they got lost in my moving. I am pretty sure I can find them now and get you a set for a very modest price.
Thanks for the links! And for the fuel scale advice. I'll try some WD-40 and see how it goes.
 
One thing about using wire wheels to clean up metal parts. It is best if you have one wire wheel for stainless and a separate one for mild steel. If you use a wire wheel for mild steel and then use it on stainless it can push mild steel bits into the stainless steel and make it rust.

There was a water treatment plant with a lot of stainless piping and equipment where a worker used a wire wheel on mild steel and stainless before welding, and many of the welds on the stainless started rusting soon after the plant was commissioned.
 
I'm about to make a trip to pick up new stainless steel hardware and I'm in need of advice!

(Y'all's friendly help has meant the world to me. I've felt so supported and encouraged throughout this project. Thank you for helping a newbie like me!)

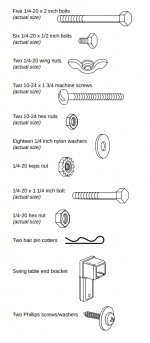
I thought I found my grill's manual: GENESIS® 2000 LX Series LP Gas Barbecue (1998), but when I compared the assembly list to what I have, things are not matching up.

@Chris Allingham - you commented that ER = 1996 - how can I find the manual for this year? I put in my serial number, but it came up with 0 results: ER 22739.

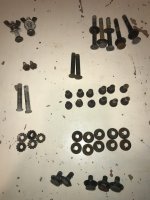
Here's a picture of what I took off (I have the hairpin cotters for the hinge pins, they just didn't make the pic!):

grill hardware.jpg

I read @Jeff MA 's post about the replacements for the end cap hardware and plan to do what he did.

What should I do about matching the rest of the hardware with new stainless steel?

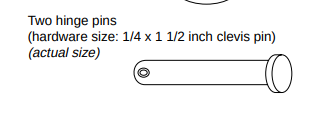
Attached are screenshots from the manual that I thought matched my grill.
 

Attachments

  • Screenshot 2020-10-26 at 8.22.50 PM.png
    Screenshot 2020-10-26 at 8.22.50 PM.png
    84.2 KB · Views: 7
  • Screenshot 2020-10-26 at 8.22.59 PM.png
    Screenshot 2020-10-26 at 8.22.59 PM.png
    9.6 KB · Views: 7
Last edited:
I would just take examples of each part in a Ziploc bag with the # needed and go to your local hardware store. You should be able to find almost all of those parts in stainless at an Ace or something similar. If not, there are some great on-line sources where you can even specify 316 stainless - a more corrosion resistant stainless than even 304. Marsh Fasteners is one I have used, but there are others. Of course, you will have to pay shipping and might have to buy some in higher quantity than one restore will require.
 
Here are the Clevis Pin part #s from the Home Depot
Stainless Steel Clevis Pin 1/4 x 1-1/2, Everbilt 836538 ea. @ $3.48 x 2
Hitch Pin Clip 1/4" 2 pack, Everbilt 809608 @ $0.85
 
@Chris Allingham - you commented that ER = 1996 - how can I find the manual for this year? I put in my serial number, but it came up with 0 results: ER 22739.
There were occasional revisions to these owners manuals over the years, but Weber does not offer a revision for each model year. Checking their website for the Genesis 2000, it looks like they only offer the 1998 manual and I think that's the one that you say doesn't match your grill. There's a 1997 manual available here but it still might be the wrong one: https://www.appliancefactoryparts.com/content/pdfs/135375-1.pdf
 
I am finally in the reassembly stage! I'm quite proud of my grinding job on the end caps. They are now painted and looking pretty!

endcaps2.jpgendcaps.jpg

Today, I dove into cleaning and lubricating the grill valves. I have some questions to make sure I got it right... I followed along with @Chris Allingham 's incredible how-to video, but am second guessing myself after looking back at pictures I took of the valves during disassembly.

Could someone take a look at my work and give me some feedback?

I never thought I would ever in my life be cleaning and lubricating a grill manifold, but here I am. I've learned so much throughout this whole process, but gosh darn, it's hard! Thank you all for your guidance and affirmation. Without y'all, I don't know if I'd make it to the end of this project...

When I disassembled the grill, the slots on the valve stems were going in the same direction as the burner tubes. See photo below.

manifold.jpg

When I finished the cleaning and lubricating process, the slots on the valve stems were facing in such a way that they would be perpendicular to the burner tubes (I hope this makes sense). See photo below.

manifold2.jpg

Here are photos of:
a. How I inserted the valve stem into the cover (with the little nub (?) seated into the slot inside the cover)
b. How I inserted the valve cone
c. The holes on the valve cone to show how they would be oriented given the way I inserted it in photo b.

a. manifold3.jpg b. manifold4.jpg
c. manifold5.jpg

Did I miss something? Or did I do it correctly?

Also, the grease I used is rated for -40F to +495F - is that high enough of a temp rating?

Thank you in advance for your help!
 
You put that little locking ring in upside down. Good rule to follow. Never disassemble multiples the try to figure out how you took it apart. Old mechanic trick. Never remove all the brake shoes at once. Do one side, if you have a problem you have the other side to look at
 
You put that little locking ring in upside down. Good rule to follow. Never disassemble multiples the try to figure out how you took it apart. Old mechanic trick. Never remove all the brake shoes at once. Do one side, if you have a problem you have the other side to look at
Thanks for the tip! I will make sure to do them one at a time next time...

Can you explain what you mean by little locking ring?
 
The grease is fine, unless Larry says otherwise. :) I think the cone is in the correct position per your photo.

When you replaced the valve cover and screws in your "perpendicular" photo, did you try turning the valve stem clockwise? It may just be in the ON position. If it rotates clockwise and stops in the orientation shown in your original photo (the OFF position), I think you're fine.

If not, maybe you've replaced the valve cover in the wrong orientation. Hold the valve stem steady and rotate the valve cover 180*. Replace on the valve body so the pin engages the cone and see if that fixes it.

Let us know the outcome.
Hi Chris! Your first thought was correct. I turned the valve stem clockwise and it went right into the OFF position, like in the "perpendicular" photo.

I put the control knobs on the stems and put the control panel over the whole thing. The knobs turn from HI, to MED, to LOW perfectly!

Thank you for settling my nerves and thanks again @LMichaels for the mechanic tip. The next time I clean and re-lube I'll be much more methodical!
 
You put that little locking ring in upside down. Good rule to follow. Never disassemble multiples the try to figure out how you took it apart. Old mechanic trick. Never remove all the brake shoes at once. Do one side, if you have a problem you have the other side to look at
Had a friend in Auto Shop in High School rebuild the drum brakes on his Ford Station Wagon...put all the leading shoes on the front brakes and trailing shoes on the rear. It didn't work well.

But apart from that, consider these valves as a precision assembly. They seal on a taper and tend to wear into each other over time. Please try not to mix and match.
 
Very good point Ed. But, if you follow Larrys advice and do one at a time, that would prevent the mix and match thing.
 
Very good point Ed. But, if you follow Larrys advice and do one at a time, that would prevent the mix and match thing.
Yeah, that Larry, he's a smart cookie.

But my fault, I was several messages behind and I didn't read the follow-ups carefully. Absolutely, that's the only way to do it properly, one at a time, taking notice on how it all comes apart so you can put it back together the same way.
 
Thanks for the tip! I will make sure to do them one at a time next time...

Can you explain what you mean by little locking ring?
That little ring that falls (or rises) into the detentes to give you that little "click". I've done the same thing so don't feel badly. Recently I decided to do the ones on my 2000. Yep you guessed it. Even with as many of the damn things I have done over the year I got one backwards just like you did. $h*t happens as they say :D


Back
Top