J Grotz
TVWBB Wizard
Thanks. Only after a couple of G&T’s.Very nice, you've got the hands of a surgeon.
Thanks. Only after a couple of G&T’s.Very nice, you've got the hands of a surgeon.
Thanks, Bruce! I kinda went overboard at times, like with the badge, the manifold, the...J Grotz, that is some attention to detail. I don't bother trying to clean of the (R) marking. Oh and instead of replacing the little push nuts to keep the emblem on the grill, I just put a little RED High Temp RTV on the back of the emblem and paste it back on.
Holy cow! A toothpick?! That is hardcore. How long did that take 30 minutes?I sprayed the red paint into a cup and then hand painted it with a tooth pick.


My emblem restoration pics, the start...View attachment 6886
Initial cleaning with simple green and sanding with 400
View attachment 6887
Two coats of gloss black high heat
View attachment 6888
Sanding with 400, then 1000
View attachment 6889
Testors Red enamel model paint
View attachment 6890
Final, three coats of high heat clear gloss
View attachment 6891
Thanks for the tip on the red Testors enamel model paint! Cheaper than the VHT spray paint.I think you and Bruce are right about the high heat gloss. Looks great! I will start using that. As always, thanks for the helpful tips!
My emblem restoration pics, the start...View attachment 6886
Initial cleaning with simple green and sanding with 400
View attachment 6887
Two coats of gloss black high heat
View attachment 6888
Sanding with 400, then 1000
View attachment 6889
Testors Red enamel model paint
View attachment 6890
Final, three coats of high heat clear gloss
View attachment 6891
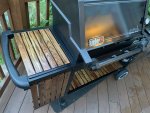
My goodness that wood is beautiful. Do you have a post or write up for they wood refinishing? @Jon TofteI will just throw in that I have experimented with both high heat paint sprayed into a cup and a bottle of Testor's red model paint. (I also used Testor's white on one newer style logo to complete the match with Weber's current corporate logo.) The Testor's red looks a lot better in my opinion and with my Skyline that had both the red and white model paint, I never noticed ANY paint problem even after many cooks. The caliper paint I used otherwise was a darker red and just doesn't look as good to me. So for me, from now on, I will stick with Testor's and use a modeler/artist's brush to apply.
p.s. Painting the outside and W E B E R white was a royal pain involving many touch-ups. It was a cool finished product for personal use, but NOT really worth all the effort. The red kettle is what matters in my opinion.
SKYLINE WITH RED & WHITE MODEL PAINT
View attachment 6720
Jon, I keep coming back to this picture of the skyline you did. It's beautiful, obviously, but I'm wondering about the handle on the left side of the grill. I really like the way it looks. Do you think it would be ok to put one on a mere platinum series grill? If so, could you share a part # or what kind of grill it went to originally. Was there anything weird about mounting it to that grill. Any feedback is greatly appreciated !I will just throw in that I have experimented with both high heat paint sprayed into a cup and a bottle of Testor's red model paint. (I also used Testor's white on one newer style logo to complete the match with Weber's current corporate logo.) The Testor's red looks a lot better in my opinion and with my Skyline that had both the red and white model paint, I never noticed ANY paint problem even after many cooks. The caliper paint I used otherwise was a darker red and just doesn't look as good to me. So for me, from now on, I will stick with Testor's and use a modeler/artist's brush to apply.
p.s. Painting the outside and W E B E R white was a royal pain involving many touch-ups. It was a cool finished product for personal use, but NOT really worth all the effort. The red kettle is what matters in my opinion.
SKYLINE WITH RED & WHITE MODEL PAINT
View attachment 6720
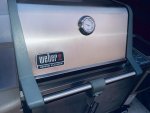
GENESIS SILVER A WITH MODEL PAINT RED KETTLE BUT REST RAW METAL
View attachment 6721
GENESIS PLATINUM WITH CALIPER RED KETTLE AND BARE METAL LOGO
View attachment 6722

