Josh Dekubber
TVWBB Hall of Fame
She also would have thrown this in for a couple bucks but I don't need it. If you do I can try to grab it also?Great deal there.
She also would have thrown this in for a couple bucks but I don't need it. If you do I can try to grab it also?Great deal there.
I would be happy to grab it for you Bruce if you wanted it but looking into it. It looks like they can be found pretty cheapSure. I would take all those I could get at $2-$3 each, but shipping would wipe out most of the savings.
Yes, I paid $18.00 for Weber one from Amazon, so those are a bargain if you have other things shipped from her.Yah, aftermarket ones are about $8 to $9. The weber oem ones are maybe double that, but for you to ship them, it would not be cost effective. I would grab them and keep them for yourself.
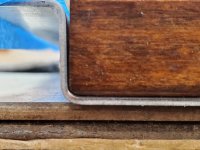
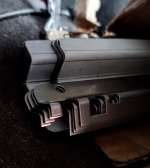
It looks like the length would be fine IF you chamfered the bottom to account for the bend in the Z bar --- it looks like a decent radius in the bend. Looks like there would be some binding from it if you got a good tight fit from the bottom corner of the slat --- it would probably tend to pull on the screws.OK - was feeling a little worried. Did a quick assembly of the bottom rails and here's how mine works... indeed, it's "snug" at 15-5/8." Maybe there's some factory build allowances. I will say that I specifically cut the wood to be tight against the brackets. As you can see in the pics, everything is set in place with no screws. Might be wise to just plan for the 15-1/2"... 1/16" on both sides is a no-brainer to allow for a little fudge factor on any future projects. And, I love your idea of the 1/4" gap in all levels.
View attachment 96226View attachment 96227View attachment 96228
Safer to go with 15 1/2" than make this bottom press fit. The bottom is more about storing some wood chips or misc, so being snug like the top tables you access during the grilling process is more important they don't move around too much.It looks like the length would be fine IF you chamfered the bottom to account for the bend in the Z bar --- it looks like a decent radius in the bend. Looks like there would be some binding from it if you got a good tight fit from the bottom corner of the slat --- it would probably tend to pull on the screws.
Indeed... I've chamfer both top/bottom, which also relieves the bracket's bend radius. For my first attempt, it's nearly perfect and I'm pretty happy with it. When looking at the rescued grills that I have, Weber's version has at least 1/16" space between wood end/bracket, which seems to be only relying on the screw to counteract the forces. Of course, there's always room for improvement and I plan to accommodate a touch bigger chamfer to allow for random tolerances.It looks like the length would be fine IF you chamfered the bottom to account for the bend in the Z bar --- it looks like a decent radius in the bend. Looks like there would be some binding from it if you got a good tight fit from the bottom corner of the slat --- it would probably tend to pull on the screws.

Nice work Chris!Indeed... I've chamfer both top/bottom, which also relieves the bracket's bend radius. For my first attempt, it's nearly perfect and I'm pretty happy with it. When looking at the rescued grills that I have, Weber's version has at least 1/16" space between wood end/bracket, which seems to be only relying on the screw to counteract the forces. Of course, there's always room for improvement and I plan to accommodate a touch bigger chamfer to allow for random tolerances.
View attachment 96281
When are we going to see this Grill?!?I used 1/8” radius router on all the edges including the ends, by the time I hit with 180 on orbital they fit well on Dave’s Z-metals.
I was focused on having no sharp edges and consistency.
David shipped my Z-metal and flip table brackets today. I need to try to finish sanding tomorrow and pick up that air compressor and gun. If I'm lucky I can finish mine by the end of the weekend. Of course my wife has me refinishing vintage furniture in my "spare time".I used 1/8” radius router on all the edges including the ends, by the time I hit with 180 on orbital they fit well on Dave’s Z-metals.
I was focused on having no sharp edges and consistency.
Soon down to drip pan, and putting off because soo messy and not my idea of fun like wood work and paint.When are we going to see this Grill?!?
This is the second and third propane hose/regulator that I've bought from this lady. At $5 a piece. Yes please!
Yeah, just beware if your wife cooks you a mushroom dish from the wild shrooms she said she foraged "just for you"Her husband was probably just like us, then she offed him and is now purging his stash.
Would be hilarious if those propane hose/regulators were form one of the wives of someone here.Yeah, just beware if your wife cooks you a mushroom dish from the wild shrooms she said she foraged "just for you"

