David Pagels
New member
Longtime lurker here (this may be my first forum post ever). But I got excited and had to post after finally fixing my temperature problems. The answer, in short - MAKE AN AIR BURNER!
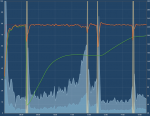
I had previously been using a cat dish with a hole drilled in it for a 1 inch pipe and held it to the WSM with 2 toggle bolts. With this configuration, I was unable to get my temps stable even after 2 years of cooks and burning with an empty cook chamber from time to time to try to figure out my PID settings. I never got it to a place I was happy with. Below is the chart of my best shot, running it on Kingsford Blue with a full water pan last year.

Drilling a hole in my WSM was the main reason I was hesitant about building an air burner. However, through a bunch of looking around I found this post by Ron Van Iwaarden on this forum talking about how he built and mounted an airburner through one of the air inlets on the charcoal bowl of the WSM. The pictures in the post are now missing, but his instructions were clear and thorough enough that with very little deduction, I was able to construct an air burner that didn't require me to drill through my WSM. Sawing out a couple of small pieces off of the charcoal grate to route the pipe through was the only permanent modification I ended up making in this project. I was ok with this due to how cheap a charcoal grate is compared to the bowl itself.


Again, credit for this design goes to Ron Van Iwaarden. Please reference his post for more details on this build. I ended up only deviating on 3 things:


For the holes in the airburner - I started off drilling 13 3/16" holes so that there would be some back pressure. After struggling to reach 325 degrees (with fan at 30% max) on my first burn, I decided to add 2 1/8" holes and one more 3/16" hole to get the cross-sectional area of all of the holes up to 15/16th of the area of the pipe. I also didn't initially ream my pipes. I was curious how much of an impact reaming the pipes would have on airflow, so I built a simple barometer using some water, fuel line, copper pipe (to prevent kinks), and some baker's twine. While not very accurate, I marked the fuel line with tape when the blower was off, when the pipe was completely blocked by my hand (the bakers twine) and saw where the water line settled when running the blower at 100% before and after reaming the pipes. The result was the water got ~2/3 of the way to the fully closed pressure before reaming and ~1/3 after. That's a lot of wasted pressure getting past those rough edges!


After all of that work, the results were fantastic

This was on my 18.5" WSM, using Royal Oak lump charcoal, and using my external heat shield wrapped in foil as a heat deflector (no water) and the blower max set to 30%. Overall, this project ended up costing somewhere on the order of $30 for the pipe and fittings. Everything fit together snugly enough that no lead solder was needed. Special thanks again to Ron, and to RalphTrimble - since seeing him preach (and rightfully so!) about the airburner around the forums drove me to search harder for a no-drill airburner solution. Let me know if you have any questions and I'll do my best to answer! Happy smoking!
I had previously been using a cat dish with a hole drilled in it for a 1 inch pipe and held it to the WSM with 2 toggle bolts. With this configuration, I was unable to get my temps stable even after 2 years of cooks and burning with an empty cook chamber from time to time to try to figure out my PID settings. I never got it to a place I was happy with. Below is the chart of my best shot, running it on Kingsford Blue with a full water pan last year.
Drilling a hole in my WSM was the main reason I was hesitant about building an air burner. However, through a bunch of looking around I found this post by Ron Van Iwaarden on this forum talking about how he built and mounted an airburner through one of the air inlets on the charcoal bowl of the WSM. The pictures in the post are now missing, but his instructions were clear and thorough enough that with very little deduction, I was able to construct an air burner that didn't require me to drill through my WSM. Sawing out a couple of small pieces off of the charcoal grate to route the pipe through was the only permanent modification I ended up making in this project. I was ok with this due to how cheap a charcoal grate is compared to the bowl itself.
Again, credit for this design goes to Ron Van Iwaarden. Please reference his post for more details on this build. I ended up only deviating on 3 things:
- I added a pipe across the center of the square (8 1/4” long)
- I shortened the two 1 3/4" long pipes to 1 1/2" so the burner would sit more level in the bowl (the pipes connecting the 90 degree inlet elbow with the 45 degree elbow and the 3/4" tee)
- I used 3 5/8" lengths of pipe for the shorter runs since 3 1/2" was too short and looked funky when all fit together (8.25" = 2*3.625" - (2.5" - 2*.75") - 2.5" being the width of a 3/4" copper tee)
For the holes in the airburner - I started off drilling 13 3/16" holes so that there would be some back pressure. After struggling to reach 325 degrees (with fan at 30% max) on my first burn, I decided to add 2 1/8" holes and one more 3/16" hole to get the cross-sectional area of all of the holes up to 15/16th of the area of the pipe. I also didn't initially ream my pipes. I was curious how much of an impact reaming the pipes would have on airflow, so I built a simple barometer using some water, fuel line, copper pipe (to prevent kinks), and some baker's twine. While not very accurate, I marked the fuel line with tape when the blower was off, when the pipe was completely blocked by my hand (the bakers twine) and saw where the water line settled when running the blower at 100% before and after reaming the pipes. The result was the water got ~2/3 of the way to the fully closed pressure before reaming and ~1/3 after. That's a lot of wasted pressure getting past those rough edges!
After all of that work, the results were fantastic
This was on my 18.5" WSM, using Royal Oak lump charcoal, and using my external heat shield wrapped in foil as a heat deflector (no water) and the blower max set to 30%. Overall, this project ended up costing somewhere on the order of $30 for the pipe and fittings. Everything fit together snugly enough that no lead solder was needed. Special thanks again to Ron, and to RalphTrimble - since seeing him preach (and rightfully so!) about the airburner around the forums drove me to search harder for a no-drill airburner solution. Let me know if you have any questions and I'll do my best to answer! Happy smoking!
Last edited: