You are using an out of date browser. It may not display this or other websites correctly.
You should upgrade or use an alternative browser.
You should upgrade or use an alternative browser.
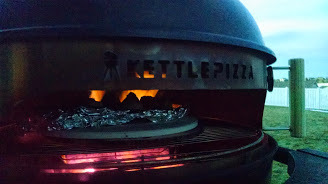
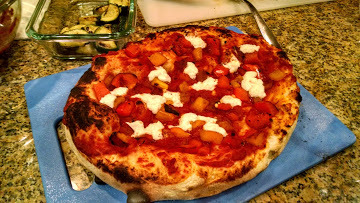
A few photos from first dance with the KettlePizza
- Thread starter Chris Conro
- Start date
")
CaseT
TVWBB Platinum Member
I have learned a few tips and tricks from a friend of mine who is a baker and uses strictly wood fired ovens. He runs his oven in the 700°-1000° range when making pizzas. He hand tosses all his pies and gets them as thin as possible. Use minimal toppings. Each pie should only take 2-3 minutes, with one 180° rotation. In the Mini-ZA I have found that using KBB provides the hottest most consistent fire. When I added a foil wrapped terracotta planter tray above the cooking area this helped radiate the heat back down.
Joe Milczewski
TVWBB Fan
Thanks, Cliff. Do you put the chunks of oak right on top of the lit charcoal, so that they catch fire, or do you have the tombstone shaped stone and the grate that lets you hang a CharBasket at pizza level, like I have? I've thought about using hardwood down at the charcoal grate level, too, but only used wood in the CharBasket on this first attempt.
Great photos, Chris.
I run my KP quite often and love it. I have found the following help get better results:
- I use regular Kingsford briquettes for the base of my fire, not lump. The KP when running hot consumes a TON of fuel. In my experience lump just burns out too quickly, even if it does provide a short boost in heat. I get a good pile of KBB nice and hot and then push them all into the back of the grill in a pile. I use a hinged grill grate, with the section in the back hanging down, so I can push wood across my pizza stone and onto the pile of hot coals as I cook. This is especially useful if cooking more than 2 or 3 pies. I don't use a basket for the coals as I use way, way more fuel than a basket would hold. I burn an obscene amount of charcoal and wood when I run my KP. But what the heck. The good folks at Kingsford will make more.
- To get the temps I want I exclusively use splits of whatever kind of hardwood I have on hand. My rule of thumb is I want the wood pieces I use to just barely fit down through the hinged grill grate. Chunks are ok if they are really big, but splits are much, much better both for duration of their burn but also the heat they provide. If I had access to oak that would be best, but out here in Wyoming the best I can do is mesquite or hickory logs sold at big box stores.
- I heat my pizza stone in the oven (as hot as it will go) for a good half hour before I ever put it in the grill, and I generally don't take the stone out until I am ready to cook... meaning I have let the KP burn for a good 20 minutes or so first and I have a big fire going in the back of it. I am pretty careful not to have hot coals under the stone once it is on the grill. I've learned that the stones can get too hot and will burn the bottom of your pie if you supply a heat source underneath it while it's in the grill. What you want is a hot surface of the stone while cooking, not necessarily a stone heated from below.
- You'll be in great shape with that baking steel over the top of the cooking chamber. What you want is for the flames to come up from your fuel in the back of the grill and lick up against the top of the steel and bend out toward the opening of the KP as the unit draws air. If you see that you have flames flicking across the top of the baking steel you are ready to cook. This is a little unlike normal grilling where we often want greyed out coals without flames. When I cook in the KP I want a roaring fire in the back of that thing. The bigger the fire the better the results.
My photos are junk compared to yours, but this one kind of shows the amount of flame I want in the unit when cooking:
And this is a pizza I did a few months ago. It was just a store bought dough but got some ok spring and charring on the cornichon.
You'll have all kinds of fun with your KP, and this forum is a great resource. I've learned a ton on here about how to approach true woodburning pizzeria results.
Chris Conro
TVWBB Fan
Right on, Joe! I really appreciate all the input, and it sounds like several others will too. There are a number of good suggestions folks have kindly shared with me, so now I'm even more confident I'll crack this nut. Access to hardwood, particulary oak and maple, is not a problem. Thanks again for the excellent feedback, and that goes to all who've chimed in with advice.
Btw, the spring and charring on your pie look great!
Btw, the spring and charring on your pie look great!
Chris, great photos! I don't have a Kettle Pizza setup, but I do have the Camp Chef Italia Pizza Oven that sits on top of a Camp Chef 2 burner Stove. (Xmas gift) Mine also has has a thermometer on top of the dome, but my instructions say to use a inferred thermometer gun so you can keep an eye on the temp of the pizza stone with it, and use the built in thermometer on dome to see the ambient air temp.
The first pizza I did, was nothing shy of Pizza Parlor perfect! Took 2 minutes, rotated once with pizza spinners, and stone temp was 800 degrees. The second pizza was nothing shy of a disaster, as I got a bit cocky from the excellent outcome of the first, and forgot to assemble the pizza on the semolina dusted peel. When I caught my mistake, I was able to drag the pizza on the peel, but the semolina dragged as well, and when I tried to put pizza in the oven, the pizza rolled under itself, and created the biggest hot mess, I've ever seen, or cleaned! But the dog loved the toppings!
Anyway, if you don't already have a IR thermometer gun, to accompany your pizza kettle, I'd get one. With a laser beam. I think I got mine on Amazon on one of their kindle lightning deals for $20. or so. That way, you know exactly what your stones temp is.
Chris Conro
TVWBB Fan
Chris, great photos! I don't have a Kettle Pizza setup, but I do have the Camp Chef Italia Pizza Oven that sits on top of a Camp Chef 2 burner Stove. (Xmas gift) Mine also has has a thermometer on top of the dome, but my instructions say to use a inferred thermometer gun so you can keep an eye on the temp of the pizza stone with it, and use the built in thermometer on dome to see the ambient air temp.
The first pizza I did, was nothing shy of Pizza Parlor perfect! Took 2 minutes, rotated once with pizza spinners, and stone temp was 800 degrees. The second pizza was nothing shy of a disaster, as I got a bit cocky from the excellent outcome of the first, and forgot to assemble the pizza on the semolina dusted peel. When I caught my mistake, I was able to drag the pizza on the peel, but the semolina dragged as well, and when I tried to put pizza in the oven, the pizza rolled under itself, and created the biggest hot mess, I've ever seen, or cleaned! But the dog loved the toppings!
Anyway, if you don't already have a IR thermometer gun, to accompany your pizza kettle, I'd get one. With a laser beam. I think I got mine on Amazon on one of their kindle lightning deals for $20. or so. That way, you know exactly what your stones temp is.
Thank you, Mary. Had to chuckle a bit at your story of misfortune, but only because I've had my share of peel transfer fails in the past (with the indoor oven). The KP setup came with a decent aluminum peel, which was a nice upgrade from my horrible wooden one I've had (and periodically failed with) for a decade. The aluminum one could use a little surface work with some ultra fine sandpaper to remove the brushed finish that adds some friction.
I do have an IR thermometer, though I didn't show that in the photos. On my first attempt, the stone was running about 650 or a little higher, and the baking steel "ceiling" was running hotter than that at first, but considerably cooler after my fuel started dying out. The IR thermometer is fun to play with, and our cats agree!
I recently posted about making a home made pizza kettle out of a food grade steel barrel.
http://tvwbb.com/showthread.php?58401-Home-Made-Pizza-Kettle
I know that baking steel is quite pricey, so for a cheap alternative that is better than aluminum foil, I would suggest looking on Craigslist for someone selling barrels. There are quite a few in my area and I know I can buy a steel lid with no holes for $5. If you even have the basics for metal such as tin snips or an angle grinder, you can cut down the barrel lid to sit on top of your pizza kettle. I am currently using a barrel lid as my top heat deflector and it works way better than I expected. I cut mine so that there is hardly any gap around the edges and the flames draw nicely along the heat steel lid right above the tops of the pizzas towards the front opening. I have had 0 problems getting the pizza tops to cook as fast as the bottom of our pizzas. I also spin my pizzas so they cook evenly all the way around. I find that the edge facing the fire will burn if I don't spin the pizzas.
Chris Conro
TVWBB Fan
Sorry to bump this thread, but I didn't feel the need to start a new one. I took a second stab at the KP tonight and the results were already quite a bit better. For all those that offered their advice and experience, thanks again very much. And for those who originally replied in the thread asking for me to post my progress, I'll discuss what I did differently on the second run that gave better results.
First of all, making pizza tonight was the result of a spontaneous decision, so we did not have all the same ingredients we might normally use for this kind of pizza. The biggest difference was in the dough, which this time was a recipe from the Lodge CI pizza pan I bought years ago: Chef John Folse's Quick Dough. This is a high-yeast dough that can be ready in about 45 minutes start to finish. The dough also contains honey and olive oil, whereas before I was using a slow-fermented lean dough.
The equipment used was the same as shown here, but with a few minor alterations.
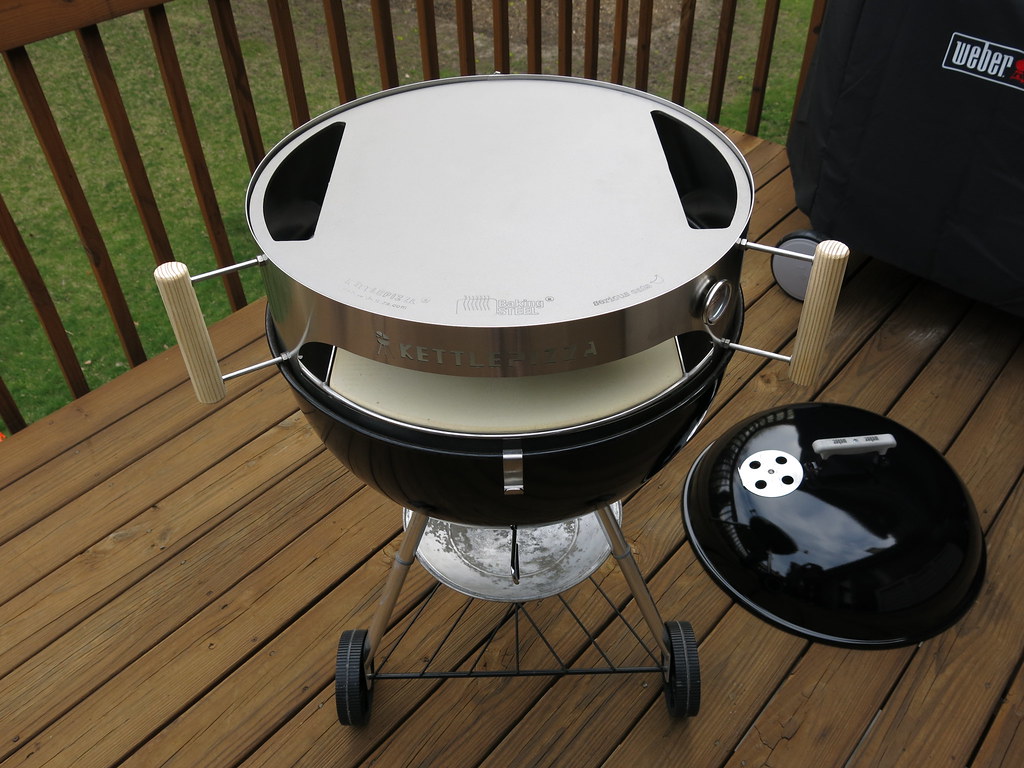
First, in an equally imptomptu fashion, I searched around an found an old cheapo cookie sheet and cut out a couple of small covers for the openings in the baking steel. I left the rims on one edge so that I could lift them with tongs or my welding gloves. The cookie sheet was very thin (cheap), so I put a box-end wrench on each one to hold it in place. Eventually, I will cut a set of steel covers with some small knobs or handles to lift them out of the way if I need to. Second equipment alteration: I did not use the char basket behind the pizza stone this time, though my KP is the version that comes with the tombstone and grate that holds the basket.
This is the procedure I followed, keeping in mind I have the benefit of a second kettle to serve as a holding place for some of these 22" diameter super-hot objects. I used the 22 OTS and the Performer, with all cooking grates put out of the way for this cook. I only needed the second grill because I am on a wooden deck without a lot of non-flammable resting places. If I was on concrete, this would be a non-issue.
I started by preheating the stone in my indoor oven at 500F while lighting the charcoal. I used Weber cubes to light 2 full chimneys of KBB at the same time on the charcoal grate of the 22 OTS. When time to dump the chimneys, I put one full chimney on the Performer charcoal grate while dumping the other into half a C shape along the back and one side of the kettle. I set the empty chimney down on my usual chimney resting place, then dumped the other full chimney to complete the C shape. Next, I put just the baking steel on the 22 OTS with all those hot coals and put the kettle lid on to preheat the steel. Meanwhile, the first of the pizzas was being made in the kitchen. When the baking steel was reading 500-600 with my IR thermometer, I took it off the OTS using welding gloves and moved it to the Perfomer while assembling the KP. Next, I put about 6 chunks of maple (chunks are all I had onhand) on the C shaped coals, placed the KP ring onto the kettle, and still using the welding gloves, moved the preheated pizza stone from the indoor oven to the KP. Next, I moved the baking steel to the top of the KP and covered the openings in the steel with the covers I made. Then capped it all off with the kettle lid. Last item of oven prep was using welding gloves and long tongs to add some more wood chunks to the back and sides of the fire, through the openings around the stone. I don't recommend using the charcoal basket behind the stone. You can easily push wood onto the coals if that basket isn't in the way. Now that this was all done, I had to wait for the wood to burn up a bit and for everything to heat up.
On my first attempt, the KP peaked at about 700F and didn't stay there very long. On this attempt, the KP's internal thermometer was easily pegged, and I was also maxing out my IR thermometer on the stone and the baking steel ceiling. When I was getting readings, they were mostly between 750F - 950F. The convection through the oven was truly wicked - using more fuel and covering the extra openings in the baking steel really helped. Actually, on this attempt, the best pie turned out to be the third and final one, after the heat had subsided a little bit, probably about 750F on the stone and ceiling. The temp was dropping a bit at this point, but if I had timed it differently, I could have made 2 pizzas when the oven was running prime - then added some more wood, waited for it to burn down, then made 2 more pizzas. Considering my first attempt fell a little short of what I was hoping for in terms of heat/duration, being able to overshoot that target on the second attempt made me very happy. The lessons I learned on this attempt were a little smaller this time, so I think when it's time for try #3, I'll really be starting to dial it in.

Second pizza

Third pizza

First of all, making pizza tonight was the result of a spontaneous decision, so we did not have all the same ingredients we might normally use for this kind of pizza. The biggest difference was in the dough, which this time was a recipe from the Lodge CI pizza pan I bought years ago: Chef John Folse's Quick Dough. This is a high-yeast dough that can be ready in about 45 minutes start to finish. The dough also contains honey and olive oil, whereas before I was using a slow-fermented lean dough.
The equipment used was the same as shown here, but with a few minor alterations.
First, in an equally imptomptu fashion, I searched around an found an old cheapo cookie sheet and cut out a couple of small covers for the openings in the baking steel. I left the rims on one edge so that I could lift them with tongs or my welding gloves. The cookie sheet was very thin (cheap), so I put a box-end wrench on each one to hold it in place. Eventually, I will cut a set of steel covers with some small knobs or handles to lift them out of the way if I need to. Second equipment alteration: I did not use the char basket behind the pizza stone this time, though my KP is the version that comes with the tombstone and grate that holds the basket.
This is the procedure I followed, keeping in mind I have the benefit of a second kettle to serve as a holding place for some of these 22" diameter super-hot objects. I used the 22 OTS and the Performer, with all cooking grates put out of the way for this cook. I only needed the second grill because I am on a wooden deck without a lot of non-flammable resting places. If I was on concrete, this would be a non-issue.
I started by preheating the stone in my indoor oven at 500F while lighting the charcoal. I used Weber cubes to light 2 full chimneys of KBB at the same time on the charcoal grate of the 22 OTS. When time to dump the chimneys, I put one full chimney on the Performer charcoal grate while dumping the other into half a C shape along the back and one side of the kettle. I set the empty chimney down on my usual chimney resting place, then dumped the other full chimney to complete the C shape. Next, I put just the baking steel on the 22 OTS with all those hot coals and put the kettle lid on to preheat the steel. Meanwhile, the first of the pizzas was being made in the kitchen. When the baking steel was reading 500-600 with my IR thermometer, I took it off the OTS using welding gloves and moved it to the Perfomer while assembling the KP. Next, I put about 6 chunks of maple (chunks are all I had onhand) on the C shaped coals, placed the KP ring onto the kettle, and still using the welding gloves, moved the preheated pizza stone from the indoor oven to the KP. Next, I moved the baking steel to the top of the KP and covered the openings in the steel with the covers I made. Then capped it all off with the kettle lid. Last item of oven prep was using welding gloves and long tongs to add some more wood chunks to the back and sides of the fire, through the openings around the stone. I don't recommend using the charcoal basket behind the stone. You can easily push wood onto the coals if that basket isn't in the way. Now that this was all done, I had to wait for the wood to burn up a bit and for everything to heat up.
On my first attempt, the KP peaked at about 700F and didn't stay there very long. On this attempt, the KP's internal thermometer was easily pegged, and I was also maxing out my IR thermometer on the stone and the baking steel ceiling. When I was getting readings, they were mostly between 750F - 950F. The convection through the oven was truly wicked - using more fuel and covering the extra openings in the baking steel really helped. Actually, on this attempt, the best pie turned out to be the third and final one, after the heat had subsided a little bit, probably about 750F on the stone and ceiling. The temp was dropping a bit at this point, but if I had timed it differently, I could have made 2 pizzas when the oven was running prime - then added some more wood, waited for it to burn down, then made 2 more pizzas. Considering my first attempt fell a little short of what I was hoping for in terms of heat/duration, being able to overshoot that target on the second attempt made me very happy. The lessons I learned on this attempt were a little smaller this time, so I think when it's time for try #3, I'll really be starting to dial it in.
Second pizza
Third pizza
Last edited:
Nate Frost
TVWBB All-Star
Excellent pies!
Chris Conro
TVWBB Fan
Excellent pies!
Thanks man, I'm chasing the kind of quality that you put out. Yours is some of the advice that's helped me.
Ken Chapman
TVWBB Fan
Great looking pies, Chris. Looks like you've got it figured out.
Chris Conro
TVWBB Fan
Some beautiful photos Chris, that last pic is amazing
Great looking pies, Chris. Looks like you've got it figured out.
Thanks Chuck and Ken. You guys also helped me out with good advice, which is much appreciated.
Now I'm really thinking about trying my own version of Chuck's setup, with the fire burning in the bottom of the 22 WSM, access door removed, KP on top of the WSM center section, baking steel on top of the KP with openings covered, and finally capped off with the kettle lid.
Chuck, does the KP fit into the top rim of the 22 WSM in a stable way? This is something I might be better off trying in the driveway. XD
Ken Chapman
TVWBB Fan
Hey Matt, congrats on the KP purchase. I have a pizza stone that did not come with the KP and its about 3/4 inch thick so I heat it up for a good 20 minutes or so. These things burn a lot of fuel so you will have to find a good balance of preheat time and cook time. The KP also takes some getting used too. so please dont get discouraged if your first pies dont look perfect. Just keep at it and you will soon find a routine that will work for you every time. Make sure you post some pictures of cooks. we need a few more KP threads on here.
Matt H.
TVWBB Super Fan
Hey Matt, congrats on the KP purchase. I have a pizza stone that did not come with the KP and its about 3/4 inch thick so I heat it up for a good 20 minutes or so. These things burn a lot of fuel so you will have to find a good balance of preheat time and cook time. The KP also takes some getting used too. so please dont get discouraged if your first pies dont look perfect. Just keep at it and you will soon find a routine that will work for you every time. Make sure you post some pictures of cooks. we need a few more KP threads on here.
Thanks. do you add the wood before you heat up the stone? I guess I worry i'd burn through the wood before I even get to the pizzas. I have some bigger chunks, but no splits or logs.
Enrico Brandizzi
TVWBB Honor Circle
You are tempting me!!
Ken Chapman
TVWBB Fan
I put down about 3/4's of a chimney of unlit kbb and then add a full chimney of lit kbb then toss in 2 or 3 small splits of wood then put the KP and stone and steel on top. i let it heat up for 15 or 20 minutes then start cooking. When temps begin to fall I'll throw in another split or two, no more KBB and wait for the fire to stop smoking and come back up to temp then cook the rest of the pizzas.
Jim Mathews
TVWBB Member
I put down about 3/4's of a chimney of unlit kbb and then add a full chimney of lit kbb then toss in 2 or 3 small splits of wood then put the KP and stone and steel on top. i let it heat up for 15 or 20 minutes then start cooking. When temps begin to fall I'll throw in another split or two, no more KBB and wait for the fire to stop smoking and come back up to temp then cook the rest of the pizzas.
Above is good advice.
I pre-heat the stone in my kitchen oven for at least 20 minutes, while I am lighting the charcoal. I dump 2 chimneys of lit briquettes into a "C" shape, with the opening of the C underneath the opening of the KP insert. After I dump in the briquettes, I put a fair amount of oak splits on top. Cooking grate and stone go on top (I have the gtrate from KP that lets me insert more wood/duel in the back and side cutouts). Baking steel on top of that, then the kettle lid.
I am still sorking out the timing of when to prepre and cook the pies to take advantage of optimal cooking performance. My results have been inconsistent, but usually pretty darn good.
Good luck. It's one of the most fun accessories.