You are using an out of date browser. It may not display this or other websites correctly.
You should upgrade or use an alternative browser.
You should upgrade or use an alternative browser.
2005 Blue Genesis Platinum
- Thread starter Samuel
- Start date
Samuel
TVWBB Emerald Member
Steve Hoch
TVWBB Olympian
I thought that's what you meant, just asking in case there was something else out there I didn't know about.
Steve Hoch
TVWBB Olympian
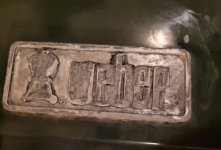
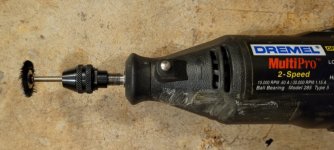
Lol, your dangerous with that dremel tool! Why wouldn't the badge come off? I've only seen where they are held on with those two little round clips that you just have to pry off.Well, I practiced cleaning the Badge with my Dremel tool on the Donor Grill and I scratched it on the top right.
If I am going to do this on the Blue Lid, I am going to have to remove the badge. I tried removing the badge on the donor grill
but I could remove cut screws that held it on.
View attachment 47254View attachment 47255
Samuel
TVWBB Emerald Member
Steve I could not pry them off. I was able get under it with a razor scraper, but I could not lift it up enough to pop it off. I just broke the razor trying to lift it up that way. I tried my screwdriver, but the tip was to thick. I tried my 8 n 1 tool and I could not get under it. I might have tried a knife but I did not want to ruin that.
Is there some kind of trick to getting them off.
Yes that is 2 strikes with the Dremel tool so far. lol
Is there some kind of trick to getting them off.
Yes that is 2 strikes with the Dremel tool so far. lol
Steve Hoch
TVWBB Olympian
They might just be gunked on there. Try cleaning around the nuts and the posts with a wire brush and try again. I usually use a very small flat head screwdriver. I've tried razor blades, and yes they usually break.Steve I could not pry them off. I was able get under it with a razor scraper, but I could not lift it up enough to pop it off. I just broke the razor trying to lift it up that way. I tried my screwdriver, but the tip was to thick. I tried my 8 n 1 tool and I could not get under it. I might have tried a knife but I did not want to ruin that.
Is there some kind of trick to getting them off.
Yes that is 2 strikes with the Dremel tool so far. lol
Samuel
TVWBB Emerald Member
I got it off. Because in my scraper blade kit there was a metal blade that had a sharp edge like a razor but got thick as it went up. So it was a thicker more robust and a stronger blade that I could pry with. Once I got under with that I then got under them with my 8 in 1 tool and then finally with my flat head screw driver. Then while inserted I turned my screw driver up as to bend it up and then I could cut with my pair of Klien Dikes. I did put to small chips in the porcelain where I turned the screw driver under the cut washers. So I did do some minor damage. Thanks for your help. Much appreciated.
Samuel
TVWBB Emerald Member
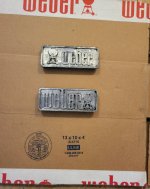
The 2 Badges I ended up with. Blue Lid Badge on Bottom. Donor Lid Badge on Top. The Donor I used high speed on the Dremel. The Blue I used Low speed. My Dremel only has 2 speeds. I may try using paint remover to get the rest of the black off.
As you can see the Kettle orientation on the 2 Badges are different
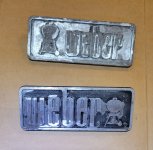
As you can see the Kettle orientation on the 2 Badges are different

Last edited:
DanHoo
TVWBB 1-Star Olympian
@Samuel

 tvwbb.com

Refinishing Weber Emblem
I have a few questions about refinishing the Weber emblem on the older Genesis grills. 1. Do you sandblast or use paint stripper to remove the black paint or just paint over it. Some of it is flaking off in between the letters on mine. 2. What grit of sandpaper do you use to sand off the paint...
Steve Hoch
TVWBB Olympian
It's actually sort of interesting once you start paying attention, how many differences there were in those badges over the years.The 2 Badges I ended up with. Blue Lid Badge on Bottom. Donor Lid Badge on Top. The Donor I used high speed on the Dremel. The Blue I used Low speed. My Dremel only has 2 speeds. I may try using paint remover to get the rest of the black off.
As you can see the Kettle orientation on the 2 Badges are different
View attachment 47256
Samuel
TVWBB Emerald Member
Thanks Dan,@Samuel

Refinishing Weber Emblem
I have a few questions about refinishing the Weber emblem on the older Genesis grills. 1. Do you sandblast or use paint stripper to remove the black paint or just paint over it. Some of it is flaking off in between the letters on mine. 2. What grit of sandpaper do you use to sand off the paint...tvwbb.com
That was just the information I needed.
TomRc
TVWBB Pro
Sometimes the trick to removing something is to put it on even tighter first. I have used a C-clamp and a couple of small pieces of wood to remove an emblem. I center the clamp and blocks over the emblem and shroud and draw it down nice and tight. The blocks are used to keep the clamp feet from damaging the emblem or the porcelain on the back side of the lid. By drawing the emblem in even tighter, it actually pushes the studs in further and gives you a gap on the backside to get a screwdriver or scraper in there to start the removal process on the push retainers.
Last edited:
Jon Tofte
TVWBB 1-Star Olympian
The second one also has the newer "Weber" font where the "b" connects to the outer edge. I actually painted all that white once. Probably never again, because it is a LOT harder than just painting the kettle red. The white looked cool but not enough different from raw aluminum to justify all the extra time and touch ups.The 2 Badges I ended up with. Blue Lid Badge on Bottom. Donor Lid Badge on Top. The Donor I used high speed on the Dremel. The Blue I used Low speed. My Dremel only has 2 speeds. I may try using paint remover to get the rest of the black off.
As you can see the Kettle orientation on the 2 Badges are different
View attachment 47256
Samuel
TVWBB Emerald Member
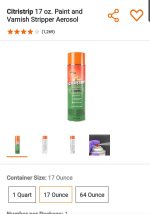
Yes, I left it on for an hour and it had no effect,Samuel, let us know how that works. I think it is powder coat on the badges and normal paint strippers don't work too well.
What I did was sprayed it and wrapped it in foil and put in a plastic bag and there was no difference.
I washed it and reapplied and this time I let sit outside exposed and after an hour at least it gelled up and now has a gel coating on it.
I spread it with a toothbrush and left it outside exposed to the elements.
I think I suffocated the process when encapsulated it. It now seems to be having a chemical reaction but still no paint has been removed.
I am going to leave it as is and check back later on it.
Samuel
TVWBB Emerald Member
Ready For Paint, as good as it is going to get.
After an hour outside in the shade. I brushed it and washed with Dawn and a toothbrush, and this had no effect. The powder coat on blue lid badge which had the most paint did not remove.
What it did do was it softened the paint so I could remove on low speed with my Dremel tool. Before I could only remove this effect at high speed. So, it did soften it, but I still had to use my Dremel to remove paint.
This is the final result of my prep work.


