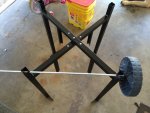
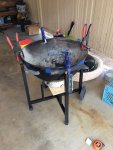
Mini Ranch Kettle build complete


Dustin Flavell

TVWBB Pro
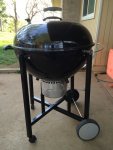
After lusting over the mini-ranch build from a few other members here and constantly complaining about the wobbly legs I decided to build one for my 26er. Over the last few weeks I ordered the parts and today I had the day to finally marry my 26er to the ranch kettle frame. Real happy with the outcome and it is sturdy as all get out. Here's a few pictures of the end result.
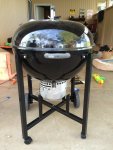
1590851912778.jpeg

1590851959833.jpeg
 
Last edited:
Dustin, after seeing builds that convert the 26" to a Mini RK, Weber should start sellimg a conversion kit. You did a excellent job on your conversion, thanks for the photo story.
 
Awesome job Dustin!! Can you go into some detail as to how you did it?
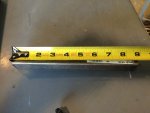
Basically I followed Steve Porters directions to the letter: http://tvwbb.com/showthread.php?56492-Pimp-My-26-75-quot-Kettle&highlight=Ranch+mini I ordered the lower and upper ranch kettle frame from eReplacment parts to start. I purchased the ranch kettle casters from Weber. And bought the hardware needed at HD. I needed 8 5/16 - 18 x 3/4" SS bolts with matching nuts and lock washers, a short piece of 1" square tubing and short piece 3/4" angle. I also bought a piece of 3/16" aluminum round stock for the rear axel. After I had all the parts I cut a piece of the square tubing exactly 8.75" and cut that out of the center of both frame pieces.
1590852234561.jpeg
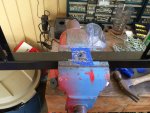
I married the frames back together using the 1" tubing along with the 3/4" angle inside the frame and secured with self tapping screws on the bottom of the frames.
1590852383323.jpeg
To put the two frames together I drilled a hole dead center through both and inserted a 1/4" x 3" bolt I had on hand tightened and then started squaring up all four corners (think 19.75" corner to corner was the number.
1590852491337.jpeg
1590852579967.jpeg
From here I inserted the 3/16" round stock in the frame holes and added the stock 26" wheels. After one side was done I cut the round stock to length leaving enough room to put the cap on. Inserted the casters and flipped it over on the wheels. I used the center sections I cut out and set on top of the frame then placed the kettle on top of those to determine where to drill the holes through the kettle.
1590852709579.jpeg
I did have to tweak the bolt hole tabes on the frame in for the smaller kettle circumference. Check for level, plumbed the frame legs and drilled. Bolted her down, tighten everything up and had a Sierra Nevada pale ale to admire my handy work.
Great job Dustin, the Ranch legs really solidify the 26.75" Kettle!
Thank you Steve! You and Stu G were the pioneers to coming up with a solid solution to the wobbly legs on these 26ers. Thank you! This is my go to favorite Weber and I couldn't be happier with the results. No more cooking on a grill that is 4-5 degrees out of level.

Very nice Dustin. Looks like a job well done.
Yes please share some details
Would this work on 22" OTG.
I don't see why not. Might be a little over kill for these legs on a 22 but it should work. You would have to take more out the middle section and cut the ash pan legs off the frame work but it should be doable. Oh and those bolt hole tabs would need to come in more.
 
Last edited:
Thanks for the details Dustin. A couple of things threw me off on your build. First, I couldn't make out the seam where you cut either of the cross pieces. Second, I didn't see any screws or bolts holding the spliced frame together. Very nice job on the design and the execution.


All that said, I am still a bit unclear on a couple of things.


After I had all the parts I cut a piece of the square tubing exactly 8.75" and cut that out of the center of both frame pieces.


This was from the short piece of 1 inch sq tubing ? Using it as a template/guide ?


I married the frames back together using the 1" tubing along with the 3/4" angle inside the frame and secured with self tapping screws on the bottom of the frames. To put the two frames together I drilled a hole dead center through both and inserted a 1/4" x 3" bolt I had on hand tightened and then started squaring up all four corners (think 19.75" corner to corner was the number.

I'm sure this is either a stupid question or extremely obvious, but, the 3/4" angle fits inside the 1 inch square tubing, and the 1 inch square tubing fits inside the RK frame ? Or does the 1 inch tubing wiggle around in the frame, and you used the 3/4 angle to kind of shim it and make a tighter fit?
 
Thanks for the details Dustin. A couple of things threw me off on your build. First, I couldn't make out the seam where you cut either of the cross pieces. Second, I didn't see any screws or bolts holding the spliced frame together. Very nice job on the design and the execution.


All that said, I am still a bit unclear on a couple of things.


This was from the short piece of 1 inch sq tubing ? Using it as a template/guide ?


I'm sure this is either a stupid question or extremely obvious, but, the 3/4" angle fits inside the 1 inch square tubing, and the 1 inch square tubing fits inside the RK frame ? Or does the 1 inch tubing wiggle around in the frame, and you used the 3/4 angle to kind of shim it and make a tighter fit?

Dave,
The 1" is used as a template to cut the middle out of both stock frame sections. In the end after cutting you should 4 equal length pieces. Yes the tubing and angle slide inside the ranch kettle frame. I used the piece I used for a template to cut out the middle sections and another to cut the same length to be used to marry the second shortened frame together. Remember there is an upper and a lower frame. Both need to be cut down 8.75 inches.

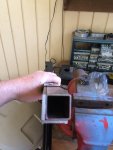
The screws are used to keep the 1" tubing and the angle from moving around inside and securing the two cut from pieces together. I didn't want to weld and paint so I used the 1" tubing and the angle really to marry the pieces I cut to shorten the frames back together. I screwed from the bottom so I wouldn't have to see the screw heads on the top of the frame. Also the lower and upper frame have to be married as well this is the center bolt in the picture below I drilled dead center on the two frames for this part.


I did take a picture of the tubing and angle shoved into one side to the RK frame but it is too blurry to see anything. Below is a picture of setting the bowl on the frame before attaching with the RK frame parts cut to hold at the right height for drilling.
 
Last edited:
Dave here's another photo of the screws underneath

Wish I would have taken more photos, but I was in the grove and the phone was buried under tools and stuff
 
Last edited:
Dustin, thank you very very much. The additional photos and explanation clears everything up for me. This kind of stuff seems to come naturally to some of you all; all you need is a photo here and there coupled with a few words and you clearly get it. For some of us, it's completely Greek. Even with detailed step by step illustrated instructions, we will still have questions ;). As you can tell, I'm definitely in the latter camp.
 
Dustin, thank you very very much. The additional photos and explanation clears everything up for me. This kind of stuff seems to come naturally to some of you all; all you need is a photo here and there coupled with a few words and you clearly get it. For some of us, it's completely Greek. Even with detailed step by step illustrated instructions, we will still have questions ;). As you can tell, I'm definitely in the latter camp.

If you decide to build one (or even if you don't) I would be happy to any more questions you have. Steve Porter's description is what I went off of which was super helpful. The biggest part was having that 8.75" measurement for cutting out the center of each frame piece. From there it was just leveling, drilling and bolting. Here is a link to the lower and upper frame if you decide to build one. http://www.ereplacementparts.com/weber-60020-ranch-kettle-grill-parts-c-193079_193086_193148.html

Yes Dustin thanks much.
Do you know how the 8.75 inch cut was figured? If I do my 22" OTG:D I'll need to calculate that.
Like I said before, NICE JOB

Sherwood, I got the 8.75 inch cut from the two pioneers of this build Steve Porter and Stu G. After doing the build however I'll bet you could set two poles or sticks of wood upright plumb and true to the height where you would bolt the frame to the kettle and get an inside measurement to determine how much you would need to take out of the center. Of course you would need to know the height of the frame with the wheels on to know about how high the kettle will set. I checked my overall height when I was done and from the ground to the top of the bowl lip was 33 inches. Not sure what the standard 22" kettle height is but I believe my 26er was 32 before on the standard legs. If you interested I'll measure from the ground to the top of the frame tonight when I get home.
 
Wow Dustin, I didn't realize you also have a full size Ranch! You the man! That's a lot of cooking acreage you've got available there! I'm still trying to decide what I want to do as far as a shelf or shelves for my mini Ranch. If you come up with something be sure to send pictures. Once again great job!
 
Wow Dustin, I didn't realize you also have a full size Ranch! You the man! That's a lot of cooking acreage you've got available there! I'm still trying to decide what I want to do as far as a shelf or shelves for my mini Ranch. If you come up with something be sure to send pictures. Once again great job!

Yeah a side table would be real handy. Have you seen the side tables brain added to his mini ranch? http://tvwbb.com/showthread.php?60668-**Side-tables-for-the-Mini-Ranch**&highlight=Mini+ranch Great idea but those puppies are expensive new. Would have to find on CL like Brian did. If I come up with something I'll let you know.
 
Dustin very nice job i love how solid it makes that grill.
SO without the grill about how much do have in the parts?
As I may just have to make one of these.


Back
Top