Wire wheel cup brush technique?


JimV

TVWBB All-Star
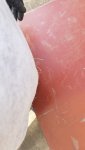
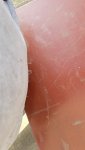
Hello all....so as a few of you are aware I have been stumbling all over myself during my first resto. My latest issue was not removing all of the factory finish off of the cook box prior to painting. My result was a blotchy look...it was textured where the oem finish remained and shiny where my wire wheel took the box down to bare aluminum. Well u guys have me talked into stripping off my high heat and taking the ole gal down to bare metal to save this project. It is rec to use the Harbor Fright brush cup. I have a bin in my shop with several other brush cups which brings me to question number 1.
1. Does it matter how coarse of a brush cup that I use? I think the more coarse cup leaves deep scratch marks so it appears the mid range cup is best right?
2. When using the cup and a drill what is your technique? I was laying the cup at an angle and doing a push pull never using the cup flush because it will just act erratically. So I guess I had the cup at about a 25 to 35 degree angle of attack....is that what u guys do?

3. After removing the oem finish and revealing the aluminum do you do anything to remove the brush cup scratches? A soft cup would prob not leave scratches but a med or coarse certainly does. I feel if I paint over the scratches I will have screwed up again.

4. Last question......my cook box has warts! yep.....it has bumps in the aluminum in a few areas. Should I just take the grinder to those bumps to smooth them out or is there a better way?

Thanks
 
Don't use a cup and a drill buy a real tool. Even a cheap HF angle grinder for $10 will out do even the most expensive drill/brush combo
 
I have learned the hard way that the words coming from Larry’s experience is often true (can’t say always just because I can’t;)) I just about fried my drill trying to use it for a task it simply was not suited for! A HF $10 angle grinder is the cheapest route. I am going to get one when I get my new “curb cut catch basin” fireplace where I want it. I need to grind the paint off the thing and make it look a little nicer, it’s going to be a little while.
But, I digress!
Get the angle grinder and a couple of spare cups ( my next end cap project will go to a media blaster, I’m not that patient)
 
Thanks guys.....I have a grinder...I was just doing a brush cup test with the drill........but none of my questions got answered regarding technique and the level of abrasive-ness of the cups.
So I will def be using the brush cup with my grinder.....
 
Sorry, I just started at the top and worked my way down. Since it was for myself, I got it “pretty clean” then realized it would not look like I’d done it anyway in half a dozen cooks so, I worked the “visible” side more carefully prepped.
If it’s for yourself get it clean on the inside, it does not need to be down to bare brand new looking, like Bruce, Jon, and Stefan get for resale.
Yes, you will not want to use the brush flat. The warts are most likely in the casting itself, you might have a lot of work grinding them to a smooth surface, I would not get too concerned. For me, the end caps are the more visible parts that need work, I went the lazy route and will have to re do them at some point, I just spot worked them which left me with a grill that looks pretty decent from ten feet away. My wife’s son was just gifted the twin to my maroon Genny so, I know what to look for better for him. Since we will have basically 3 lids, I plan on getting 2 sets of end caps blasted and will swap mine out for a “fresh” set!
Does that help?
 
Last edited:
Jim: I have done dozens of grills inside and out with the angle grinder and 4" wire cup brush from HF. I have never gouged the cook box while doing so. A drill will never work well with the wire cup brush as it simply will not turn enough RPMs. You need something in the neighborhood of 10,000 RPM's for it to be effective.
Once have the proper tools, it just takes a little time and experimenting to figure out how to position and move the angle grinder to get it to work the best. I thought I did a video on this a while back but I cannot find it.
You can also get the wire cup brushes at HF for about $4 each. So for under $15 you can have a rig that will do what you need it to....you may need more than one wire cup brush to finish the job however.
 
Yo reduce deep scratches and gouging,use this technique. Apply only enough pressure to make contact with the surface you are working on. Let the tool do the work you will just guide it. As you go over your work area you will see areas that did not clean up ss good as others as you go over these areas again approach from different angles and add a little more pressure where needed to clean tuff spots.
If you have say 3 different cups from fine to very corpse, always start by using the least aggressive and then move up as the job requires.
You maybe able to clean 95% of the fire box with that fine and only need the next step brush for the last 5%. Remember patients and light touch will make your end product much better.
 
Make sure you are using the loose cup brush, don't use the braided or twisted ones. The twisted ones will leave some ugly marks in your cookbox.

The loose brushes are annoying in they will impale your pants, skin and whatever else they end up flying. You'll also find little metal needles everywhere for the rest of your life, lol. My wife always seems to step on them and I hear about it non-stop.
Make sure you wear gloves, long sleeves, pants, dust mask and some safety goggles. I grinded off a good bit of my skin on my forearm once because I was working without my work jacket on. Hurt just a little.
 
To alleviate any questions, here is the rig that most people on this forum use to grind out a Weber cook box.

You can use this coupon to get it for $9.99
ANGLE_GRINDER_WHEN_YOU_SPEND__49.99_1582076209.9349.jpg

And you can use this coupon to get 20% off of it.
20_percent_off_1588350509.8568.jpg

You can be out the door for under $15 and be ready to grind your cook box. (not including protective equipment of course) But HF sells all that too.

If you somehow "gouge" your cook box with this, then you are clearly doing something wrong. It would be hard to leave any "gouges".
 
To alleviate any questions, here is the rig that most people on this forum use to grind out a Weber cook box.

You can use this coupon to get it for $9.99
View attachment 5296

And you can use this coupon to get 20% off of it.
View attachment 5298

You can be out the door for under $15 and be ready to grind your cook box. (not including protective equipment of course) But HF sells all that too.

If you somehow "gouge" your cook box with this, then you are clearly doing something wrong. It would be hard to leave any "gouges".

Don't use any coarser brush than as shown.
I have a heavier-wire cup and it left noticeable swirls that sanded out, fortunately.
But it was no fun having to take the extra step.
 
Good info here for wearing good safe clothes eye,ear,hand protection. Great grinder and brush set up, softer brush is for aluminum, coarse for steel. And as Kyle said you will never get it all.
Final do a good clean up if your garage or outdoor work area so you do not track the dirt and broken wires into your house.
 
If you are willing to splurge a little more, consider this one from Harbor Freight with a little more amps and a "paddle" switch that is safer to use. You can use 20% off coupons on these, and sometimes they have a specific coupon:


I had one of those, but I admit it failed on me. But, it was very nice while it worked. With cheaper tools you sometimes come in on the wrong end of the luck of the draw :confused: .

For another notch up you can go with HF's "Bauer" line which offers pretty decent quality. You can't use 20% off on these, but occasionally it goes on sale or they have a special Bauer coupon. A lot more power and a trigger switch:


Having shown all this, it is entirely true that the $9.99 one will get the job done. It depends if the extra safety and power are worth it to you.
 
One other add to this is that if you spend a little time with some oven/grill cleaner like Sams Club and some house hold stainless steel steel wool, you will cut down a lot on your grinding for the inside of the cook box and end caps.
 
You guys are great and thank you for all of the replies and great advice!!! I dont know how many times I have to say I already have a grinder....but I already have a ggggggggrrrrrrriiiiiiinnnnnnndddddddddddeeeeeerrrrrrrrrrrr :) As noted above I was just using my drill to do some experimenting.
Thank you for posting links and comments about the brush cups that you are using. I got to Harbor Freight tonight at 7:10 pm only to find out that they now close at 7pm :( That is my second strike out for these coveted brush cups....round one they were sold out. I will hit Harbor Freight again tomorrow and get that cook box done this weekend.
Thanks again guys
 
Pictures will be required Jim. Especially the selfie after you grind out the cook box. Those are fun.
Oh, and those $9.99 angle grinders make it real easy to have a backup in the tool box.
 
I will absolutely post pics of this ole green top when I finally finish. I cant wait to have that trophy sit around for a while so I can walk past it and puff my chest out.
I am a retail store setter upper.....I have lots of tools because I can put them on the company card when needed. Sometimes its just because its wanted but dont tell ok? I have grinders of all shapes and sizes......colors.......u name it. I even have a pile of brush cups......but I am on a mission to get me some Harbor Freight brush cups so I can complete my mission.
I will report back soon
Thanks!
 
ok guys I earned my cup brush patch today. For some reason my Harbor Freight always has like one in stock........I bought a 3" and a 4" brush cup. I learned the 3" is the more aggressive monster and the 4" just like u guys said it the softer easier to get along with cup brush. I was unable to get the OEM paint to shed very easily with the 4" so I used the 3" ...NOTE......I am talking about removing the OEM paint from the OUTSIDE of the cook box and the side pieces of the lid.....not talking about the inside of the cook box. So now I understand the danger of using the cup brush on the grinder....I was impaled with about 20 pieces of wire......I tried to take a pic of my shirt....I couldnt believe how many pieces of wire were stuck to me. Once my 3" wheel was destroyed I switched to the 4"......with the 4" I was unable to remove the paint from the outside of the lid side pieces.......Anyway I made a lot of progress today and I am getting close to the painting portion of the game......round two. I know your not supposed to use primer under Rustoleum high heat.....but have u guys tried it? I do see they sell a high heat primerwire wheel 1.jpg for the 2000 degree stuff......but will it play nice with the 1200 degree stuff? I want to prime to hide some of the imperfections. I was able to grind out the wart bumps my cook box had...they smoothed out easily with a flap disk on the grinder. I will see if I can enclose a pic of my shirt with 20 pieces of wire in it..........
 

Attachments

  • wire wheel 3.jpg
    wire wheel 3.jpg
    52.5 KB · Views: 33
  • wire wheel 2.jpg
    wire wheel 2.jpg
    71.1 KB · Views: 30
I had a blasting place do an old (cheap) cast iron hibachi and related parts for something like $30a couple os years ago then used 2000 degree caliper paint on the body, brass bolts for the reassembly, I liked the contrast.
After one season the brass was simply indistinguishable from anything else but, I still know it’s there.
I will let them do two fire boxes and two sets of end caps then simply have the painting part to do. I’m getting to the point where I don’t like picking stray pieces of wire out of my sagging old guy hide! I’ll work “smarter not harder” as a guy that used to build SR-71 Blackbirds once said to me.
 
Jim, we all know about the tiny spears in the clothing after using those brushes. Have you picked any out of your skin? I wind up picking several that are impaled in my arms each time I use the wire cup brushes.
Clearly, grinding away the factory paint from the outside of the cook box and end caps is tedious and relatively hard work, but it sounds like you still had more trouble than normal for some reason.

As far as the primer goes, I am sure it will be OK to use, but it is probably not going to have a lot of benefit. The Rustoleum high heat paint is designed to be used without primer. Just make sure the piece is cleaned well ahead of time and a prep with a solvent is a good idea as well.


Back
Top