The Adapt-a-Damper - Open Source Project


Hey Gang!
I have just printed and built one of these

I have a slight issues with my servo/case, in that it won't shut completely at 0% fan.

I have tried adjusting the servo. But as soon as it is powered up, it jumps 'open' again.

Made we wonder if it was designed to be slightly open at all times

Thanks
Aaron
 
It was not designed to be slightly open.

Best procedure IMO is to start with lower uS setting at 1000 and upper uS setting at 2000 (the defaults). Follow these steps ...

1) Remove the top disc from the servo, along with the horn by removing the screw
2) In manual mode on the heatermeter, set the fan speed to 100% (Fully Open)
3) Re-attached the top disc with horn onto servo so it is positioned to as close to fully open as possible.
4) If necessary, adjust the upper uS number up or down to exactly 100% open.
5) Set heatermeter fan speed (output) to 0%
6) Adjust the lower uS number so the damper is fully closed.

This sets your servo in the middle of it's bandwidth, which is the safest position.
 
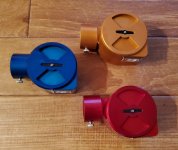
Question. I can do a 3D printed (plastic) version of the alum-a-damper if there is enough interest. It would do away with the box the original Adapt-a-damper has. It would be a standalone without other options, but could be printed in less parts. I would do a integrated keystone insert instead of the screw in part as in the alum-a-damper.

Is there enough interest? All will be shared to print as you please.
 
Wow..... that's some pretty impressive work.

There is something to be said for the integrated insert. Speaking personally, as long as I could find screws with the right thread, I wouldn't have a problem going that route either.
 
Wow those look so pretty! I was actually thinking about redesigning the body to take a small PCB that would take the same ethernet jack as on the HeaterMeter and have pinheader footprints for the servo and fan, along with a couple capacitors. I think the punchdown has a high chance of making a poor connection because the wires are stranded and we're shoving two wires in the GND which needs to be a good connection. I think the circuit board and ethernet jack would still cost less than buying keystones and would be a lot easier to assemble. I like how you put it tangent to the body like that, it looks a lot more integrated.
 
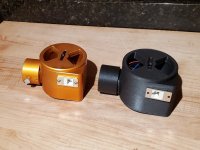
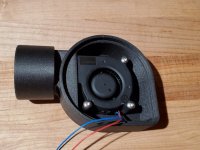
Printed some plastic Alum-a-Dampers. HAd to spend some time getting print settings right so things fit snug. Still need to incorporate an integrated keystone jack on the print, but I really like these inserts by L-Com. Pretty good price for a 25 pack. ONe deviation from the Adapt-a-Damper is that the fan is now mounted via 4mm screws into the body.

Damper 1.jpgDamper 2.jpg
 
Wow those look so pretty! I was actually thinking about redesigning the body to take a small PCB that would take the same ethernet jack as on the HeaterMeter and have pinheader footprints for the servo and fan, along with a couple capacitors. I think the punchdown has a high chance of making a poor connection because the wires are stranded and we're shoving two wires in the GND which needs to be a good connection. I think the circuit board and ethernet jack would still cost less than buying keystones and would be a lot easier to assemble. I like how you put it tangent to the body like that, it looks a lot more integrated.
Love the Idea would like to test it out if you design the board these connections always haunt me.
 
I just got on Thingiverse to download the latest files. Wow, I didn't realize their website was so badly broken. I was able to get them, but searches and many site functions are inop. @WBegg - you may want to find a different repository.
 
Last edited:
Searches on Thingiverse have always been broken.

Use the Google search tool function to search. For example, I was there yesterday looking for some shop light mount brackets. And the search for "shop light" turned up ZERO hits, which I thought was odd. So I used the Google Site search feature, like this:

Site:www/Thingiverse.com/ shop light

And there they were.

Tom

PS: That works for any website. It will search the entire site and pass back the results.
 
I have one of the roto dampers with the thermo couple board and 2 temp probes are on the side of it. The box that they are in has started to break...the layers are pulling apart. I also apparently back drafted into my damper and melting a few of the fan blades. I have had issues in the past getting and holding temp with my Wide body vertical offset smoker. I was thinking, a 120mm metal computer case fan will be able to push more air into the fire box...my question is would that be too much air? I have started to play around with fusion 360 and tinkercad to try to drawl something up...but still learning.

Also are the files to print the board holder to the side available? I will be getting a 3D printer in the very near future and figure it will be something I can get setting nailed down on and with it not being a big piece won't have to use a lot of filament if I have to print a couple to get the right.

Thoughts? Thanks all.
I suggest you look at teaching tech for printer tuning:


Amazing advice for tuning and troubleshooting. Also a lot of reviews on upgrades. Not sure what printer you are getting but the Ender stuff is spot on (speaking from experience)
 
I concur on Creality (Ender 3/5/C10S) products. Good stuff. A bit tough with ABS, but there are surfaces and settings to go to. I bought a $2,000 printer 7 years ago, and it comes no where near what new affordable printers can do. Go up a few responses and look at the black damper. That was done with a Creality Ender 3 Pro. In PLA of course, but the print is perfect. That's a $200 printer. An open printer is not going to do ABS without some modifications. Case printing is fine in PLA, but the Damper needs to be printed in ABS or a filament with a higher heat rating.
 
Last edited:
I concur on Creality (Ender 3/5/C10S) products. Good stuff. A bit tough with ABS, but there are surfaces and settings to go to. I bought a $2,000 printer 7 years ago, and it comes no where near what new affordable printers can do. Go up a few responses and look at the black damper. That was done with a Creality Ender 3 Pro. In PLA of course, but the print is perfect. That's a $200 printer. An open printer is not going to do ABS without some modifications. Case printing is fine in PLA, but the Damper needs to be printed in ABS or a filament with a higher heat rating.
Have you printed with PETG? It's highly resistant to heat and UV. A great middle ground between PLA and ABS. It prints just as easy as PLA but structurally much stronger. I have been really impressed with the results
 
Have you printed with PETG? It's highly resistant to heat and UV. A great middle ground between PLA and ABS. It prints just as easy as PLA but structurally much stronger. I have been really impressed with the results
Forgot about PETG. Sorry. It will still quiver under heat of a WSM 18" heat source if things go wrong. Great for cases that get a bit of Vitamin D abuse, and certainly has a much better heat tolerance than PLA. It will print better than ABS, and maybe under certain circumstances, it may be a better solution for small open frame printers that can't print ABS or ASA. Still, **** is gonna melt if the temp get's high. Oddly enough, the lowest temps in a grill/smoker is below the coals. Right where you want to put the O2. I think some people miss that.
 
Are the files for HXT900 servos publicly available? Looks like they would be easily available in Europe and I wouldn't want to deal with bad SG's again.
 
I modeled it from scratch in OpenSCAD to fit the HXT900 I got from HobbyKing. I can post the source file if needed but I'd have to edit it to include the library functions I use so just posting the STL is easier. This is both the dial and top case in one STL that will need to be split in the slicer software into individual parts (and rotated).
 

Attachments

  • adapt-a-damper-HXT900.zip
    27.7 KB · Views: 19


Back
Top