OK. I just checked that I only need the 2 wire fan: "If you have a third blue wire on your fan (RPM sense) just cut it off as HeaterMeter does not provide RPM monitoring. A little heatshrink tubing makes a really nice connection." The F00 designation is for the tachometer wire. Delta does not list an R00 designation, but it could be a revision. The A version is two wire. I ordered the one from digikey.
You are using an out of date browser. It may not display this or other websites correctly.
You should upgrade or use an alternative browser.
You should upgrade or use an alternative browser.
The Adapt-a-Damper - Open Source Project
- Thread starter WBegg
- Start date
Bryan Mayland
TVWBB Hall of Fame
Yeah F00 is RPM sense and R00 is Rotation sense. The standard blower comes in these configurations as well, but doesn't have an "-A" version, which is what I was confused about. It might indicate something else non-functional, like ROHS compliance or something. Delta lists R00 as "Rotation detector o/p - R00".
It cracks me up because the powerpoint presentation that's in says the objective of the powerpoint is to "Cover the optional functions of Delta fans" and lists the 3 options. Then it just says, on a page labeled "Original (sic) Functions", that the options are (lists the 3 options again). Oh that clears it up, thanks guys. /rolleyes
It cracks me up because the powerpoint presentation that's in says the objective of the powerpoint is to "Cover the optional functions of Delta fans" and lists the 3 options. Then it just says, on a page labeled "Original (sic) Functions", that the options are (lists the 3 options again). Oh that clears it up, thanks guys. /rolleyes
That works great! Thanks for all your help. I still have one problem. My old graphite fitting for the roto-damper won't fit this. When my fire temp gets above 500F, the temp of the metal mounting tube gets up to ~300F and the rectangular to circular adapter softens and sags due to the weight of the blower hanging off of it. That was why I had a machinist friend make me a graphite adapter for my old roto-damper.
I was wondering if anyone has any 34mm OD carbon fiber tube (about 2" long). That would withstand high enough temperatures (with a couple of pipe clamps inside and outside of the mounting plate to hold it). It also would not conduct the heat into the rectangular to circular adapter and soften it.
I was wondering if anyone has any 34mm OD carbon fiber tube (about 2" long). That would withstand high enough temperatures (with a couple of pipe clamps inside and outside of the mounting plate to hold it). It also would not conduct the heat into the rectangular to circular adapter and soften it.
Hello world! first post.
I have ordered everything to make a headless HM and an adapt-a-damper and I am very excited to put this on my grill. I have been lurking the forms for the past few weeks and could find anything on the below topic.
I am looking to make an all in one HM-adapt-a-damper design using a pi zero w. I am hoping to integrate the boards into this design but wanted to ask if anyone has done something similar or has any suggestions. I am a mechanical designer and have my own 3d printer so i am willing to prototype but why make a wheel three times and definitely don't want to reinvent it.
best,
Here's a video of a bit of CNC, machining the bottom of the Alum-a-Damper. It's sped up quite a bit.
Alum-a-Damper Video
Alum-a-Damper Video
Last edited:
Michel Kraaij
TVWBB Member
Okay, now i'm officially jealous... 

AlexKendall
New member
Hi all. Newbie question. I have a friend who can 3D print the damper case but I want to be certain I tell him the correct files to print. I'm looking at the Thingiverse site and it's not totally clear to me. I would like the threaded case design. I have two questions:
1. I see it references the MG90s servo in the file name. Does that mean I can only use that servo with that style case?
2. Minus the adapter, which files do I need for the threaded design? Here's my assumption:
TopCase_MG90S_Threaded.stl
BottomCaseBox_V2.stl
BttmCase_MG90S_Threaded.stl
TopDamper.stl (this one I'm not 100% certain on)
Hi all. Newbie question. I have a friend who can 3D print the damper case but I want to be certain I tell him the correct files to print. I'm looking at the Thingiverse site and it's not totally clear to me. I would like the threaded case design. I have two questions:
1. I see it references the MG90s servo in the file name. Does that mean I can only use that servo with that style case?
2. Minus the adapter, which files do I need for the threaded design? Here's my assumption:
TopCase_MG90S_Threaded.stl
BottomCaseBox_V2.stl
BttmCase_MG90S_Threaded.stl
TopDamper.stl (this one I'm not 100% certain on)
I read a comment here to use the SG90 servo, various issues with the MG's. If you bought the delta fan with the kit & get decent quality servos, the default settings seem to work for me ok, so far. Just got my fan together today.
Bryan Mayland
TVWBB Hall of Fame
Yeah there are a lot of different parts there for different configurations and components. You need 1x BottomCase, 1x TopCase, 1x BottomCaseBox, 1xDisc/TopDisc, 1x Adapter. I think the two Threaded count as the topcase and bottomcase, then you just need the disc and the bottomcasebox and adapter. MG90s does refer to the servo that it is designed to fit so that must be used. The SG90 has slightly different dimensions. The SG92R and HXT900 9g servos also have different dimensions so be aware of that if you're looking at servos. I've only used the non-threaded versions though so I am only speaking from that experience.2. Minus the adapter, which files do I need for the threaded design? Here's my assumption:
TopCase_MG90S_Threaded.stl
BottomCaseBox_V2.stl
BttmCase_MG90S_Threaded.stl
TopDamper.stl (this one I'm not 100% certain on)
Short answer though, I think just drop TopDamper and add TopDisc_2Hole and an adapter, and get an MG90S servo.
AlexKendall
New member
Thank you Bryan. You have been very helpful!Yeah there are a lot of different parts there for different configurations and components. You need 1x BottomCase, 1x TopCase, 1x BottomCaseBox, 1xDisc/TopDisc, 1x Adapter. I think the two Threaded count as the topcase and bottomcase, then you just need the disc and the bottomcasebox and adapter. MG90s does refer to the servo that it is designed to fit so that must be used. The SG90 has slightly different dimensions. The SG92R and HXT900 9g servos also have different dimensions so be aware of that if you're looking at servos. I've only used the non-threaded versions though so I am only speaking from that experience.
Short answer though, I think just drop TopDamper and add TopDisc_2Hole and an adapter, and get an MG90S servo.
Yeah there are a lot of different parts there for different configurations and components. You need 1x BottomCase, 1x TopCase, 1x BottomCaseBox, 1xDisc/TopDisc, 1x Adapter. I think the two Threaded count as the topcase and bottomcase, then you just need the disc and the bottomcasebox and adapter. MG90s does refer to the servo that it is designed to fit so that must be used. The SG90 has slightly different dimensions. The SG92R and HXT900 9g servos also have different dimensions so be aware of that if you're looking at servos. I've only used the non-threaded versions though so I am only speaking from that experience.
Short answer though, I think just drop TopDamper and add TopDisc_2Hole and an adapter, and get an MG90S servo.
yeah, I printed the SG90 optioned parts @WBegg has on the thingiverse page
")
SMALL update!Hello world! first post.
I have ordered everything to make a headless HM and an adapt-a-damper and I am very excited to put this on my grill. I have been lurking the forms for the past few weeks and could find anything on the below topic.
I am looking to make an all in one HM-adapt-a-damper design using a pi zero w. I am hoping to integrate the boards into this design but wanted to ask if anyone has done something similar or has any suggestions. I am a mechanical designer and have my own 3d printer so i am willing to prototype but why make a wheel three times and definitely don't want to reinvent it.
best,
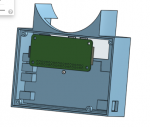
I have received all my heater meter parts and am about 3/4 the way to my initial design. Still lots of prototyping to do but happy with where my MicroHMDamper project is going.
This case would fit directly onto the adapt-a-damper design and include the base board and a pi zero w. Back has been removed for visibility.
EDIT: board housing is approx 100mmx75mm for scale
Attachments
Very Nice!! Great to see it coming along. Keep us informed on the progress.SMALL update!
I have received all my heater meter parts and am about 3/4 the way to my initial design. Still lots of prototyping to do but happy with where my MicroHMDamper project is going.
This case would fit directly onto the adapt-a-damper design and include the base board and a pi zero w. Back has been removed for visibility.
EDIT: board housing is approx 100mmx75mm for scale
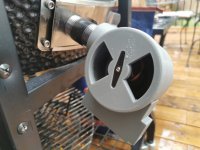
Made this really simple adapter for my Brinkman smoker to attach the adapt-a-damper with a stainless steel blank plate for a light switch and a 1" NPT nipple. Very easy to make, took about 30 min. Still need to bash it flat to seal gaps better but was able to smoke a ham for about 6 hours without issue. Amazing first run of this great system!
Should fit visions and Green eggs as well

Should fit visions and Green eggs as well
Attachments
Last edited:
I think a fully dimensioned drawing would be most useful. STL's are terrible to edit and not many folks will have access to the paid version of fusion360. Personally when designing my all in one case this would have come in handy. I just printed your case and took dimensions but would have had an easier time if I could have seen all your clearances to get a better mating part.
Either way its a great design and worthy of new ideas and investment from a fresh perspective!
Either way its a great design and worthy of new ideas and investment from a fresh perspective!


