Refinishing Weber Emblem


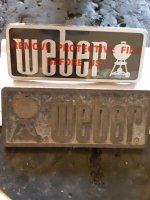
Lots of responses to my reminder on threading the studs as an option and I won’t claim it as a better option over another. I can’t fathom how quickly we got caught up into the structural integrity of aluminum and the horrors of dissimilar metals along the way, though. I’m just thinking out loud, but does it really matter that much? How many times are we going to refinish the same emblem that can be bought new for $15? Would it really be such a bad thing to snap a stud off 5-6 years from now on a badge that we have already refinished once? At some point, we’ve got to reach a point of diminishing returns with that poor little slab of aluminum. Anyways, I will share my thoughts behind using the threaded method. If you’re refinishing a logo for you personal grill, you can stop reading now as the rest of my diatribe would not apply to your needs. Having said that, perception is reality when it comes to flipping and selling grills and that is what moves the needle for me. I turn over 30-35 grills a year on everything from the most basic of refurbs all the way up to top of the line high dollar restorations. Being able to point out to a potential buyer that I am threading the studs and using stainless fasteners where someone else might just be using push clips or slapping some RTV on there adds perceived value and plants the seeds of an additional sense of quality in what I am offering beyond any other work they can already see that has been done to one of my grills. I’ve chosen those words carefully and am dissing on both other methods purposely when I use them to add value to my own product and methods. This is also the same reason I use new emblems more often than not on anything more than a basic refurb. Yes, new emblems do cost $15, but when the customer sees that new badge with the clear “peel before use” cover still on it, they feel like they’re getting something new beyond just an emblem and I can sometimes command an additional $30-$50 in the sale without having to waste time and consumables refinishing an emblem. For this reason, even the new emblems get the threaded stud treatment in my shop as well. It’s a double-whammy of perceived value. As a consummate salesman, I love to see the mental side of the sale unfold in a customer’s mind, particularly when they go from “interested” to “wanting” what I am offering with these little value-added details. It makes me smile to think of some dude buying one of my grills and lifting the lid to brag to his buddies about the same threaded badge and stainless fasteners I sold him on. If you’re selling grills, don’t knock these techniques until you try them is all I’m saying. Sure, it’s a hobby...but that doesn’t mean we can’t make some money once in a while, either.
 
Hi Tom! Just a gentle reminder that the topic is "Refinishing Weber Emblem " (as opposed to buying new. I'm not implying that you are off-topic!) and that a $15 emblem today will in all likelihood become NLA at some future point.

I'm certain that the early Weber emblems with TM instead of ® are NLA already and may not make a hill of beans to a rehabber but to those of us that like to reminisce about the good ol' days it makes us feel good to preserve as much as we can for as long as we can.
 
Last edited:
Tom,
I think your idea is VERY respectable. I am still mulling it over but being upside down as I am in grill parts and tools, it is easy for me to stay the course for now. I do think it has a very classy feel about it. I would also have to say a person is probably as at great a risk of scratching porcelain trying to take off the OEM holders as they are unscrewing one of your nice bolts. I guess the silicone method wins on that issue.
 
Hi Tom! Just a gentle reminder that the topic is "Refinishing Weber Emblem " (as opposed to buying new. I'm not implying that you are off-topic!) and that a $15 emblem today will in all likelihood become NLA at some future point.

I'm certain that the early Weber emblems with TM instead of ® are NLA already and may not make a hill of beans to a rehabber but to those of us that like to reminisce about the good ol' days it makes us feel good to preserve as much as we can for as long as we can.
I'm not going to argue with anything that Tom has said, he brings up some good points. Personally, I like the older badges better than the replacements that are being sold currently. The older badges are physically larger than the new ones which I find more attractive when comparing the two. The other thing I discovered is that the first one I refinished actually looked nicer than the new one as far as paint quality and the polish of the bare aluminum. It's a win win in my book. As far as reattaching it goes, I just use the factory style clips. I can definitely see the advantages of the other methods however.
 
I rather enjoy redoing the badges on my rehabs. It just takes minutes and I don't think any of my grill buyers realized they were not new.
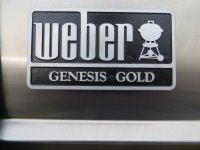
Here is one I did last year on a rehab. I don't have a before picture, but the grill was about 15 years old.20210330 Genesis Gold C - SS (9).JPG
 
The only problem I have with redoing badges is that it seems like every time I rehab a grill, I get all done and get ready to take pictures for the listing and then realize that I forgot to do the badge. Like I said, it only takes a few minute, but I have to wait for the paint to dry before I start man handling it to put it on the grill. I keep telling myself that I should just spend an afternoon doing a dozen or so of them all at once and have them ready to go. But, while keep telling myself that, I keep ignoring myself as well.
 
Can someone post a side by side of the new vs old badges?

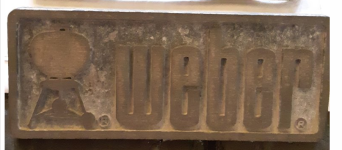
This is a picture that I believe was provided by @DanHoo of the badge on his blue lid showing the TM next to the kettle. Also, notice the kettle is offset to the right, away from the border.

1648009313041.png

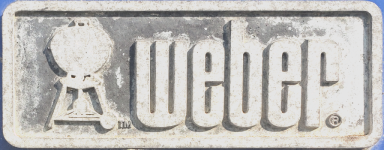
This is a picture of the badge provided by @Steve Hoch above. Note that the kettle is to the left and the TM has been replaced by the ®. Also, the Weber font is slightly different, as I found when I overlaid one badge with the other.

1648009551884.png

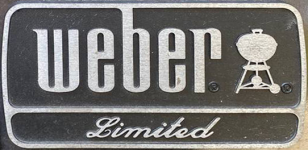
And I'm going to add this one here, probably the most unique Weber badge we've seen so far. If you come across a badge like this, please preserve it.

Weber Limited.png

It's just something for Weber collectors to nerd out about.
 
Last edited:
This is a picture that I believe was provided by @DanHoo of the badge on his blue lid showing the TM next to the kettle. Also, notice the kettle is offset to the right, away from the border.

View attachment 47689

This is a picture of the badge provided by @Steve Hoch above. Note that the kettle is to the left and the TM has been replaced by the ®. Also, the Weber font is slightly different, as I found when I overlaid one badge with the other.

View attachment 47690

It's just something for collectors to nerd out about.
That's why I think it's a shame to throw away the old ones, there are many variations and they can't really be replaced.
 
Has anyone here gone rogue and painted the background something other than black? Thinking about doing it on mine.
 
I am not sure on the back ground, but several have painted the kettle on the emblems red.
 
anybody still watching this thread? i have a badge with the grill on the right, and a badge with the grill on the left. both from SSPs. one has some surface corrosion on the silver parts. 0000 didn't seem to do anything. what's next? sandpaper? also, is there a push nut size that fits these? went to ace and HD and couldn't find anything that would work...
 
anybody still watching this thread? i have a badge with the grill on the right, and a badge with the grill on the left. both from SSPs. one has some surface corrosion on the silver parts. 0000 didn't seem to do anything. what's next? sandpaper? also, is there a push nut size that fits these? went to ace and HD and couldn't find anything that would work...

I used 220 wet/dry sandpaper on my older logo badges. I use a full sheet on a solid surface and move the logo around on the sandpaper as if it were a sanding block.

The push nuts for the logo on genesis lids are in this posting

 
What you want to do is clean them up as best as you can. Strip all the paint if it isn't in good shape. If it is leave it even if faded or stained. Then spray the whole front and edges of the badge with Rustoleum High heat Ultra black. Then, let it dry overnight. Then grab an orbital sander and sand the face of the badge until all of the lettering is removed of paint. It will look brand new. I just finished up this one this morning.
 

Attachments

  • 20230516_130738.jpg
    20230516_130738.jpg
    290.2 KB · Views: 9
Paint them all in black and then sand off the face.

Chris did a great "HOW TO" on refinishing the emblems.

 
And don't bother with those little push nuts. Just use a little dab or two of red RTV Silicone. Degrease the back of the emblem and the lid. Put a few dabs of the RTV and smoosh it on there. It will hold perfectly and if you ever need to take it off slide a plastic putty knife behind it.
 
I used 220 wet/dry sandpaper on my older logo badges. I use a full sheet on a solid surface and move the logo around on the sandpaper as if it were a sanding block.

The push nuts for the logo on genesis lids are in this posting

#10 bolt retainer...hmm. i'll go look again. pretty sure my ace and the nearby HD didn't have anything like that. if not, i'm fine with RTV. it's just for my daily driver.


Back
Top