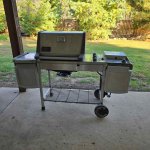
I will just leave this here


I have thought long and hard about how a black lid, w/ silver end caps, black control panel & side burner, grey knobs and black end handles would look on an SS frame.
 
It looked rough in the pics for the ad. I was hopeful the dirt was keeping it from fade. When I saw it in person I fell in love! The frame was shot but the rest was in great shape. Greasiest inside I’ve ever seen. Was at a beef farm so I assume it cooked a lot of red meat!
 

Attachments

  • IMG_7341.png
    IMG_7341.png
    736.1 KB · Views: 8
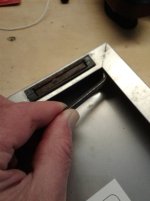
So last weekend I finally dealt with the magnets on the SS doors of my Spirit B that were horribly rusted - Josh had gifted me some door off of a Silver B with magnets that were perfect (huge (y)) ..... I never knew/noticed that the magnets on a Silver B were at the top of the door and the ones on a Spirit B were at the bottom --- no big deal - I'll just flip them over and it will work..... Well, when I finally got around to dealing with it I realized that the handles on the ones Josh gave me were all rusty and crappy while mine were perfect - so that meant I would have to swap out the magnets. I don't know how many of you have tried to get those magnets out of the cutouts in the doors without damaging them - but damn its not as easy as you would think - I couldn't get my finger in behind the formed edge to release the latch...... I finally figured out that I could use an allen wrench to pull on the latch and lift it out with my other hand finger... I hope this help somebody that has to do this.

20241013_154430.jpg

Got the GOOD magnets installed and thought it would make a big difference, but sadly it didn't - its still not a really strong holding force to keep the doors closed..... But I feel better for at least trying and I made sure to spray the magnets down with some WD40 to hopefully keep them from rusting out.

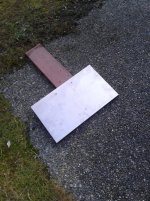
So...... now I have two scrap doors that I can use for something..... Today I got around to doing something with them..... So you start with a door......

20241022_165835.jpg

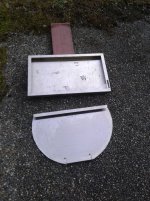
And you use your grinder with a cutoff wheel and make this.......

20241022_170309.jpg

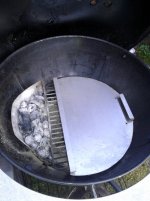
So that you can have this....

20241022_165859.jpg

A redneck sloNsear for the kettle! Its not perfect --- I had actually planned on using BOTH doors to make it, but the one door came really close to what I needed. I'm gonna give it a try with some whole chickens this week to see how well it works and decide if I need to cut up the other door to make it 'betterer'. I'm thinking I can cut a piece that will angle up and hang on the top of the coal basket and butt up against the formed edge nicely if I need to.

Gotta luv having 'opportunity stainless steel' !!!!! And I'm so happy to have survived cutting a circular cut with the cutoff wheels of death.
 
Last edited:
Great use for those scrap SS doors. I have quite a few of them but I don't do coal. Probably too thin to make a skillet out of, hmmmmm.......
 
First time I have seen a SS Platinum with no cabinet and a wire rack bottom other than the ones on this forum that have been rehabbed. Did the grill come from the factory with an open cart option?


1729649425377.jpeg
 
Honestly --- I think that is the PERFECT grill.... I would feel compelled to paint the rack with a grey just to make it match better --- it would sooth my OCD.
 
Oh, by the way. Just in case someone or several out there are looking at that rehab and wondering what in the heck I added in the front and rear cross members for. I honestly can't remember what I was thinking on that. It was fairly early on in my rehabbing hobby so maybe I didn't realize that the wire rack alone would have provided all the support needed making the front and rear cross members over kill. Or maybe I simply put the cross members in before I decided I was going to put in the wire rack. I honestly don't remember the process. It was 5 years ago and many rehabs ago.
 
Oh, by the way. Just in case someone or several out there are looking at that rehab and wondering what in the heck I added in the front and rear cross members for. I honestly can't remember what I was thinking on that. It was fairly early on in my rehabbing hobby so maybe I didn't realize that the wire rack alone would have provided all the support needed making the front and rear cross members over kill. Or maybe I simply put the cross members in before I decided I was going to put in the wire rack. I honestly don't remember the process. It was 5 years ago and many rehabs ago.
Probably added good strength. More than just the rack alone
 
Those racks actually add a LOT of stiffness to the frames --- much more than the flimsy 'cabinets' do. Braces are always good, but I would say they are overkill with the racks --- you'd be better off using Z bars and trex if you put in the braces.
 
You are right Tom, there is wobble when rolling it around. What I meant by some stability is that at least it secures the legs from bowing out and thus ruining the squareness of the frame. Only time will tell if the wobble will effect the welds at the top of the legs and frame.

One mistake I did make in removing the back panel was I lost the bolts that went into the frame. Only after did I realize those bolts secured the connection between the top and bottom parts of the frame. I need to get replacements and put them back in.
 
Last edited:
I’m contemplating welding all bolted joints solid, and adding gussets to eliminate/help the wobble effect, since it will be going in and out of the garage each use. I think I came up with a way to do it in the front, behind the lower cookbox shield with minor modifications needed to that panel. Enjoy my beautiful photo editing skills 🤣
 

Attachments

  • IMG_7828.jpeg
    IMG_7828.jpeg
    122.3 KB · Views: 10


Back
Top