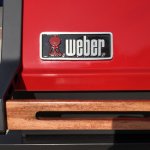
HOW TO: Restore The Weber Emblem


Chris Allingham

Administrator
Staff member
WHAT: This is a How To on how to restore the emblem on a Weber gas grill lid.

WHY: To restore the emblem to like-new condition.

WHAT YOU NEED:
  • Basic tools like straight-blade screwdriver and needle-nose pliers
  • Stiff bristle brush
  • Solvent like lacquer thinner
  • High temp gloss or semi-gloss black spray paint
  • Sandpaper: 100, 150, 220, 320, 400 grit
emblem_splitview.jpg

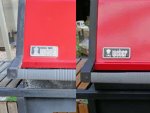
The emblem on many Weber gas grills may shows signs of aging long before other parts of the grill. Here are the steps to restore the emblem to a like-new state.
  1. Remove the emblem from the lid. It may be fastened with nuts or friction clips. If clips, work them off from inside the lid using a small straight blade screwdriver and needle nose pliers.
  2. Use a stiff wire brush to remove any flaking paint. Clean the surface with a solvent such as lacquer thinner.
  3. Spray the surface with high-temp gloss or semi-gloss black paint. Allow paint to dry thoroughly
  4. Sand the emblem to remove paint from the raised surface, leaving black paint in the negative space. Place a piece of 100 grit sandpaper on a flat work surface and place the emblem face-down on the sandpaper. Move the emblem in a circular motion to remove paint. Check the emblem frequently. Don’t sand more than necessary to remove paint.
  5. Repeat with 150 grit, 220 grit, 320 grit, and 400 grit sandpaper until a smooth finish has been achieved.
  6. Reinstall the emblem and enjoy your handiwork!
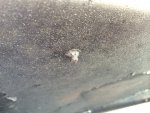
Here's an example of a friction clip.

img_2432-1024.jpg

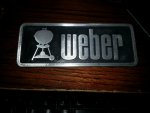
Here's a partially sanded emblem. Additional sanding with finer grit sandpaper will provide an even better result.
2013-05-07173253_zpsada5fd3c.jpg

In some instances, the black background may be in good shape and doesn't need painting. An emblem like this just needs a good cleaning followed by sanding.
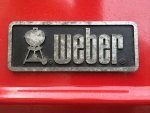
img_2430-1024.jpg

Thanks to members Steve Counts for the before/after photos, Bob U (Queens) for the partially sanded emblem photo, and Chad Bman and LMichaels for sharing the restoration steps.

Source: The Virtual Weber Gas Grill
 
The friction nuts are actually called:
“Tinnerman” nuts.
Information gleaned from the vast knowledge of Bruce!
We end up storing so much “specific trivia” for the Weber family it just cracks me up! Well, I seem to store a lot!
Thanks Chris, now I have another project to add to the list!;)
 
Timothy, I don't even remember calling them Tinnerman nuts... LOL. but with my memory, it is entirely possible.
 
Timothy, I don't even remember calling them Tinnerman nuts... LOL. but with my memory, it is entirely possible.
I don’t remember when you shared that but, now, that I think about it, it may have been Larry! I was pretty sure it was you though. I had asked you this very question(restoring the emblem) and you said that you used some kind of adhesive instead of the nuts.
Time to go get the birthday cake for dessert after 2” ribeyes, beets, potatoes, Brussels sprouts for dinner! I will be using some of the marrow compound butter to finish them off.
Now there’s a wild tangent!
I need either more sleep or coffee!
 
Timothy. Entirely possible. My memory is not that great. It would have likely been not long after I had acquired some and knew the name due to that and have since forgotten. LOL.
Anyway, someone one here several years ago suggested using red RTV high temp silicone to stick the emblems back on. I have been doing that ever since.
 
WHAT: This is a How To on how to restore the emblem on a Weber gas grill lid.

WHY: To restore the emblem to like-new condition.

WHAT YOU NEED:
  • Basic tools like straight-blade screwdriver and needle-nose pliers
  • Stiff bristle brush
  • Solvent like lacquer thinner
  • High temp gloss or semi-gloss black spray paint
  • Sandpaper: 100, 150, 220, 320, 400 grit
View attachment 5218

The emblem on many Weber gas grills may shows signs of aging long before other parts of the grill. Here are the steps to restore the emblem to a like-new state.
  1. Remove the emblem from the lid. It may be fastened with nuts or friction clips. If clips, work them off from inside the lid using a small straight blade screwdriver and needle nose pliers.
  2. Use a stiff wire brush to remove any flaking paint. Clean the surface with a solvent such as lacquer thinner.
  3. Spray the surface with high-temp gloss or semi-gloss black paint. Allow paint to dry thoroughly
  4. Sand the emblem to remove paint from the raised surface, leaving black paint in the negative space. Place a piece of 100 grit sandpaper on a flat work surface and place the emblem face-down on the sandpaper. Move the emblem in a circular motion to remove paint. Check the emblem frequently. Don’t sand more than necessary to remove paint.
  5. Repeat with 150 grit, 220 grit, 320 grit, and 400 grit sandpaper until a smooth finish has been achieved.
  6. Reinstall the emblem and enjoy your handiwork!
Here's an example of a friction clip.

View attachment 5217

Here's a partially sanded emblem. Additional sanding with finer grit sandpaper will provide an even better result.

View attachment 5219

In some instances, the black background may be in good shape and doesn't need painting. An emblem like this just needs a good cleaning followed by sanding.

View attachment 5220

Thanks to members Steve Counts for the before/after photos, Bob U (Queens) for the partially sanded emblem photo, and Chad Bman and LMichaels for sharing the restoration steps.

Source: The Virtual Weber Gas Grill
This looks fantastic, a small detail but it really completes the face lift. Just to be clear, you aren't masking anything prior to painting, just paint the entire badge and flat sand the raised logo/boarder to reveal the stainless after its been painted over? Also, do you happen to know what size push nut are used to reattach the badge? I have a feeling I'll probably damage one or both in the removal process.
 
Just paint the whole thing black with high heat paint, then sand off the face. That's it. The kettle would have to be hand painted however.
 
Did you hand paint the grill icon in the badge? Looks really clean.
Thanks. Yes, I bought a can of red high temp rustoleum. I sprayed the red paint into a cup and then hand painted it with a tooth pick. Because the black and red were different finishes and I did not want the bare metal to tarnish again, I sprayed it with a high temp clear coat gloss. I also used the clear on the tank sticker and serial number sticker.
 
Thanks. Yes, I bought a can of red high temp rustoleum. I sprayed the red paint into a cup and then hand painted it with a tooth pick. Because the black and red were different finishes and I did not want the bare metal to tarnish again, I sprayed it with a high temp clear coat gloss. I also used the clear on the tank sticker and serial number sticker.
Very nice, you've got the hands of a surgeon.


Back
Top