Alan Erickson
TVWBB Fan
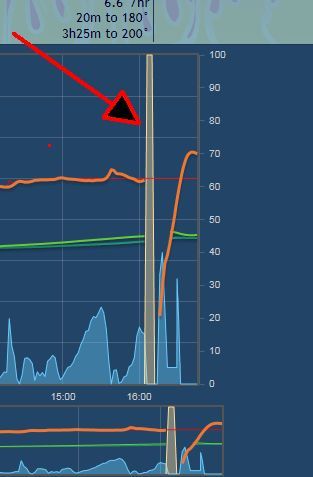
I was curious if anyone knew what the gray trend pointed to below is for? Lid open?
Paul is there any chance I can get an SSH and web connection to your Pi? I'd love to take a look at it to see if I can fix whatever your problem is.
Ok, so I got my brand new RPi, did not hook up heater meter to it, wrote newest image to an SD card stuck it in and it works just like the old one did, not at all, any tab I try to get to other than the one you get to from the "configuration" link at the start just ends up in an error. The only thing I can think of that I have not tried is writing to the SD card from a computer that has something other than windows XP? But not sure why that would make any difference. I am at a complete loss as to what to do at this point, its obviously not my heatermeater board, as I never hooked it up, I can't imagine its the Rpi since the chances of getting 2 that have the exact same issue are slim, it has to be the image that is getting written to the card or the power supply, which I have tried 3 of. I have to be doing something wrong, I just cant figure out what that is.......ok done venting, glad everyone else is having success!
That's really odd because it should work fine with no HeaterMeter connected at all (just say that no HM is connected). This is something good for me to check though because if that's the problem then that is definitely a bug I can fix.Hi Paul,
Now, since I haven't built a working HeaterMeter yet, I assumed this crash was normal when hitting the config page sinec it could not communicate with the HM.
I have used that blower on both my 22 in weber, and on a stoker clone,, when the outside temps were just above 0F. Temps were fine at 225F.
Just loaded the new version, whatever you did fixed it! Hope it works for Paul as well!
Serial communication aside, this check here uses the SPI bus to communicate with the AVR which is what the USBtinyISP and other chip programmers use. The RaspberryPi can power the 3.3V HeaterMeter board no problem with just the 5V supply. You can start poking around with a multimeter to maybe see what's going on.LinkMeter platform is BCM2708
AVR fuses ERROR
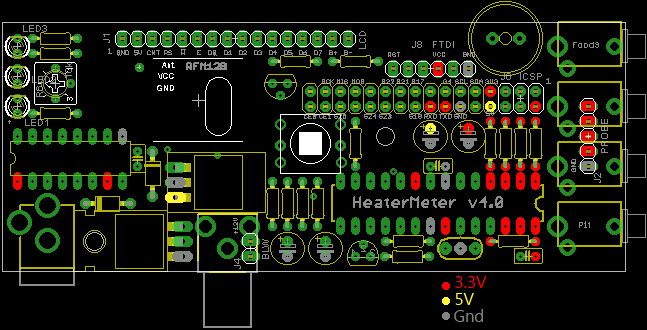
Serial communication aside, this check here uses the SPI bus to communicate with the AVR which is what the USBtinyISP and other chip programmers use. The RaspberryPi can power the 3.3V HeaterMeter board no problem with just the 5V supply. You can start poking around with a multimeter to maybe see what's going on.

I would grab an old toothbrush and a bottle of rubbing alcohol. Power down the system, pour the alcohol on the board, and scrub with the toothbrush. Do it a couple of times, then allow the board to dry. Take a magnifying glass and look at the solder joints. This will help you find any solder bridge that may have developed. Any solder connection that is not shiny would be considered a cold solder connection. Remove the solder and reflow that connection. With a magnifying glass, you will notice any discolourization of the solder Take you time, use a clean solder tip (it too should be shiny, at all times; use a wet cloth to clean it), and clean solder.
I would grab an old toothbrush and a bottle of rubbing alcohol. Power down the system, pour the alcohol on the board, and scrub with the toothbrush. Do it a couple of times, then allow the board to dry. Take a magnifying glass and look at the solder joints. This will help you find any solder bridge that may have developed. Any solder connection that is not shiny would be considered a cold solder connection. Remove the solder and reflow that connection. With a magnifying glass, you will notice any discolourization of the solder Take you time, use a clean solder tip (it too should be shiny, at all times; use a wet cloth to clean it), and clean solder.
When used with the RaspberryPi, the ATmega328P-PU without the bootloader is fine. The chip is programmed using the rPi's GPIO lines as an SPI programmer so any bootloader on it will actually be erased when HeaterMeter is flashed from the web interface / avrupdate. It's one of the bigger features of the new platform, no ISP programmer / bootloader needed!Brian's easy-to-use Mouser project lists include the Arduino without UNO bootloader