Genesis 1000 Redhead Restoration


J Grotz

TVWBB Wizard
First of all, thank you to all the Gasser Forum denizens that freely share their knowledge and experience so that a person like me with no experience with tools could start and finish a project like this.

I got hooked last summer browsing the Gasser Forum seeing all the beautiful Genesis restorations. I have a WSM 22 and a charcoal grill, but no gas grill. I suggested a gasser to my DW as something she could use herself and something that could be used on work nights when time was short. She was surprised when I said I wanted a used grill that was over 20 years old. My goal a Genesis 1000 redhead. I wanted a deep-box, 13 bar, rotisserie machine. I browsed CL, FB Marketplace and Offerup for a few months before giving up and getting a black on for $40. Of course, a few days later a redhead showed up for $30. This worked out well because I could put the best parts of both grills together.

fullsizeoutput_2ba.jpeg

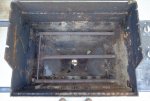
The black one was more complete and came with some shiny new parts, but it also had six extra holes in the firebox because someone mounted a non-Weber rotisserie. So I focused my attention on the redhead.

DSCF5890.JPG

DSCF5891.JPG

The grill is finished, but I'm having difficulty posting this thread, so I'll break it into smaller posts.

Edit: I'm having difficulty with my internet, so I will try to finish this later.
 
Last edited:
Have you had your internet connection tested for COVID-19?

Looking forward to your photos.
 
More before photos:

DSCF5925.JPG

DSCF5932.JPG


The firebox bolt was fused in the firebox. Drilling out the bolt did not loosen it. I bought a Harbor Freight blowtorch, learned how to use it, and it dropped right out after 30 seconds of heat from the blowtorch.

IMG_2583.JPG

Edit: Technical difficulties solved and photos added.
 
Last edited:
I'm doing a similar resto on my Genesis 1000 redhead, I just posted a new thread! Looking forward to seeing more of your pics as well. How's the progress coming along?
 
Those old 13 bar genesis grills are really great. I'm not known for holding on to things but I still have my Genesis that I bought new in 1998 it started life as a 1000LX and a few years ago I upgraded it to a 2000. It's still like new and works great. If I had to go down to one grill (I have 9 Weber's and a camp chef pellet grill) it would be the one I would keep.
looking forward to seeing your completed restoration.
DSCN2766.JPG
 
I bought a HF angle grinder, wire brush and appropriate protective gear. I sprayed the box with Walmart oven cleaner and let it soak in a garbage bag overnight. After 5 minutes of wire brushing, I went online and found a media blaster to do the job at a reasonable price. I cheated and went to a media blaster because of the grill's intended use. My wife misses having a gas grill that she can cook on during the week. Understandably, she wants something quick and convenient (read: NOT charcoal). And I want a good rotisserie set up and have become jealous of all the beautiful restorations here. So when I brought up getting a gasser, she was keen on the idea, but not real enthusiastic about a used one filled with someone else's "seasoning." So this grill is being brought back to new; new burners, flavorizers, grates, and even new black control knobs and switches. I'm not very skilled with an angle grinder, so when I found a local blaster that would do the firebox and lid end caps for $75, I was all over it. I know it will be well "seasoned" within a couple of weeks of when I finish it, but it will be our "seasoning." ;)

Here's the blasted box:

IMG_3054.JPGIMG_2687.JPG

New RCP Flavorizers and grates wondering what is taking so long to finish this thing.
 
Last edited:
The hood cleaned up nicely thanks to all the great tips on here.

IMG_2685.JPG

The inside cleaned up almost as well, but there was some stubborn stuff that would not come off.

IMG_3161.JPG
 
Next up was the frame. I used Krylon high heat on the outside and Eastwood frame paint on the inside. The Eastwood paint would lead to an issue later on, but since this is a keeper and a forever grill, it was worth the hassle. The frame was in decent shape, after all this is SoCal.

IMG_2707.JPG

IMG_3032.JPG

IMG_3049.JPG
 
After some sanding, I used the low VOC version of Eastwood's Pre Painting Prep to clean the frame (I used it on the firebox, too.). That is all they can sell to California. It worked well. The frame was ready for painting. To do the internal painting I built a paint booth in my garage. It is very thin and runny initially to get everywhere on the inside of a frame. I only took a before shot. It was a real mess afterwards.

IMG_3052.JPG

The external frame painting was easier to do on the driveway.

IMG_3102.JPG

If I ever do another one I would buy that nozzle/hose thing from Eastwood and use Krylon or Rustoleum high heat, because the Eastwood is only rated to about 500 degrees. When I fired up the grill the first time this happened:

IMG_3224.JPG

Judging by the amount and duration of the smoke, I may have been too heavy handed with the internal paint. It ran out of the frame quite a bit and necessitated some re-sanding of the outside of the frame before I could paint the outside.
 
Last edited:
With the frame done, I turned my attention to the firebox.

I think this means my firebox was cast in July 1995:

IMG_3070.JPG

Painting always seems like 85% prep work, 5% painting and 10% cleanup.

IMG_3059.JPG

IMG_3076.JPG

IMG_3078.JPG
 
I cut a pair of 2x4s to fit inside so I could raise the firebox off the ground while I painted. I did not want it stuck to the drop cloth.

IMG_3079.JPG

Then I could actually paint.

IMG_3060.JPG

IMG_3061.JPG

IMG_3080.JPG
 
Next up was the manifold. The LMichaels valve job was needed and it's as easy as it looks in Chris A's video. I decided to take it one step further and do the detailing that Ralph Meyer did to the manifold on his Genesis 2000 restoration. It was messy but surprisingly fast and relatively easy. I used a Dremel with mini cup brushes. Lots of brushes. Amazon has 60 of them for $15.

IMG_3109.JPG

IMG_3112.JPG

IMG_3111.JPG
 

Attachments

  • IMG_3111.JPG
    IMG_3111.JPG
    130.5 KB · Views: 9
Last edited:
Valves needed cleaning.

IMG_3114.JPG

Detailing begins with the screws.

IMG_3117.JPG

Before and after detailing of the valve stem assembly.

IMG_3118.JPG

All the shiny bits are shiny again, time for some paint.

IMG_3119.JPG
 
This is starting to look like a grill again.

IMG_3144.JPG

What's missing?

IMG_2681.JPG

I decided to go with Redwood because of its beauty and the fact it is available locally. I couldn't believe the size of this lumberyard. They seemingly had every variety of wood known to man. It is a small, family-owned, southern California chain called Ganahl Lumber. The yard I went to has been there 115 years. A friend of mine that dabbles in woodworking was kind enough to cut them to length. A stack of unsanded slats are on the left, a stack sanded slats are on the right.

IMG_3164.JPG

So much sanding.

IMG_3163.JPG
 
Last edited:
I know most people here use spar varnish on their wood handle and slats. The glossy look is beautiful. But it looks like so much work. And when it fails (and every outdoor finish option fails at some point), all of it has to be removed and started over. I watched what happened to a spar varnish finish applied to an outdoor dining table by the Wood Whisperer on youtube. The finish didn't last and rather than redo it, he cut up the table and used the most of the wood on an outdoor coffee table. He used a non-sealant oil on the coffee table. I had a teak set for many years that I kept looking new with teak oil in the mostly dry sunny SoCal climate. So I'm going to try the oil the Wood Whisperer used, Osmo UV protection oil.

https://osmocolorusa.com/product/uv-protection-oil/

Here I am about halfway through the first coat.

IMG_3213.JPG

IMG_3214.JPG

After the second coat.

IMG_3227.JPG

I found a guy to make a new handle, but I decided to try and restore the old one first. My friend who cut the slats ran the handle through one of his machines (planer? joiner?) and it came out with two nice faces. After some hand sanding and staining, it doesn't look half bad.

IMG_3234.JPG

There's more to come, hopefully tomorrow. Until then here's a little taste.

IMG_3467.JPG


Back
Top