• Enter the TVWB 27th Anniversary Prize Drawing for a chance to win a Weber Traveler Portable Gas Grill! Click here to enter!

Genesis 1 Restoration


I painted the firebox and end caps with this product. Also did the top frame bracket, and used what was left on some of the small parts. The can says heat curing is required "for surfaces that exceed 500°F."

I figure the firebox will self cure with a good preliminary burn, as I think I've seen in these pages. What about the frame and small parts, will this paint hold up if they're not heat cured? Wifey's not too keen on me baking parts in her oven :oops:

View attachment 95188
I always paint the frames with that paint and they hold up fine, just like a regular spray paint.
 
I always paint the frames with that paint and they hold up fine, just like a regular spray paint.
Thanks. I've seen some concerns & complaints on other sites, about lack of durability because it never fully dries, thus allowing moisture to penetrate and cause peeling or bubbling. Like so much else with this resto, I'm probably just over thinking it. I'll use the last can and finish out the rest of the frame. I like the semi-gloss finish more then I thought I would; the box looks awesome. Won't be long now...
 
Thanks. I've seen some concerns & complaints on other sites, about lack of durability because it never fully dries, thus allowing moisture to penetrate and cause peeling or bubbling.
Like all paint jobs, it's all in the prep work. If you know you spent way more time sanding and cleaning that frame than painting it you can probably rest easy. It's the people that think they can just take something and spray paint it that end up complaining about the results. It's like that with lots of things, a lot of the bad reviews are from people that really didn't know what they were doing to begin with. I can think of specific examples of this but won't bore anyone with them, I'm sure you get it.
 
Like all paint jobs, it's all in the prep work. If you know you spent way more time sanding and cleaning that frame than painting it you can probably rest easy. It's the people that think they can just take something and spray paint it that end up complaining about the results. It's like that with lots of things, a lot of the bad reviews are from people that really didn't know what they were doing to begin with. I can think of specific examples of this but won't bore anyone with them, I'm sure you get it.
Hmm...I replied from my phone but must have purged it before posting.
Anyways, it's pretty well prepped. I was pleased to find very little rust, mostly at the joints and all taken care of with a wire brush and a wipe down. Cleaned it all up with dawn and simple green, rinsed thoroughly, scuffed lightly, then applied the paint. Wifey doesn't want me using her oven, so I'm baking the small parts now before she wakes up. If y'all don't hear back from me you'll know why...
 
Small parts could be baked inside the grill as well. But, yah, you did fine on the paint job. Most parts, other than the cook box and end caps will never hit 500 degrees anyway.
 
You don't need to remove the manifold bolts to paint the cook box. Just take the nuts off the bolts, remove the manifold and it is ready to paint.....Of course you need to remove the left side cook box bolt though.
If the manifold bolts are stuck and the nuts or paddle bolts or wing nuts won't come off, then YES, you will probably just have to twist them off and drill them out....if other methods won't work.
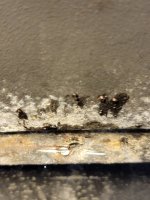
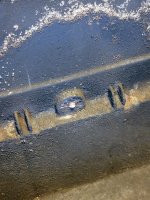
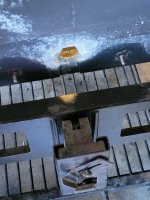
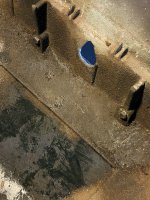
On my second Silver B I'm working on now both manifold bolts are stuck and the firebox main bolt on the other side broke off at the hex end. I cut them off and now considering either trying to punch or drill out. Any suggestions on these problems? inbound2728096453116775155.jpginbound3624590268915450568.jpginbound7913133198043746393.jpgThanks!inbound670195361918728109.jpg
 
Just leave the manifold bolts alone, no reason to make more work for yourself. On the cookbox bolt I would heat up the metal around it with a propane torch and then punch the rest of it out. I've used this method a couple of times and it's quick and easy.
 
The manifold bolts I believe have spline that allows them to seat into the cook box. It you attempt to twist them off from the inside you will just snap them off every time. I believe. Members please confirm?
 
The manifold bolts I believe have spline that allows them to seat into the cook box. It you attempt to twist them off from the inside you will just snap them off every time. I believe. Members please confirm?
No, they're just regular bolts. On most of the cook boxes I come across, they sort of "weld" themselves to the cook box and don't really want to come off. It's fine since there usually isn't any reason to remove them anyway.
 
Thanks Steve. I can leave the manifolds in place. Unfortunately I turned the head hard on the inside and realized the other side was not turning. The both seem secure so I'm going to leave them. The firebox bolt is more of a problem. I started heating and punching and it wasn't budging. I started drilling and have a nice center. Drilling from the outside of the box but it is going REALLY slow through the stainless steel bolt. Taking a break now. Boy, my first Silver B started out a lot easier than this.
 
I've been lucky enough not to have to drill out any bolts, which I doubt I have the patience for anyway. If you work on enough of these grills you will eventually come across these problems and maybe even to learn to avoid some of them. Good luck with that bolt, it sounds like you're on the right track.
 
I use the brute force method. I know the pitfalls, but it works for me 98% of the time and it is much faster.
 
Val, I do it this way to save time. If I was working on a grill and didn't have spare parts, like an extra cook box laying around, I wouldn't do this or at least would get as aggressive doing it this way. BUt I have done a good 200 Silver B and Genesis 1000 cook boxes and I would say 40% have a had a frozen cook box bolt. So probably out of those 75 or 80 cook boxes that I have done this to, I remember only one or maybe two cracking.

Having done this so many times, I have refined my technique from just whacking away willy nilly to setting it up properly and using a bit of finesse. First is to ensure you have good support directly under the frozen bolt. That will ensure a solid strike and keep the cook box wall from flexing any more than necessary. Then you can go after the bolt. But, always try to twist off or cut off the bolt so that some sticks out from the cook box. That way you can tap/hit it side to side all around instead of just hitting straight down on it. The side to side hitting will help break the corrosion that is holding the bolt in. It also doesn't cause the cook box wall to flex like straight punching will do. But, if you don't have any of the bolt to go side to side with, you will just have to punch. Many small to medium hits are the key. It will slowly break up the corrosion kind of like a hammer drill or jack hammer. If that doesn't work, then increase the aggressiveness using a regular hammer. If that still doesn't work, then you are looking for a 2lb maul and that is where you will increase your chances of cracking the cook box wall. But, as I said, I get almost all mine out this way.
When I first started doing rehabs, I did drill them out. But after a while, it got tedious and the hammer kept barking at me.

I should do a video on this, but every cook box is a little different. Some take two or three hits and it is done, some take 20 hits or even more. Besides, I never remember when I am in the process of doing rehab and find a frozen cook box bolt.

So, I will just tell you my experience and also tell you that if you try this method, you do so at your own risk. Hopefully it winds up more reward than risk.

Oh, one other disclaimer. Wear hearing protection. It is like whacking a bell with your head inside.
 
Oh, and don't bother taking out the manifold bolts. Those are stainless bolts and I have found very few of them rusted or damaged other than being stuck which I think Weber did on purpose on some of their grills. Just leave them in and reuse them. I even have them in when I get the cook boxes sand blasted and they still function fine after that.
 
Thanks so much for your comprehensive experience on these frozen bolts Bruce. Next time I will leave a bit of the bolt on to hit sideways but this time I cut both ends flush. I will try some more hitting and see how it goes. For some reason there is a chip out of the firebox next to the bolt. Who knows, maybe it's from a past removal. Anyway, since I have a good pilot hole I can always still continue to drill. And one more option - if I crack the box I have a free Silver C under the deck with a bad frame that I can probably cannibalize for the box. In any event, I'll tell you how it goes. Thanks again!


Back
Top