I only found a couple adhesives that would bond pei to aluminum and hold at 120c. I got a quote from a company and it was over 300 bucks for a minimum order. :< I was really hoping to get rid of the clips but I hadn't considered flexing for tough part removal. My first print came off little effort after cooling. It was a part that I had warping issues on PET tape but printed nicely on ultem. So far so good. To be fair I changed my heatbed at the same time so that could have helped to. These silcone heaters rock!
You are using an out of date browser. It may not display this or other websites correctly.
You should upgrade or use an alternative browser.
You should upgrade or use an alternative browser.
General 3D Printing Thread
- Thread starter Bryan Mayland
- Start date
The silicone heat pads are a game changer in terms of time to temp and uniformity. If you scan the surface of a bed heated by a pcb with an ir thermometer, you'll see huge temperature variations. With a silicone heat pad attached to aluminum, you'll be within a degree (C) until you get really close to the edge.
RalphTrimble
TVWBB Diamond Member
Well, I'm certainly interested in 3D printing nirvana! So I guess I should try a sheet of Ultem... (even though I've become a master and laying down smooth Kapton layers lately) What thickness are you using, or I should ask what thickness do you think will be durable enough? And is McMaster-Carr the best/only place to get it?
RalphTrimble
TVWBB Diamond Member
Just got my sheet of Ultem today. It killed me to cut the 12" sheet down to 8" to fit my printer bed, the thought of building a bigger printer passed through my head a few times then I whipped out the Plexiglas knife and ripped her down to 8"...
I am impressed with the first print, adhesion was great and it released without leaving a trace that there had been a print, ready to go for another print... nice... The print didn't pop off the Ultem on it's own, it seemed to hold down kinda like the prints do on Kapton tape, without the worry of damaging the Kapton tape upon removal. I had a little too much first layer squish on the print so perhaps that made the print stick down a bit more.
So far I am very happy I made this move, thanks Tom for giving me the incentive to give Ultem a try, it's the best print surface I have used so far...
Here is my little tid bit that hopefully someone else can benefit from. I finally figured out how to measure stl parts in netfabb. The critical issue was being able to measure the distance to the center of a circle. Here is how you can do it, in case you don't already know.
Go to measurement
choose circle
click on the circle
click on the show anchors button (this was the key), now you will have an anchor at the center of the circle that you can measure to/from.
dave
Go to measurement
choose circle
click on the circle
click on the show anchors button (this was the key), now you will have an anchor at the center of the circle that you can measure to/from.
dave
RalphTrimble
TVWBB Diamond Member
So I've been printing on the Ultem sheet, AWESOME! Unfortunately I have been having some other issues crop up recently, I've been getting some rough outer surfaces on one side of objects that have been puzzling. I checking into/tweaked all my stepper motor drivers, my belt tension, bearings etc etc, nothing netted any improvement. I removed the quick release mount I made for my J-head, problems persist. At this point I determined it HAS TO BE the J-Head....
I noticed that I am getting some serious curl on the filament when it exits the j-head, specially the first bit, once some plastic was hanging out it seemed to shoot straight ahead. I had this once or twice before, had a partial clog on the nozzle one time, and a bad/tight PTFE liner once, so I pulled the J-head apart again to inspect. The nozzle seemed clean (I burned it clean with a blow torch anyway), the PTFE liner seemed ok too.. So, cleaned and re-installed with the same issue... Frustrating....
So I took the J-head off again for further inspection. I got a look at the end of the nozzle where the filament comes out with a magnifying glass and what do you know, it seems part of the nozzle that sticks out from the block is gone, one side is sticking out further. Really easy to see why that would cause a curl when looking through the magnifying glass. I decided to take the tip down a bit with some sand paper until it was flat and even all the way around, which didn't take much doing... I re-installed the quick release mount and installed the J-head, and there you have it, the filament comes straight out like it used to! BINGO!!! Right away when I saw the filament circle around and form a nice even cone as I extruded a bit above the bed I knew I had it licked...
I'm running a print now that looks outstanding, best I've seen! With all the inspection and tuning I did before I found the problem my printer is running like a well oiled machine again...
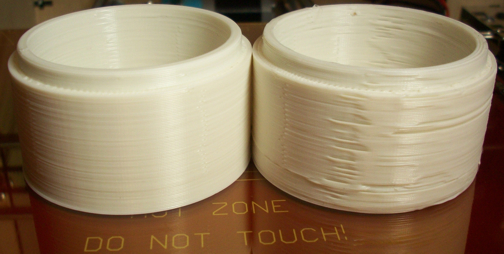
In trying to diagnose the problem I did a lot of searching/reading on the internet, found lots of suggested solutions but nobody touched on what turned out to be my issue, so I figured I would post about it here. If you run a J-head hotend and start to have filament curl do yourself a favor and make your first stop be a magnifying glass and take a close look at the tip of your hotend and make sure it is all intact and even with no partial clogs, had I done that right away it would have saved me much time and frustration....\
Edit: Here is a picture of the same object before and after I nailed down the issue. Before on the right of coarse:
I noticed that I am getting some serious curl on the filament when it exits the j-head, specially the first bit, once some plastic was hanging out it seemed to shoot straight ahead. I had this once or twice before, had a partial clog on the nozzle one time, and a bad/tight PTFE liner once, so I pulled the J-head apart again to inspect. The nozzle seemed clean (I burned it clean with a blow torch anyway), the PTFE liner seemed ok too.. So, cleaned and re-installed with the same issue... Frustrating....
So I took the J-head off again for further inspection. I got a look at the end of the nozzle where the filament comes out with a magnifying glass and what do you know, it seems part of the nozzle that sticks out from the block is gone, one side is sticking out further. Really easy to see why that would cause a curl when looking through the magnifying glass. I decided to take the tip down a bit with some sand paper until it was flat and even all the way around, which didn't take much doing... I re-installed the quick release mount and installed the J-head, and there you have it, the filament comes straight out like it used to! BINGO!!! Right away when I saw the filament circle around and form a nice even cone as I extruded a bit above the bed I knew I had it licked...
I'm running a print now that looks outstanding, best I've seen! With all the inspection and tuning I did before I found the problem my printer is running like a well oiled machine again...
In trying to diagnose the problem I did a lot of searching/reading on the internet, found lots of suggested solutions but nobody touched on what turned out to be my issue, so I figured I would post about it here. If you run a J-head hotend and start to have filament curl do yourself a favor and make your first stop be a magnifying glass and take a close look at the tip of your hotend and make sure it is all intact and even with no partial clogs, had I done that right away it would have saved me much time and frustration....\
Edit: Here is a picture of the same object before and after I nailed down the issue. Before on the right of coarse:
Last edited:
Bryan Mayland
TVWBB Hall of Fame
Wow what a difference!
Changing subjects, are there any slicers that are smart enough that when they print solid on top of infill, they expand the area of the solid to an infill line?

The green lines are the infill from the previous layer, and the red is fill for the current layer. The circles are the first layer of solid, but as every slicer I've ever used does, the edges of the circle are defined by the geometry of the STL. What should be done is that the edges should extend into the infill area so that they reach to an infill line from the previous layer. This would anchor them so they don't just dangle into space, curl up and potentially ruin a print. Basically extend the red lines using the yellow lines I've drawn (except everywhere the red doesn't meet green):

When printing with low infill values, I've had edges which exist completely between infill lines so they just get squirted into the gap and make a mess. It seems to me this would be something that everyone would want by default but I've never seen it. Is there a slicer that does this or an option I am missing?
Changing subjects, are there any slicers that are smart enough that when they print solid on top of infill, they expand the area of the solid to an infill line?
The green lines are the infill from the previous layer, and the red is fill for the current layer. The circles are the first layer of solid, but as every slicer I've ever used does, the edges of the circle are defined by the geometry of the STL. What should be done is that the edges should extend into the infill area so that they reach to an infill line from the previous layer. This would anchor them so they don't just dangle into space, curl up and potentially ruin a print. Basically extend the red lines using the yellow lines I've drawn (except everywhere the red doesn't meet green):
When printing with low infill values, I've had edges which exist completely between infill lines so they just get squirted into the gap and make a mess. It seems to me this would be something that everyone would want by default but I've never seen it. Is there a slicer that does this or an option I am missing?
Bryan Mayland
TVWBB Hall of Fame
Also does anyone have a problem not recognizing the scale of an object you design in the CAD software until you print it? :-D
"What's a good height for that? Hrm 25mm I guess is good" an hour into printing I'm thinking why the heck did I make that piece so tall? It could have been half that height easily!
"What's a good height for that? Hrm 25mm I guess is good" an hour into printing I'm thinking why the heck did I make that piece so tall? It could have been half that height easily!
Last edited:
RalphTrimble
TVWBB Diamond Member
Yah, big difference since I fixed my J-head nozzle. The most frustrating part was the rest of the (bad) object looks perfect, and you don't see the problem until you are well into the print. For the life of me I couldnt figure out what was causing it until I looked at the nozzle with a magnifying glass... Filament curl can be a real object killer. At any rate, it's rocking now...
On your infill/solid layer question, I have watched prints go down and see the same thing happening... My thought was that the first solid layer on top of infill should have shell layers like the top and bottom layers. If the circles in your example started out with circular shell loops rather than just the grid the circle loops would be able to bridge the gaps between infill without sagging and causing the potential problems with the print. Unfortunately I don't know of a slicer that actually does this, you might suggest it over at the slic3r page on github though...
Speaking of Slic3r, they are up to RC3 now, but frankly I am frustrated trying to use any version past v0.9.10b. The newer versions all make way too much support, and place it so close to the object that they fuse together and ruin the object. Also, I tried slicing a simple cap for the roto damper with RC2 and RC3, no matter how I slice it the thin outer walls came out almost hollow, I tried all sorts of layer heights and infill settings, sliced a dozen times or more between the RC versions. Then I decided to try v0.9.10b and it sliced perfect the first time around, the object came out great. IDK what is going on with Slic3r development but IMHO they seem to be breaking more than they are fixing. I have reported the support issues long ago, others have chimed in to echo my sentiment, yet RC3 came out with no improvement in their support material.
I think the only good news in this situation is 3D printing is really taking off these days and I anticipate lots of software will be hitting the streets in the months and years to come...
...and yah, I've designed and printed objects way out of scale a couple times, if the prints went faster if wouldn't be as much of a problem... but after sitting for an hour watching layers print that are not needed I got a grip on reality and now I give a lot of thought about how big/thick an object needs to be to get the job done...
PS If you haven't tried printing on Ultem yet you should give it a try. I am getting the most trouble free first layer adhesion ever, and still getting easy release when the print is done. That stuff is the "Ultem-ate" print surface I have used so far...
Last edited:
I gave up on using auto support features a while ago and instead create supports in my designs that require them. Just have them start 1 layer height above the surface and end 1 layer height below the ceiling. This way the slicer still creates a solid layer above and below. The support just pops right out.
RalphTrimble
TVWBB Diamond Member
Yah, I've created my own support for a few object and it has worked out better than the auto generated support. Frustration with support has led me to tuning my machine to do better bridging, adding a fan that comes on during bridging to achieve longer bridges so I can print more objects without support. I don't use any support at all any more when printing roto damper parts for instance... I created a test object that had a bridge that widened from 5mm to 50mm and was able to print a perfect bridge all the way through the 50mm span, I was pretty thrilled with that...
Bryan Mayland
TVWBB Hall of Fame
Yeah you're right, Ralph, adding one perimeter shell would prevent the problem in my case. I looked at Slic3r again to see if the newest version does anything to address it but it looks like it tries to work around the issue by extending the size of the skin (solid fill) by the size of the space between infill lines in every direction. This does fix an issue where a chunk of solid fill would have fit completely between two infill lines would just fall through, but because it extends the skin beyond the infill line, that skin curls too.
Kisslicer tries to work around it by creating doubly dense infill on the layers leading up to the solid layer. It has a problem where it can actually create double density infill which falls in between the regular infill which makes the problem even worse as twice the amount of material curls. That's what it looks like caused problems with my print today which had gently sloping solid layers trying to form over pretty sparse infill.
I haven't tried ultem yet. The glass with hairspray has been working great for me although it is annoying to have to wait for it to cool before I can really remove it without a lot of struggling. I'll probably get some at some point but like you said I'd hate to cut a 12" sheet so I may just wait long enough until I build a slightly larger printer. :-D
You're right about the Slic3r support bug though, that support is totally unusable and I'm not sure why they keep putting out RCs without addressing it. I try to just avoid designing objects that need support by making them two parts or using clever orientation.
RalphTrimble
TVWBB Diamond Member
I was happy with hairspray on glass until I started working on the roto damper, the slight curl on the edges I was getting wasn't acceptable for the mating surface of the valve.... So I moved to Kapton tape. I got great adhesion with Kapton, the parts came out perfect, with the first layer perfectly flat and glossy smooth, impressive looking... but the kapton tape was pretty delicate and easily damaged when removing parts.... when it cooled the parts were nearly impossible to pull at times without damaging the tape, if you pull when it is too warm the tape was easily damaged as well.... so it was... touchy. The Ultem is freakin' awesome, the first layer prints like magic and the parts release easily over a wide range of temperatures, leaving the bed perfectly clean and ready to go immediately, again and again. A dozen prints or so, so far, and all I have done is wipe the bed with a microfiber cloth. The best upgrade I have done to my printer is switching to Ultem, well worth the $30 bucks IMHO to get reliable first layer adhesion with zero curl and easy release, reliably time and time again....
I used hair spray until a chunk of glass was removed with a part. I switched to glue sticks which were awesome but Ultems is proving to be even better. I think the silicone heater is the best upgrade I have ever performed. I just started playing with my kraken so maybe that will change.
Last edited:
Yeah, I think my next upgrade is going to be the silicone heater with http://pages.ebay.com/link/?nav=item.view&id=321266949712 once available again and my ultem sheet.
Curt Parkins
New member
Which printer are most of you guys using? I want to get started but unsure of the best direction to take.