You are using an out of date browser. It may not display this or other websites correctly.
You should upgrade or use an alternative browser.
You should upgrade or use an alternative browser.
General 3D Printing Thread
- Thread starter Bryan Mayland
- Start date
"Optimal layer heights" as you describe are based upon whole step numbers which are determined by your z pitch. This calculation has nothing to do with what is optimal in regards to layer adhesion and print stability. Most people would not recommend using a layer height more than 60% of nozzle diameter (80% is pushing it). You can essentially go as low as you want.
Last edited:
Bryan Mayland
TVWBB Hall of Fame
I used to think they needed to make ABS fumes more immediately hazardous to health, so I wouldn't sit for 30 minutes and watch my printer with my face pressed danger-close to the hotend. Just one more layer, I want to see it do this bridge!
I've hooked up the Raspberry Pi camera to the printer. Great. Now I sit in the other room and watch it print at 1 fps. This isn't productive!

I've hooked up the Raspberry Pi camera to the printer. Great. Now I sit in the other room and watch it print at 1 fps. This isn't productive!
My understanding is if you choose a layer height that is in between .5-.99 of a motor step it will cause the motor to make that step. So on a tall object those extra steps will add up. Your 100% correct that calculation has nothing to do with layer adhesion or print stability. Doesn't temperature play a bigger role in those? For the record I make no claims as to bieng an expert and I have learned alot from your posts. I do print at .4 layer height with a .5 nozzle quite a bit. Its a little ugly but prints really fast and is great for prototyping.
RalphTrimble
TVWBB Diamond Member
...made a couple more small upgrades to the printer recently that I thought I should document here...
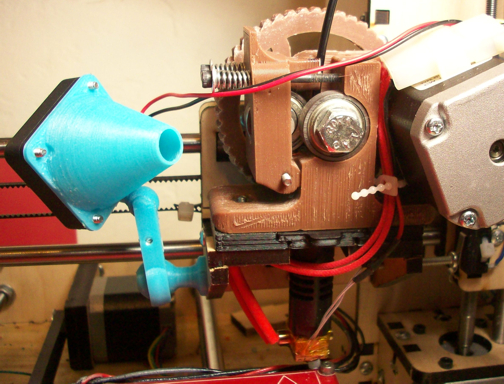
First off, I added a cooling fan so I can print longer bridges which enables me to print the roto damper parts without support material. I got the "articulated ball joing fan mount" after searching through dozens of designs on thingiverse. The version available on that link was extremely thin and fragile, fortunately if you hit the "Open in customizer" button you can customize the design in many ways to suite your needs. The customizer is pretty damn cool....
I ended up making my own single screw mount that goes through the existing extra hole on the Maker Farm i3 in that area. It's kinda like a chess piece with a hole for a screw through it. The screw is the same screw used on the Heater Meter case. The arm works really great, it has two ball joints that allow a wide range of motion, the fan/funnel not so much....
With the fan mounted on the funnel the air flow goes way down to a tiny trickle, most of the air deflects out the back of the fan, I assume this is because most of the air is coming through the outer edge with this type of fan. I am going to redesign the funnel/fan mount so the fan fits inside the funnel and hope that increases the air flow a bit. If that doesn't work I will have to change the fan type.
Here's a pic of the fan mount arm:
I also made a "quick release" for my J-Head Hotend. Since I purchased the .35mm hotend I have two size hotends, the .35 is great for fine detail but the .5 is better to get prints done fast when super fine detail isn't needed. I've already swapped back and forth once, anticipating doing that fairly often I wanted a way to do this without disassembling the whole extruder. I simply replaced the original mounting plate with one I designed that has a removable center portion that locks the J-head into place. Now when I want to swap my head I just disconnect the molex connector then pull the center clip and the J-Head drops right out, reverse the procedure for the install and the swap is done really fast and easy. (of coarse you need to retract the filament first)
Here is a pic of the center clip removed:
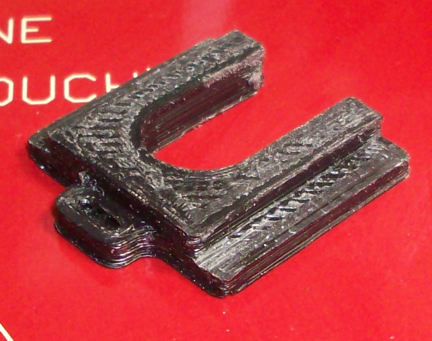
It fits nice and tight so I included a depression in the pull tap to insert a small screwdriver to aid removing it, which works great. I filed down the inner edges to make it easier to insert but made sure to leave the unit thick enough to fit tightly into place. It seems to hold the print head just as firmly as the original part, though time will tell, I haven't put it through the proper paces yet.....
First off, I added a cooling fan so I can print longer bridges which enables me to print the roto damper parts without support material. I got the "articulated ball joing fan mount" after searching through dozens of designs on thingiverse. The version available on that link was extremely thin and fragile, fortunately if you hit the "Open in customizer" button you can customize the design in many ways to suite your needs. The customizer is pretty damn cool....
I ended up making my own single screw mount that goes through the existing extra hole on the Maker Farm i3 in that area. It's kinda like a chess piece with a hole for a screw through it. The screw is the same screw used on the Heater Meter case. The arm works really great, it has two ball joints that allow a wide range of motion, the fan/funnel not so much....
With the fan mounted on the funnel the air flow goes way down to a tiny trickle, most of the air deflects out the back of the fan, I assume this is because most of the air is coming through the outer edge with this type of fan. I am going to redesign the funnel/fan mount so the fan fits inside the funnel and hope that increases the air flow a bit. If that doesn't work I will have to change the fan type.
Here's a pic of the fan mount arm:
I also made a "quick release" for my J-Head Hotend. Since I purchased the .35mm hotend I have two size hotends, the .35 is great for fine detail but the .5 is better to get prints done fast when super fine detail isn't needed. I've already swapped back and forth once, anticipating doing that fairly often I wanted a way to do this without disassembling the whole extruder. I simply replaced the original mounting plate with one I designed that has a removable center portion that locks the J-head into place. Now when I want to swap my head I just disconnect the molex connector then pull the center clip and the J-Head drops right out, reverse the procedure for the install and the swap is done really fast and easy. (of coarse you need to retract the filament first)
Here is a pic of the center clip removed:
It fits nice and tight so I included a depression in the pull tap to insert a small screwdriver to aid removing it, which works great. I filed down the inner edges to make it easier to insert but made sure to leave the unit thick enough to fit tightly into place. It seems to hold the print head just as firmly as the original part, though time will tell, I haven't put it through the proper paces yet.....
@Tom and D Peart: relative to the Ultem PEI sheets that you are using on your build plates...I seem to still be experiencing lift on my prints. Would this be due to not getting a high enough temp on the actual Ultem sheet or did I order the wrong material? I bought this one at McMaster I got for $12 (I know someone that works at the shipping warehouse and gets cost). From your two pictures it looks like you each have different materials. D. Peart's looks bumpy while Tom's looks more like what I got. I ended up clamping it to a sheet of glass and the MK1 heat bed and printed at the temperature set to 110C.
That's the right stuff. What temp on your bed do you normally print at? I've found that the bed temp for the Ultem should be a little higher than that. For me it was moving from 95C to 100C. This same trend has been experienced by others on the reprap forums.
I was printing on glass with hair spray at 100 and was getting lifting. I need to get a laser thermometer to see what temp my bed is actually getting since the thermistor is mounted on the bottom of the mk1.
I was printing on glass with hair spray at 100 and was getting lifting. I need to get a laser thermometer to see what temp my bed is actually getting since the thermistor is mounted on the bottom of the mk1.
I use the same stuff as Tom, he actually sent me the link to order.
I was having issues, but on Tom's suggestion I moved from the filament I got with my kit, to the filament I bought and haven't had any issues since.
dave
RalphTrimble
TVWBB Diamond Member
Made a couple more updates to my printer...
I've never cared for the Y-motor mount on the wooden framed Pusa i3 (mine is from MakerFarm), it just wasn't very solid the way it is designed IMHO and so the Y-motor can bounce around a bit when the bed is moving fast. I had an extra brace between the motor and the back of the printer which did help some, but I knew it was still moving a bit so I took the time to design my own very simple 3D printed motor mount. Instead of using the square pegs I decided to go with a "T" shaped bracket using three screws through the back.
Here's a pic of the new motor mount:
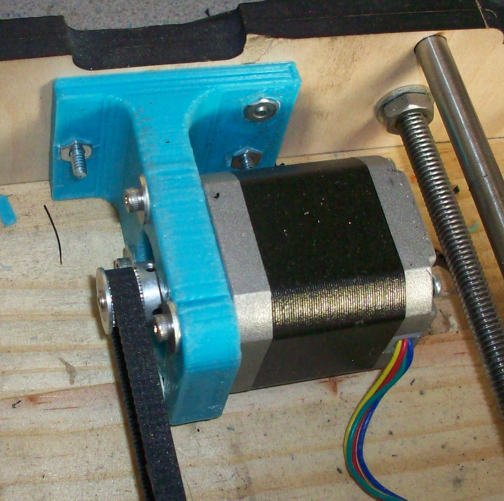
This is my first draft, wasn't perfect but it is very solid so I am not going to refine it further. Immediately when I did my first print with this new mount I noticed the improvement, the Y-axis movements are much more accurate and to my surprise the y-axis seems to move smoother and more quietly. If you have a MakerFarm i3 or any wooden framed i3 I highly recommend that you take the time to make an improved Y-axis motor mount.
During the print of this part I ran across another vexing issue. As the print went higher the infill plastic seemed to be building up which eventually caused a skip up near the top. You can see the defect in the part in the picture, luckily I was watching the print and was able to reset the origin and continue the print and still get a part good enough to use.
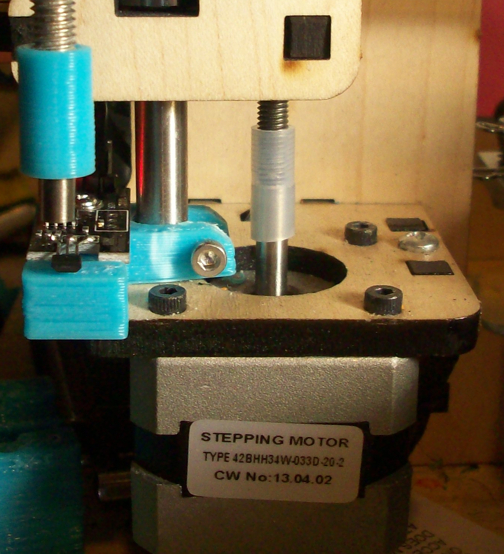
So I set out to determine the cause of that issue, I suspected it must be something with the z-axis. I never was very thrilled with the plastic tube coupler used between the Z motor and Z rods, raising and lowering the Z-axis I found that the tube would slip a bit on the motor and so the Z-axis wasn't always moving accurately. I tried tighter zip ties around the tube, that still didn't make it 100%. While clipping off a wire tie I clipped the tubing by mistake so something had to be done at this point... I suspect the tubing has worn out and loosened anyways cause it WAS really tight when I first built my printer, so it needed to be replaced. Looking around the basement I didn't find any similar clear medical type tubing like the original material, however, I did find some plastic water line (hookup tubing for refrigerator water) that looked like it might work. I cut a section, it fit extremely tight on both the threaded rod and motor, so I went with it. My Z-axis is accurate again now, I've done some taller builds without issue since I changed the tubing. Time will tell if it loosens up....
Here's a pic of the tubing in place on the printer:
With these latest two improvements my prints are coming out better than ever, and my printer is running more quietly and cool as well...
Speaking of running cooler. Some of my motors had been running really hot, typically the y-axis and extruder motors got really hot during a print and the X and Z motors ran cool. My print bed is moving like greased lightning so I knew the Y motor wasn't hot because of binding, so it seems the polulu drivers probably needed to be adjusted. Those things are so damn small I didn't want to attempt to attach my multi-meter to them to make the adjustment and risk slipping and blowing something up. So I set out to make the adjustments "by ear"... While holding the tool on the adjustment I set the axis in motion and adjusted the polulu driver until the motor stalled, then adjusted the other direction until it moved again, and then further until you can hear the motor get noisy. I repeated this a few times until I got a feel for the point where the motor is driven enough to move while still sounding quiet and relaxed. I did this adjustment on all of my servo drivers and all of my motors run really quiet and cool now. I actually did this a while ago and I noticed a nice improvement in my printer at that time. Mainly it ran quieter and cooler and a couple days into it I thought, "Hmm, haven't had a skip in a while..."
If you are running a Maker Farm or any other wooden framed Prusa i3 printer you might want to consider doing these upgrades, or at least keep them in mind if you run into trouble getting quality builds.
I've never cared for the Y-motor mount on the wooden framed Pusa i3 (mine is from MakerFarm), it just wasn't very solid the way it is designed IMHO and so the Y-motor can bounce around a bit when the bed is moving fast. I had an extra brace between the motor and the back of the printer which did help some, but I knew it was still moving a bit so I took the time to design my own very simple 3D printed motor mount. Instead of using the square pegs I decided to go with a "T" shaped bracket using three screws through the back.
Here's a pic of the new motor mount:
This is my first draft, wasn't perfect but it is very solid so I am not going to refine it further. Immediately when I did my first print with this new mount I noticed the improvement, the Y-axis movements are much more accurate and to my surprise the y-axis seems to move smoother and more quietly. If you have a MakerFarm i3 or any wooden framed i3 I highly recommend that you take the time to make an improved Y-axis motor mount.
During the print of this part I ran across another vexing issue. As the print went higher the infill plastic seemed to be building up which eventually caused a skip up near the top. You can see the defect in the part in the picture, luckily I was watching the print and was able to reset the origin and continue the print and still get a part good enough to use.
So I set out to determine the cause of that issue, I suspected it must be something with the z-axis. I never was very thrilled with the plastic tube coupler used between the Z motor and Z rods, raising and lowering the Z-axis I found that the tube would slip a bit on the motor and so the Z-axis wasn't always moving accurately. I tried tighter zip ties around the tube, that still didn't make it 100%. While clipping off a wire tie I clipped the tubing by mistake so something had to be done at this point... I suspect the tubing has worn out and loosened anyways cause it WAS really tight when I first built my printer, so it needed to be replaced. Looking around the basement I didn't find any similar clear medical type tubing like the original material, however, I did find some plastic water line (hookup tubing for refrigerator water) that looked like it might work. I cut a section, it fit extremely tight on both the threaded rod and motor, so I went with it. My Z-axis is accurate again now, I've done some taller builds without issue since I changed the tubing. Time will tell if it loosens up....
Here's a pic of the tubing in place on the printer:
With these latest two improvements my prints are coming out better than ever, and my printer is running more quietly and cool as well...
Speaking of running cooler. Some of my motors had been running really hot, typically the y-axis and extruder motors got really hot during a print and the X and Z motors ran cool. My print bed is moving like greased lightning so I knew the Y motor wasn't hot because of binding, so it seems the polulu drivers probably needed to be adjusted. Those things are so damn small I didn't want to attempt to attach my multi-meter to them to make the adjustment and risk slipping and blowing something up. So I set out to make the adjustments "by ear"... While holding the tool on the adjustment I set the axis in motion and adjusted the polulu driver until the motor stalled, then adjusted the other direction until it moved again, and then further until you can hear the motor get noisy. I repeated this a few times until I got a feel for the point where the motor is driven enough to move while still sounding quiet and relaxed. I did this adjustment on all of my servo drivers and all of my motors run really quiet and cool now. I actually did this a while ago and I noticed a nice improvement in my printer at that time. Mainly it ran quieter and cooler and a couple days into it I thought, "Hmm, haven't had a skip in a while..."
If you are running a Maker Farm or any other wooden framed Prusa i3 printer you might want to consider doing these upgrades, or at least keep them in mind if you run into trouble getting quality builds.
Last edited:
Nice design on the y-motor mount. I ended up using something similar that works much better than the wood variant that came with our printer as well. Here's the link.
http://www.thingiverse.com/thing:172347
Thanks for the info on tuning the stepper motors. I think I need to do that to mine. I know it's one of the first steps mentioned in the config guides that I've seen. My motors just never really seemed outrageously loud so I didn't want to fuss with it and risk screwing something up.
Also, maybe on the z axis we should consider upgrading to a better connector...http://www.amazon.com/exec/obidos/ASIN/B00GFKH3WM/tvwb-20
RalphTrimble
TVWBB Diamond Member
Also, maybe on the z axis we should consider upgrading to a better connector...http://www.amazon.com/exec/obidos/ASIN/B00GFKH3WM/tvwb-20
Thanks for the suggestion. When I cut the existing tubing coupler my printer was dead in the water so I came up with the other tubing solution, which does seem to be working great at this time, so I will keep an eye on it and consider changing to better coupler if this tubing fails.
RalphTrimble
TVWBB Diamond Member
Just looked at your y motor mount, I like it! I put a LOT of force on my bracket and I did get a TINY bit of flex but I'm pretty sure the motor won't be able to put that much force on it... The leg back on your bracket would completely eliminate that flex, I will add one to mine if I end up tweaking it. Thanks for sharing...
Also, maybe on the z axis we should consider upgrading to a better connector...http://www.amazon.com/exec/obidos/ASIN/B00GFKH3WM/tvwb-20
Or just print some nophead couplers
http://www.thingiverse.com/thing:9622
Z couplers have been a topic of debate for some time. Nophead has put a lot of effort into testing different methods
What does everyone set their vref to? I have my z-axis at .9 and my x,y-axis at .6v. Just curious as to what others run.
For an extended run my z-axis motors don't warm up at all, remember that there are two so each motor gets only half the current. My x and y motors get slightly warm to the touch. I can't measure there temp, but I would guess around 80F, while ambient is 70F.
dave
For an extended run my z-axis motors don't warm up at all, remember that there are two so each motor gets only half the current. My x and y motors get slightly warm to the touch. I can't measure there temp, but I would guess around 80F, while ambient is 70F.
dave
What does everyone set their vref to? I have my z-axis at .9 and my x,y-axis at .6v. Just curious as to what others run.
For an extended run my z-axis motors don't warm up at all, remember that there are two so each motor gets only half the current. My x and y motors get slightly warm to the touch. I can't measure there temp, but I would guess around 80F, while ambient is 70F.
dave
It really depends on your motor current rating and drivers. I am assuming that you have pololu 4988s and here is a good explanantion of what to do:
http://www.nextdayreprap.co.uk/commissioning-reprap-prusa-mendel-build-manual/ goto section 11.4
I would highly recommend using this method.