First Grill Restoration


The grill that you bought is still listed for sale on FB marketplace for $125
 
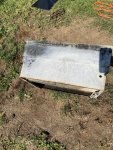
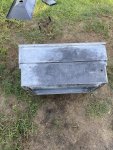
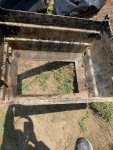
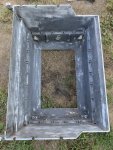
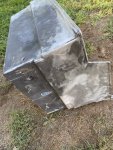
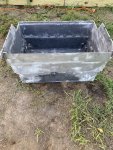
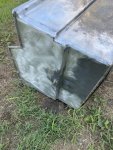
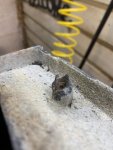
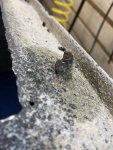
started the cook box today. There seems to be areas that refuse to go to bare aluminum and areas that have pits that will not come out. Also, the bolt on the left side of the box that attaches to the frame... I ground the head off to get the box out of the frame. I also ground the other side where it looked to be a nut (so corroded could not tell). . Do I just cut the bolt shaft off and drill it all out and then through bolt it when I’m re assembling?

19138A9E-A78D-44D9-9A35-C8A4DDB7CDF3.jpeg27F6AD9F-9F39-41C4-9275-09629C9D90D6.jpeg6FB1B591-8B86-4389-A88C-A28A0721D867.jpeg443C61FC-C68C-4450-9B73-65412E4A253A.jpegB21ECD88-AA72-4EEB-90C8-BEC55422534E.jpeg2B951679-1942-4E83-9526-5F834E560C70.jpeg9F654193-170D-4635-89FF-D0A82657248E.jpeg
 
Drilling that bolt out is probably your best option at this point. First try some penetrating oil on it and grab the bolt stud with a pair of locking pliers and try to free it up. If not, grind it off flat and drill it out.
 
Drilling that bolt out is probably your best option at this point. First try some penetrating oil on it and grab the bolt stud with a pair of locking pliers and try to free it up. If not, grind it off flat and drill it out.

Thanks Bruce! I’ll give that a try!
 
Thanks for the tip!
So this morning, I was working on the cook box more and removed the drip pan rails on the bottom after letting penetrating oil soak on the screws all night. The one side came off flawlessly. However, When the other sides screws came out of the other side, the threads left behind seem to be destroyed and the raised mounts deteriorated as if only corrosion was holding that side together. Any suggestions on how to mount the new drip pan rails when they arrive?

30342882-A5A2-4CFC-981E-8E17BD1AC3FB.jpegF3E5E28A-1366-4E8F-92AE-1E11A370A7A9.jpeg
 
Yah, judging from that last photo, it looks like that whole cook box has some bad corrosion. It happens on some of them. I am not sure exactly what the cause is. Likely something the previous owner liked to cook had some kind of grease in it that could eat away at aluminum.

My suggestion would be to find a different cook box. Those 13 bar cook boxes are pretty common and available. However, you already have a lot of work in on that one. This is maybe a place where the JB Weld (HIGH HEAT) would shine. Build up those post mounts with the JB Weld.

I would go for another cook box but honestly, I can’t find the deep boxes around that much here. The ones I’m finding are at least 1.5 to 2 hours away and the people always seem to want a high price.
I’ll have to see if the JB Weld High Heat will work out.
 
Extreme measure1: Drill all the way through with a tap drill and tap for either #10-32 or 1/4-20 (I thought those screws are #10 but someone else posted that they were #12) . Use appropriate stainless steel screw.

Extreme measure2: Drill clearance drill all the way through and use a SS screw from inside the cook box.

Use JB Weld High Heat to build up the boss as needed.
 
Thanks for the tip!
So this morning, I was working on the cook box more and removed the drip pan rails on the bottom after letting penetrating oil soak on the screws all night. The one side came off flawlessly. However, When the other sides screws came out of the other side, the threads left behind seem to be destroyed and the raised mounts deteriorated as if only corrosion was holding that side together. Any suggestions on how to mount the new drip pan rails when they arrive?

View attachment 13692View attachment 13693
I have repaired one of these posts on my daughters 1000 not as bad as what you have but it did have chunks out of it and after 2 years working fine. Here is the first thing I would ask do the screws till screw in? If so I tried Quik Steel it did not work and I am skeptical whether the JB weld high heat would work either since this is a structural problem regular JB Weld the 2 part mix is what I used.

I wish I could find that post as I had a video from YouTube that described what to do but from memory here is what I did. Coat the screw with 3 and 1 0il, ATF would mostly work also. Put the screw down about a 1/4 inch mix the JB lay it on the post overlap the damage no need to sand this down later just leave it alone. Wait 15 minutes take the screw out it should not stick to the JB leave to cure for a day. Then again coat the screw fill from the top of the post, push down on the screw into the filler turn 1/2 on the screw let sit for 15 or 20 minutes take the screw out. Let sit another day.

When you go to attach the rails don't go crazy tightening the screws to much and risk stripping them not holding a ton of weight.
 
Extreme measure1: Drill all the way through with a tap drill and tap for either #10-32 or 1/4-20 (I thought those screws are #10 but someone else posted that they were #12) . Use appropriate stainless steel screw.

Extreme measure2: Drill clearance drill all the way through and use a SS screw from inside the cook box.

Use JB Weld High Heat to build up the boss as needed.
Thanks Ed! I will definitely give one of those suggestions a try!
 
I have repaired one of these posts on my daughters 1000 not as bad as what you have but it did have chunks out of it and after 2 years working fine. Here is the first thing I would ask do the screws till screw in? If so I tried Quik Steel it did not work and I am skeptical whether the JB weld high heat would work either since this is a structural problem regular JB Weld the 2 part mix is what I used.

I wish I could find that post as I had a video from YouTube that described what to do but from memory here is what I did. Coat the screw with 3 and 1 0il, ATF would mostly work also. Put the screw down about a 1/4 inch mix the JB lay it on the post overlap the damage no need to sand this down later just leave it alone. Wait 15 minutes take the screw out it should not stick to the JB leave to cure for a day. Then again coat the screw fill from the top of the post, push down on the screw into the filler turn 1/2 on the screw let sit for 15 or 20 minutes take the screw out. Let sit another day.

When you go to attach the rails don't go crazy tightening the screws to much and risk stripping them not holding a ton of weight.
Brian, I think that will be the ticket. They do still screw into what’s left so I’m thinking that will be the first route I will try and if that doesn’t work, then I can explore drilling out and so on.

I really appreciate everyone’s help and input here!
 
Brian, I think that will be the ticket. They do still screw into what’s left so I’m thinking that will be the first route I will try and if that doesn’t work, then I can explore drilling out and so on.

I really appreciate everyone’s help and input here!
Yes, absolutely, if you still have some bite with the screw, even a little, it should be enough to hold the bracket that holds the pan. The JB Weld will increase the surface area and stabilize the joint....should work well. Even if you have to do the extremes, I'd still use the JB as Brian describes for stability. Good luck, Steve!
 
Brian, I think that will be the ticket. They do still screw into what’s left so I’m thinking that will be the first route I will try and if that doesn’t work, then I can explore drilling out and so on.

I really appreciate everyone’s help and input here!
Good luck Steve hope it works make sure you clean that joint before filling and one thing I have learned with JB it will cure a lot faster in direct sun especially this time of year.
 
Thanks everybody!

I also have been looking for burner tubes to replace the rotted ones. I am finding two different part numbers for the Gen 2000. Part#20428 and Part#7506.
At first it just seemed like a new part number super ceded the original 20428. However, when looking at actual photos of the two different sets of burner tubes, the 20428 seems like it matches what came off of my Gen 2000. The center tube is vertical with the crossover tube running through it.
The 7506’s center tube is positioned horizontally just like the other two burner tubes, and the crossover tube lays flat on the end of the tube.

has anyone ever experienced the same differences uponlooking at the two different part numbers?
Is there any real difference in performance?

thanks for all the help!

I've seen both burner tubes from when I've picked them up for rehabs.

The 7506’s center tube is positioned horizontally just like the other two burner tubes, and the crossover tube lays flat on the end of the tube.
- this one has flames in the middle of the tube

20428 seems like it matches what came off of my Gen 2000. The center tube is vertical with the crossover tube running through it.
- Mine have the the flames on both sides of the tube (instead of just the middle).

Not sure of performance, I kept the 20428 on mine because I figured more flames, it may run hotter? But I'm sure the btu label shows its the same heat. (haven't compared). Ultimately, I don't know if there is a big difference.

Thanks for the feedback Alex. I found a set of 7506 burner tubes on ebay for $20 last night. They are the ones from Weber so I bought them simply because of price. I was going to buy the 20428 set from Ereplacements.com and I still may just to see the difference.


Back
Top