Cranberry Silver C


John G (Boston)

TVWBB Super Fan
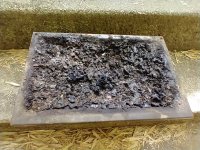
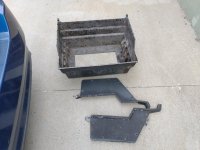
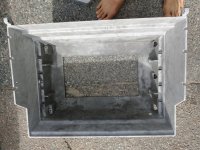
Hello Everyone... As you all can see I have "spazzed" a bit here on my projects. The redhead is on hold for a bit while I sort out the bent frame (I do have a good cookbox for it now, thanks to Hank). The Junior is all apart and indoors awaiting spare time. And now - I have just sand blasted a Silver C cookbox and endcaps? What's up with that? Well here's why...

When I first started my grill odyssey I tried to find a Silver C, preferably a 2000-2001 model. I really liked the look of these grills. I missed several early Silver C grills listed on CL (a couple free and one great deal - all gone before I saw the ads). I did manage to collect quite a few other grills (mostly B's) in the meantime. And, I did eventually get one early Silver C but it was in tough shape.

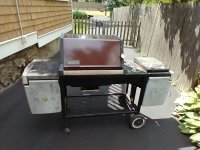
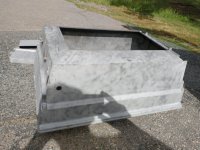
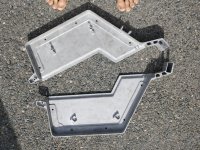
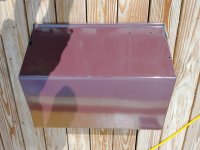
Then I saw THIS for free on CL. The ad was only up for a short time (possibly minutes). I was lucky this time - and brought home this beauty. I guess I'm officially in trouble here. A friend asked me today how many grills I had. And, you know... I'm not sure any more just *how many* I have.

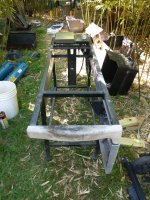
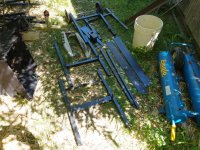
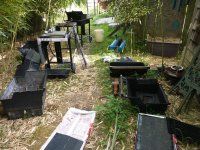
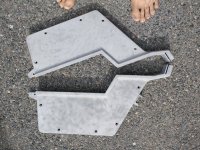
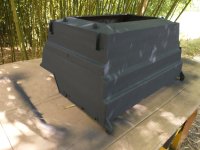
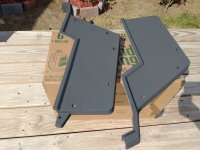
So, this Silver C needed minimal work to get me up and cooking - and it was the exact model I had originally been looking for. Well I decided to do it up and finally get me a grill to use. I will get back to the other "collector" grills after this little diversion. Who says I can only have one grill, right? I'll post pictures as I go...
 

Attachments

  • FREE.jpg
    FREE.jpg
    156.7 KB · Views: 78
  • Yup Fits in a Prius.jpg
    Yup Fits in a Prius.jpg
    185.9 KB · Views: 78
Here's the Silver C frame before (boy that's a l-o-n-g frame)... And all apart. Also, a shot of the "new arrivals" area - taking two grills apart at the same time (the C and the Junior).

On the Silver C I'm thinking of just touching up the few little rust spots and leaving the rest of the frame alone. I cleaned most of it up and it looks pretty nice. Pretty hard to beat a factory paint job. There are just a couple of little spots to touch up. I plan to oil the inside of the frame to help control future rust.
 

Attachments

  • Frame.jpg
    Frame.jpg
    263.5 KB · Views: 31
  • Frame apart.jpg
    Frame apart.jpg
    275 KB · Views: 31
  • dismantle.jpg
    dismantle.jpg
    288.9 KB · Views: 31
Nah, that is booster fuel. If you really want to get a good hot cook going, heat you grill up on high and then put a match to the stuff in that tray. You will have a 1200 degree sear station going in a few minutes.
I think that treatment is what led to me getting a warranty replacement fire box on my Genny, so I’m not going to say that you’re completely off base…
 
I have had it happen to me Lee. But I caught it before it got too bad.
I picked up a Silver B 3-4 years ago to rehab. I met the guy and showed me how the knobs had melted. I asked him what happened and he said that it had a nuclear melt down and he had flames three feet high shooting out of it and it almost caught his garage on fire.
As I was leaving, I noticed that he had Fire Department logos on his personalized license plates. I asked him if he was a fire fighter and he replied "YES". I just smiled and kept pushing the grill down the driveway.
I also picked up a Genesis II where the cook box was actually melted away on the bottom from a nuclear meltdown.
 
Might be time to clean the tray...
Went over to father-in-law's house to check on things while they're on vacation. Cleaned out his E-210 while I was there-the tray looked like that. The grease tray had 3/8" of grease in it.
I think he dodged a bullet.
 
Yah, I think there are a lot of "bullets" out there. Most of the rehab grills that I pick up for free or a few bucks look like that. I picked up an E310 that was full of gunk all the way to the bottom of the burners. When I cleaned that out, I found a lot of odd stuff to include a dinner fork.
 
Yeah we had one a few years ago. Fire dept was here (not my house a neighbor) and acrid smoke is pouring out the back side of the house, deck was on fire and so on. Could days later a pretty badly melted Genesis was on the street in front
 
Here's the Silver C frame before (boy that's a l-o-n-g frame)... And all apart. Also, a shot of the "new arrivals" area - taking two grills apart at the same time (the C and the Junior).
If I dared to take two grills apart at once, I think I would end up with two frankengrills, or worse, nothing....
Or maybe that is what I am getting with my Spirit 850 and Genesis 3000 anyway.
 
Hello Everyone,

Did a little work on the Cranberry Silver C over the last few days so here's a few pictures... Hope no one minds if I repost the sandblast photos so they end up all together in this thread.

So here are the cookbox and endcaps before being blasted and after being blasted.
 

Attachments

  • Before blasting.jpg
    Before blasting.jpg
    202.9 KB · Views: 24
  • Cookbox blast.jpg
    Cookbox blast.jpg
    204.3 KB · Views: 23
  • Cookbox blast 2.jpg
    Cookbox blast 2.jpg
    194 KB · Views: 24
  • Endcaps blasted inside.jpg
    Endcaps blasted inside.jpg
    297 KB · Views: 26
  • Endcaps blasted outside.jpg
    Endcaps blasted outside.jpg
    302.2 KB · Views: 25
Cookbox and endcaps after being painted... I painted them with Rustolium spray high heat BBQ paint. I just painted right over the blasted aluminum with no primer (all I did was wash everything down with brake cleaner first). I did not paint any of the inside areas as shown in the old Weber brochures (they all show bare aluminum inside). Also, a shot of the painted endcap bolts.

All in all I think they came out OK. I'm not that great with a spray bomb and I can find a couple of light "streak marks" on one of the endcaps if I look just right. But overall I'm happy with it.
 

Attachments

  • cookbox painted.jpg
    cookbox painted.jpg
    114.9 KB · Views: 20
  • endcaps painted.jpg
    endcaps painted.jpg
    150.8 KB · Views: 19
  • endcap bolts.jpg
    endcap bolts.jpg
    93.1 KB · Views: 19
I use Rustoleum High Heat Ultra (semi gloss) on the end caps. I am interested to see what yours look like on the lid.
 
Cookbox and endcaps after being painted... I painted them with Rustolium spray high heat BBQ paint. I just painted right over the blasted aluminum with no primer (all I did was wash everything down with brake cleaner first). I did not paint any of the inside areas as shown in the old Weber brochures (they all show bare aluminum inside). Also, a shot of the painted endcap bolts.

All in all I think they came out OK. I'm not that great with a spray bomb and I can find a couple of light "streak marks" on one of the endcaps if I look just right. But overall I'm happy with it.
You did a great job painting that. Getting everything sandblasted first makes a huge difference in the way the paint looks too.
 
I spent a few hours carefully cleaning the porcelain lid insert. I used Simple Green and razor blades on the carbon, followed by buffing with 0000 steel wool and Simple Green. The carbon was a bugger to get off. I buffed the outside with 0000 steel wool and Simple Green.

There is, sadly, a light scratch on the top of the lid - not deep at all but it's there. I couldn't see it when the lid was dirty. There are no chips in the porcelain under the endcaps but I did find a couple of little ones right at the "riveted" joints inside. The photo of the outside does not look so great due to all of the reflections going on there. Where you see black at the edges is not chipping - it was a little "undersprayed" when they put on the cranberry color. This, of course, is covered by the endcaps.

Did I get the inside clean enough? Here's the "Weber lid selfie"...
 

Attachments

  • Lid Outside.jpg
    Lid Outside.jpg
    130.6 KB · Views: 39
  • Lid Inside.jpg
    Lid Inside.jpg
    101.4 KB · Views: 39
John G,
Looking very good to me. I think you have to accept a certain amount of "patina" even on a well-restored grill. These things are getting pretty old, so finding ones with no signs of use is not realistic most of the time. That is especially true with a less common color like the nice one you have.
 
Fantastic job! It is a little disappointing when you put in all the time and effort and can't make it look perfect, but it's not for lack of trying. I've looked at a lot of YouTube videos on getting scratches out of porcelain but haven't come up with anything that looked worth trying. If someone knows a way to at least minimize the scratches we find in the lids I hope they post it for us.


Back
Top