You are using an out of date browser. It may not display this or other websites correctly.
You should upgrade or use an alternative browser.
You should upgrade or use an alternative browser.
Cranberry Silver C
- Thread starter John G (Boston)
- Start date
Steve Hoch
TVWBB Olympian
I've tried it. It's kind of like doing it on a car except it takes the sun a few months to dull the finish and it only takes one cook to do it on the grill lid.I have heard some use an automotive buffer to really shine them up and from what I understand, it does hide some minor scratches but they come back after a while.
John G (Boston)
TVWBB Super Fan
Thank You to everyone for all the kind words and support. I should be getting a little more done tomorrow. More pics coming soon ")
HankBates
TVWBB Pro
I'd like to see what rubbing compound or some windshield repair abrasives might do, but I don't have a spare faded control panel to try them on..
Maybe even valve grinding compound ? Has anybody tried this?
Since the presence of water on the surface of a faded panel temporarily solves the problem, I don't think that there is damage to the painted surface below, just to the surface of the glass. Different colors, however, will heat differently in the sun, which could explain why some colors appear to fade more than others.
Something like this? https://www.amazon.com/dp/B005HWBC5S/?tag=tvwb-20
Or this? https://www.amazon.com/dp/B00BBMB0H8/?tag=tvwb-20
Bruce
TVWBB 2-Star Olympian
Something specifically designed for glass might just work, however, I do think the fading is pretty deep seated in the porcelain.
As far as the fading goes, it seems to me to affect just the black lids and panels almost exclusively. I am sure a 30 year old red lid is still "faded" from what it was when new, but I have yet to see the "Haze" on any of them or other colors that the black seems to suffer from.
As far as the fading goes, it seems to me to affect just the black lids and panels almost exclusively. I am sure a 30 year old red lid is still "faded" from what it was when new, but I have yet to see the "Haze" on any of them or other colors that the black seems to suffer from.
Jon Tofte
TVWBB 1-Star Olympian
I have noticed, too, that it is almost always black hoods, which the heat effect from the sun would go along with. I know that sun/exposure is part of the equation because I have an old Jr. black hood that was taped off by the prior owner (who gave it to Bruce who gave it to me!) back who knows how long ago. The black under the tape is much better than the parts that were exposed which show that "Weber fade".
John G (Boston)
TVWBB Super Fan
If water temporarily makes the panel look good I would think there is a surface hazing or etching going on. A frosted glass insulator (sand etched over time) will often look fine (or at least better) wet. If the color is actually gone or lighter then it seems that the damage may be further in.
I have a 22 inch kettle (my first Weber grill) that has some pretty good "Weber fade". I'll have a closer look at it. I bought the kettle brand new, around 20 or 21 years ago on clearance in the late Fall - of all places in a supermarket. I still remember the price - $19.95. I think it was marked down from $119.95, if I recall.
I have a 22 inch kettle (my first Weber grill) that has some pretty good "Weber fade". I'll have a closer look at it. I bought the kettle brand new, around 20 or 21 years ago on clearance in the late Fall - of all places in a supermarket. I still remember the price - $19.95. I think it was marked down from $119.95, if I recall.
Jon Tofte
TVWBB 1-Star Olympian
I have never heard of anything that works long-term. Spray on some Pam and you usually will get very positive results if you don’t mind a greasy grill hood. And, of course, it will burn off quickly.
I would never advocate painting a porcelain hood/lid but I would be curious what spraying on a coat of high heat gloss clear coat might do.
I would never advocate painting a porcelain hood/lid but I would be curious what spraying on a coat of high heat gloss clear coat might do.
Steve Hoch
TVWBB Olympian
I don't think anything will actually solve the fading issue, especially when they get really bad and become "speckled" with all those little dots. Removing scratches from an otherwise nice lid or control panel is possible I'm sure with the right substance and maybe an actual buffer pad on an angle grinder.
John G (Boston)
TVWBB Super Fan
Hello Everyone,
Slow going, sadly - had to work on other things last couple days. But I got the end caps back on the lid, using the original hardware. I snugged the nuts down "about that tight" - hoping they are not too tight or too loose. Looks like a fine line to walk between cracking the porcelain and having them come loose and wiggle around (which can also crack the porcelain due to movement). Just had to tell myself, "This is NOT a Cummins or Kubota engine" - It's not going to shake itself apart.
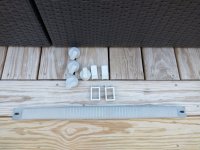
Then I cleaned up the small plastic parts and the handle. Thank You to Bruce for the suggestion (elsewhere in the forum) on how to clean. I soaked the knobs and switch parts in 50/50 bleach and water for four hours (outside - I detest the smell of bleach) and then went over them with a piece of green Scotchbright. The handle I just scrubbed with the Scotchbright (and bleach).
The handle still looks a little dark to me but it seems to be made of a different material than the knobs and switches. I can see fiberglass sparkles in the handle so I'm thinking it is actually glass filled epoxy (like some modern car door handles). I may try Bon-Ami on it and see if I can "buff" out a little more of the darkness. Then I'll hit it with Plexus or Aerospace 303 (depending on what I can find).
And, a little setback... I did not realize that the top of the gas valve on the side burner was zinc (or maybe aluminum?). The brass nut holding it on had basically dissolved the threads on the valve. So when I took off the nut the threads just turned into white dust. I thought the valve was brass. Had I known, I would have left it alone and worked around it. So now I need to figure out how to remount the valve. I may play with aluminum foil and lock-tite - and see if I can get the nut to hold. I *do* have a parts grill but I surmise the valve is made the same way (I will check).
OK, That's all for now... Hope to get back on it soon...
-John (Boston)
Slow going, sadly - had to work on other things last couple days. But I got the end caps back on the lid, using the original hardware. I snugged the nuts down "about that tight" - hoping they are not too tight or too loose. Looks like a fine line to walk between cracking the porcelain and having them come loose and wiggle around (which can also crack the porcelain due to movement). Just had to tell myself, "This is NOT a Cummins or Kubota engine" - It's not going to shake itself apart.
Then I cleaned up the small plastic parts and the handle. Thank You to Bruce for the suggestion (elsewhere in the forum) on how to clean. I soaked the knobs and switch parts in 50/50 bleach and water for four hours (outside - I detest the smell of bleach) and then went over them with a piece of green Scotchbright. The handle I just scrubbed with the Scotchbright (and bleach).
The handle still looks a little dark to me but it seems to be made of a different material than the knobs and switches. I can see fiberglass sparkles in the handle so I'm thinking it is actually glass filled epoxy (like some modern car door handles). I may try Bon-Ami on it and see if I can "buff" out a little more of the darkness. Then I'll hit it with Plexus or Aerospace 303 (depending on what I can find).
And, a little setback... I did not realize that the top of the gas valve on the side burner was zinc (or maybe aluminum?). The brass nut holding it on had basically dissolved the threads on the valve. So when I took off the nut the threads just turned into white dust. I thought the valve was brass. Had I known, I would have left it alone and worked around it. So now I need to figure out how to remount the valve. I may play with aluminum foil and lock-tite - and see if I can get the nut to hold. I *do* have a parts grill but I surmise the valve is made the same way (I will check).
OK, That's all for now... Hope to get back on it soon...
-John (Boston)
Attachments
Steve Hoch
TVWBB Olympian
The bleach does wonders for the old knobs and igniters. I always use a black sharpie to "paint" the pointer mark back on the old genesis knobs.
John G (Boston)
TVWBB Super Fan
Maybe I can find a stainless one. That's a good idea, Hank! I may still try to get the brass nut to hold. First I need to clean everything up and see what's left of the threads.How about replacing the brass nut with something like an axle push nut?
John G (Boston)
TVWBB Super Fan
Hello Everyone,
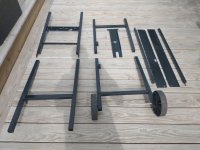
Been busy with lots of other projects lately so time has been a little short on the grill project. But I have done a few things and I'm getting ready to put some of it back together. So far, I have decided to keep the original paint on most of the frame. I cleaned it up and it looks presentable enough for a daily driver. I *did* use rustolium rust converter on the few places that had a little rust - and on pretty much the entire manifold, which was pretty rusty. Not sure how well that stuff works but thought I'd give it a try.
The only part of the frame I painted was the cookbox crossmember, which was good and solid but had some scabbing around the bolt hole and also had damage to the paint on the top surface (maybe from heat?). I sanded it to roughen it up a little and painted it with high temp engine paint (gloss) - it looks OK. You can see on this grill the axle shaft is still nice and clean. Some of them get very rusty.
Attachments
John G (Boston)
TVWBB Super Fan
Next, I oiled the inside of the frame (and, well... yes, unintentionally also the outside... and my hands... and the saw horses... and my forehead...)
This should keep future rusting to a minimum and, providing I don't light it on fire, should help the grill last a good long time. I used HD30 oil.
My first attempt was to saturate a piece of paper towel, wad it up and press it down into the frame tube an inch or so, and then pour a quarter inch of oil on top of it. I then slowly pushed the wad down the frame tube with a piece of bamboo - while the opposite end of the frame was in a tunafish can to catch the wad and oil. The theory was that the quarter inch of oil would spread itself on the walls of the tube as I pushed the wad through.
It was a nice theory. What actually happened, though, was the wad got hung up here and there , eventually turned sideways, and came out the bottom *without* spreading the oil. Also, the bamboo became so slippery that I nearly got it stuck in the tube. After several tries I moved on to plan B.
Next, I poured oil down one sidewall of the frame tube while holding it an an angle, rocking it side to side. The opposite end drained into a tunafish can. I was able to look down the tube and actually "steer" the oil so as to cover the entire sidewall of the tube as well as the corners. I repeated this three more times to complete the first tube. I did four "pours" for each frame tube (one down each wall) and let each tube drain into a tunafish can for about a half hour (reusing the drained oil for the next tube).
I still need to do the three welded crossmembers (which have no access to the ends of the tubes). My plan is to squirt oil into the holes and rotate the frame in hopes of covering most of the interior surfaces, especially the welds at the ends.
Attachments
Ralph
TVWBB Super Fan
Unfortunately, that would have required a PM plan, something that seems to be a foreign idea to many municipalities.The city of Boston should have done the same with their lamp posts
It's also sad what one of the city councilors said: "replacement poles will need to be ready to "withstand the elements of salt water and sea air which led to this incident."". Maybe that should have been in the original requirements?
I feel sorry for the woman that was injured. I heard that she's still in the hospital, upgraded to "fair" condition.
https://www.boston.com/news/local-n...after-moakley-bridge-light-pole-falls-on-her/
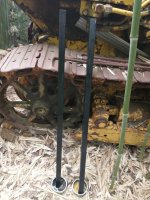
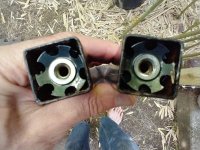
John G (Boston)
TVWBB Super Fan
Hello Everyone,
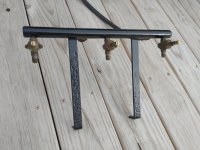
Got some more done on the Cranberry C. Had to replace the tubing connectors on the lower cross members. One had rusted badly and the other three actually had stress cracked. I oiled the new inserts and pushed them in. They are actually round but seem to hold OK in the square tube. I chased the threads on the original bolts and greased them.
Got some more done on the Cranberry C. Had to replace the tubing connectors on the lower cross members. One had rusted badly and the other three actually had stress cracked. I oiled the new inserts and pushed them in. They are actually round but seem to hold OK in the square tube. I chased the threads on the original bolts and greased them.
Attachments
John G (Boston)
TVWBB Super Fan
I then assembled the frame, using all of the original bolts, greasing the threads. For now I reused the casters. They don't roll (probably a good thing, actually) but they are still nearly round. I may get new ones at some point or I may make "landing gear" pads (like a semi-trailer has) instead. That way the grill won't try to move around too much.
Attachments
