Another Genesis 1000 rehab, FB marketplace find for free


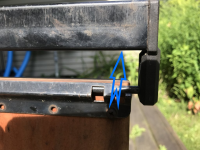
John: The original clips provide space between the control panel and the grill frame which pushes the frame to the right about 3/16". Without those spacers and screws, the control panel would likely slide around a bit and would probably contact the cook box on the left side. Would it work without the clips and screws? Yes, it probably would but it is not optimal really.
If you omit the original weber clips and just use regular automotive style clips, it would set the control panel about 3/16" further to the left and again but it up against the cook box. It would also misalign the valves with the opening in the control panel by that same 3/16". Again, it would probably work, but is not optimal.
Bruce,

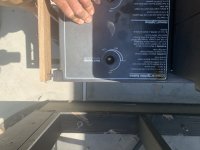
I am not disagreeing with you, and I respect your knowledge of these grills and willingness to share that knowledge, but I just popped the control knobs off this 93’ 1000, and the burner controls seem to line up perfectly (to my carpenters eye) with the holes in the panel without spacers.

Caveat is I installed the later model three sided shroud which bumps the panel out about 1/16”.
D991733D-3E9B-4F50-AA6A-77468628A3F9.jpeg

58601F0D-2112-401D-B51B-1D9F07CEDC18.jpeg
 
Looks good John. Yep, it doesn't look like you need the clips for proper alignment with the control panel.
 
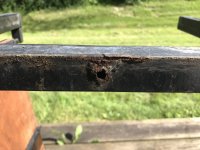
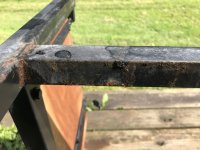
finally had time to disassemble the grill a bit. I am hoping to paint the frame today. The Worst rust as expected is that crossbar to the side of the cook box. I am planning on cleaning it with a steel brush and then using a rust encapsulation an painting over it. is this right course of action? Really hoping I don’t need to replace the whole bar.

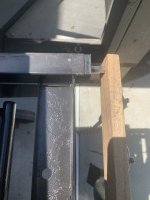
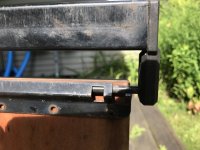
Also I am having trouble getting the table assembly end cap off. is this something that just needs to be pried off with force?

E8BAE2A3-811D-4AF4-A58A-8CFA5442D877.jpeg
75E6F8EC-A46B-453B-A502-638555278916.jpeg
A532DB7F-3155-405A-9EC7-D25EDC211A26.jpeg
 
Jeffrey: That end cap will come out easily but there is a slot under the frame where the arrow is pointing. Stick a flat head screw driver into that slot to release the catch that is holding the end cap in. Once you get the end caps started out, you can remove the screw driver to get the end cap the rest of the way out.

Untitled.png

That cross member is in pretty rough shape. You can probably clean it up and repaint it and get several more years out of it. But, if you want to replace it, it is possible.

 
Jeffrey: That end cap will come out easily but there is a slot under the frame where the arrow is pointing. Stick a flat head screw driver into that slot to release the catch that is holding the end cap in. Once you get the end caps started out, you can remove the screw driver to get the end cap the rest of the way out.

View attachment 57524

That cross member is in pretty rough shape. You can probably clean it up and repaint it and get several more years out of it. But, if you want to replace it, it is possible.

Thanks for the help. I watched your video the other day. It’s very helpful. I think that’s a project I’ll definitely tackle In the near future.

unrelated, I just got the end caps off the cooking lid (jammed a putty knife under the nuts to get them off as per your advice on an early thread as I don’t have an impact wrench) should I treat the inside of those end caps like I would the inside of the lid? Are they porcelain coated as well?
 
The end caps are aluminum. They don't have any porcelain on them. The outside of the aluminum end caps are painted. However, the inside of the lid is porcelain coated just like the outside.
 
The end caps are aluminum. They don't have any porcelain on them. The outside of the aluminum end caps are painted. However, the inside of the lid is porcelain coated just like the outside.
Yeah, I already stated the inside with a razor scraper and degreaser. I think I’ll just blast both sides of the end caps with the pressure washer at the car wash


You will have to get a Bauer charger and battery to make the Harbor Freight model work. All these battery tools pretty much force you to pick a brand and go with it, if you are going to get any savings from sharing charger(s) and batteries. I understand there are some work arounds for this, but I am not sure I would want to trust that myself.
 
Jeffrey: That end cap will come out easily but there is a slot under the frame where the arrow is pointing. Stick a flat head screw driver into that slot to release the catch that is holding the end cap in. Once you get the end caps started out, you can remove the screw driver to get the end cap the rest of the way out.

View attachment 57524

That cross member is in pretty rough shape. You can probably clean it up and repaint it and get several more years out of it. But, if you want to replace it, it is possible.


I think I may actually just replace that crossbar. Your video makes it look fairly easy and straightforward. i am going to order those leveling inserts from McMaster. I don’t really understand why the Weber manual calls for nylon washers agains the firebox. Wouldn’t it just melt? Have you ever used a high heat resistant washer? I saw McMaster sell a high heat ceramic washer for a few bucks.
 
You may be able to find a source even less expensive. That was just the first listing for them that I found when searching on Amazon.
Oh, and make sure they are the right size for the tubes you are using. I think the cross member is 1 1/4"

 
Last edited:
You may be able to find a source even less expensive. That was just the first listing for them that I found when searching on Amazon.
Oh, and make sure they are the right size for the tubes you are using. I think the cross member is 1 1/4"
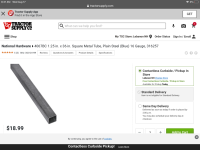
I plan on picking this one up. Home Depot and Lowe’s doesn’t seem to have anything in stock

E9AEB9A0-B1EA-405D-B6EF-F46038FA389D.png
 
That should work. Another alternative is to cut a piece out of a donor grill frame. There is a lot of 1 1/4" tubing on the genesis grills.
Make sure you get star connectors that are the right size of 1 1/4" for that tubing.

Here is an ebay listing. I could not find them on Amazon with a quick search.
 
I wasn’t really thinking and just used regular Rustoleum rust reformer on the manifold and not the high heat primer. How hot does that manifold get? Would it be ok to leave it on or does it get too hot?
 
I wasn’t really thinking and just used regular Rustoleum rust reformer on the manifold and not the high heat primer. How hot does that manifold get? Would it be ok to leave it on or does it get too hot?
No, you're good. Put a couple coats of high heat paint on it and it will be fine. That's how I repaint my manifolds and they are fine. It only really gets hot where it connects to the fire box and maybe a few inches past that.
 
No, you're good. Put a couple coats of high heat paint on it and it will be fine. That's how I repaint my manifolds and they are fine. It only really gets hot where it connects to the fire box and maybe a few inches past that.
Cool, i thanks I will do exactly that.


Back
Top