The main reason I added the CAT5 jack is because there is no proper jack to plug in the servo, and since the fan and servo are together as a unit I thought they should be wired together with one wire. (I have grown tired of being careful with the makeshift servo connector, and never liked the idea of having it's connector dangling outside of my HM case in the first place) Now I can plug and unplug the servo from the HM in a more proper manner, and have the option to include the fan power in the same cable. (or I can still use a separate wire connected to the original fan port)
As for the probes, I don't know if I am on the same page... Cause sometimes I use just one pit probe, other times I need a meat probe, more rarely I need two meat probes. So my probe configuration changes from cook to cook. The probes are a PITA even when they are connected individually, they love to tangle, so I would think having them all tethered to one CAT5 plug would be a nightmare. Not to mention that you would have to alter the probes and remove the plugs from them to do this. So I am plenty happy with the way the probes connect currently and see no good reason to change.
Although, as Bryan stated, there is already a ground in the plug for the servo which could be shared for the probes, so you could actually attach 3 probes to this CAT5 plug along with the servo and the fan if you wanted to. The wires I have in the CAT5 jack right now are Servo (Gnd, +5V, Control), Blower (+12V, Control), if Bryan does flip flop the fan control so the 12V is pulsed rather than the connection to GND that would free up one more wire and you could do all 4 probes with this one CAT5 connector (along with the servo and fan)
I had asked for a CAT5 or phone jack to be added to the HM board (to replace the current fan connector and integrate the servo into the jack), Bryan was reluctant because the HM board is jammed tight as it is and he didn't think it could be done. Now that I have this worked out I am fine with this setup, though it would be nice if the HM board would have a header for the servo and fan to wire in this new jack if you wanted it. (I don't think that would be as difficult to accomplish as adding a CAT5 jack to the board?) There is a place to wire in the fan directly to the board (two spare holes under the fan connector) so I connected the fan wires there, but the servo wires all had to be piggy back soldered to the solder joints of the components. Not an impossible setup, but not the best either...
The way I setup this CAT5 jack it is not "mounted" to the case, so If I need to remove the HM board(s) from the case for any reason the CAT5 jack will come right out with it, no problem... I'm not sure yet if I will rework the case design to print with the hole and latch area for the CAT5 jack or just continue to manually alter the case to fit the jack, it was pretty easy to do with a hack saw blade and some super glue (to mount the plastic for the latch). I doubt I would have the unit in hand yet if I had gone about altering the 3D case design and printing it, and if I did I would have to alter the case design manually every time the case was updated unless Matt or Tom decided to include this version in their lineup (I'm not even gonna ask, they already maintain two case designs for two different displays). So the availability of a case with this feature may be questionable, but you can always alter your case on your own.... (FYI, I am using the case for the larger 4-line display, which I believe is a tiny bit larger than the case for the standard 2-line display. I am not 100% sure it will work the same in the smaller case, because I haven't done it, but I have looked at it and I am reasonably sure it should work out the same)
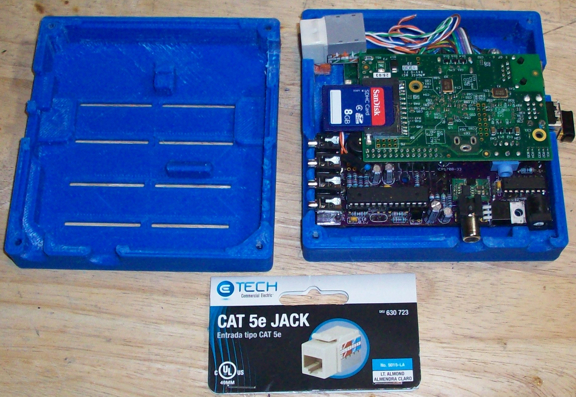
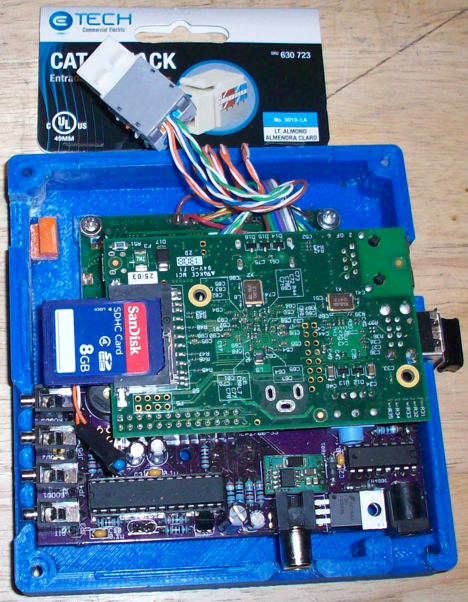
I opened up my case and shot some pics of the inside today in case anyone was interested in doing it themselves. I got the
CAT5 jack from Home Depot (you can see the label in the picture), it is the type where you just punch down the wires and it snaps into a standard wall plate. I inspected the wall plate at the store to get an idea how to make a mount for it, I didn't end up mounting it exactly the same as the wall plate in the end. I just made sure the hole was tight to the jack on all sides and used the latch to prevent forward and backward motion. One piece of plastic glued in was all it needed, I used a piece that had an L-shape cause it was easier to position while gluing (and I had scraps handy), but you could actually use the piece of plastic you cut from the case glued in place to do the same job. (BTW, I just cut straight down with a hack saw blade on both sides then snapped the plastic out with some pliers. I cut down about 6mm on the top and 10mm on the bottom. The cuts need to be about 15mm apart)
Here are the pics:
And here is a pic showing the piece of plastic I glued inside for the latch. I used an orange plastic scrap so it would be easy to see what I added...
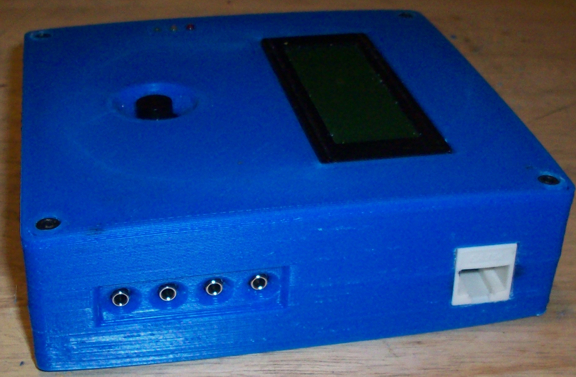
...and a pic of the whole thing assembled to make this post more comprehensive...
The CAT5 jack would have fit on either side, I chose the same side where the probes connect so all the wires would be on the same side. So you could put another CAT5 jack on the other side to use for the probes if you wanted that... (or put the probe jack on the same side as the regular probe jacks, and the blower/servo jack on the same side as the USB which is where I hear the power jack will be moving in future HM versions) I personally like the setup as I have it with the Servo+Fan on the CAT5 and the probes separate, but you have the option to attach some probes to this CAT5 jack if you like, or add a separate CAT5 jack for the probes.... whatever floats your boat! The
Home Depot Website shows the CAT5 jacks available in color(s), it would have been nice to have a blue jack but I didn't even think of that when I was brainstorming this at the time.....