What to do with all these grills......


Nice looking bird. What is the metal piece near the front of the bbq?

Regarding burning food, I just have recurring memories when I first tried doing ribs on the BBQ and turned out awful. At the time, I had a Silver A, 2 burner, and tried indirect heat by just having 1 burner on. It wasn't hot enough, so had to put on both burner, and tried to find a spot not directly over the burners. Ribs ended up super dry, and tough, and I vowed never to try again until I got a 3-burner.

So I'm still procrastinating because I don't want something like that to happen again. :p
Ribs can be tricky, no doubt, and everyone has their own special technique. I like to sous vide ours first, then finish them on the roto with a healthy dose of a BBQ sauce recipe we got from a Smart & Final mailer we got years ago. But whole chicken is dead simple, especially if you brine it first. Did you notice that J Grotz had a Meater stuck in his for temp monitoring?
 
Nice looking bird. What is the metal piece near the front of the bbq?

Regarding burning food, I just have recurring memories when I first tried doing ribs on the BBQ and turned out awful. At the time, I had a Silver A, 2 burner, and tried indirect heat by just having 1 burner on. It wasn't hot enough, so had to put on both burner, and tried to find a spot not directly over the burners. Ribs ended up super dry, and tough, and I vowed never to try again until I got a 3-burner.

So I'm still procrastinating because I don't want something like that to happen again. :p

And after the chicken you can do desert. Pineapple glazed with brown sugar and maple syrup. Sliced while hot with a scoop of ice cream on top. 😋

7D0A12E2-D3DF-4646-BF63-1EAEDA0D0636.jpeg
 
Not yet. I really wanted one, and ended up picking up a grill that had everything except the counterweight (motor, bracket, split, holder). Picked up the counterweight from eBay, and then got one as a gift from my co-workers, so now I have 2 counterweights. (I didn't have the heart to tell them I already bought it, when they gifted it to me).

I've been waiting to use to rotisserie, but have been preoccupied with cleaning up/rehabbing the grills I have.

So any recommendations on where to start with to roto is much appreciated. I was thinking of starting with something cheap in case I burn it, like a chicken. Then move up to things like roasts, etc.
Chicken. Easy and about $5, so if you jack it up, no bigger. Doesn't take all day either.
 
There are also smoker tubes that sit on top of the grates so you don't have to lift the grate(s) to load...
I always remove the grates when I use the roti. And the smoker box is v shaped so it sits perfectly in between the flavorizers when I’m not using the roti. I don’t mind lifting the grate to put it in place. I’m a charcoal guy. I got the gasser for week day convenience but I have been pleasantly surprised how much smoke I can get in the food on the gasser by using that smoker box.
 
I always remove the grates when I use the roti. And the smoker box is v shaped so it sits perfectly in between the flavorizers when I’m not using the roti. I don’t mind lifting the grate to put it in place. I’m a charcoal guy. I got the gasser for week day convenience but I have been pleasantly surprised how much smoke I can get in the food on the gasser by using that smoker box.

Which smoker box do you recommend? I was thinking just foil and chips.
 
Originally I bought the smoker tube for my BGE because it's unwieldy to do a low and slow with the platesetter in place and add wood chunks. I'm not a fan of lifting a hot grate with food on it to add wood, either. And I had the roti on a dedicated kettle and I usually use the grate there, so I thought it would work well for that. But the smoker tube was a disappointment on a coal burner becuse you control the temperature by throttling the air and there isn't enough oxygen left to keep the tube going. I have the same V-shaped box that you guys do but the problem there is that it's too long for my 5-bar box with the E-W FBs so I have to lift both grates to load or reload. Granted, that sucker holds a lot of wood, but TBH I don't see a real advantage over plain ol' smoke bombs, and it's one thing less that I have to keep clean at the end of the day.

EDIT: If it's below the grates, it's gonna get dripped on sooner or later.
EDIT2: Here's one pic showing both of my two biggest complaints about the V-shaped smoker box.
 

Attachments

  • Smoker Box.jpg
    Smoker Box.jpg
    112.5 KB · Views: 10
Last edited:
There is very little road to spin meat if the grates are left in place. I have this smoker box and it works good.

https://www.amazon.com/dp/B002WJIQGW/?tag=tvwb-20
I have grillgrates which are great :ROFLMAO:! The panels are a little under 5", I think, and there's one half-size panel, too, so plenty of placement options there, but nothing I couldn't do some other way. What I like about the tube is that I can take it out of the grill to load/reload/light it if needed, and it's small enough to stand it up out or place it out of the way above the grates so I don't need to clean it.
 
Last edited:
On the pineapple try adding a little cinnamon to the brown sugar. Excellent with a scoop of vanilla ice cream. As for smoker boxes I honestly just use foil packet(s). If I have to go on a longer smoke I have multiple packets prepared. As smoke dies down I lift the grate remove the old packet and place a fresh one in. Crude, yes but works. I get fantastic smoke rings and performance
 
Alex, where are you at in Wisconsin. Have you considered attending the 2021 Midwest Weber Gas Grill Meet next summer. It will probably be in the N. Illinois area.

Nice plug there Bruce!
 
On the pineapple try adding a little cinnamon to the brown sugar. Excellent with a scoop of vanilla ice cream. As for smoker boxes I honestly just use foil packet(s). If I have to go on a longer smoke I have multiple packets prepared. As smoke dies down I lift the grate remove the old packet and place a fresh one in. Crude, yes but works. I get fantastic smoke rings and performance
Totally agree, on the cinnamon, I like to add a splash of Meyers’ rum too! If I have don’t something spinning and want that, I’ll slice the pineapple into spears and do them that way, sometimes it’s easier.
 
I tried finishing up one of the projects last night, building out my work bench so I have something to work on. Was going to use the 1000 frame because of the limited space I have in my garage.

I was planning to just rip some plywood to fit the top section, and cut a separate piece of piece where the side table would be, so in the summer I could place my golf clubs where the side table is, in between the frame. Cut 2x4 and screw them to the underside so it braces against the frame like a cross member. In theory, it would allow me to just have the plywood sit on the frame, not shift around, and I wouldn't have to drill/bolt anything into the frame. In the future, if I find it's not sturdy enough, I can always revisit. Same idea for the bottom shelf.

I also bought some caster wheels that I think fits into the existing plugs on the weber.

caster wheels.jpg

I started with:

Beginning frame.jpg

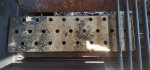
Frame didn't look too bad, just a little dirty, and a little bit of surface rust. The caster wheels were broken, so I tried get them off. One plug was absolutely seized and couldn't get it off, so started taking the entire frame apart to spray WD-40 inside to loosen it up. As I was taking the frame apart, I found that one bottom cross member frames had rusted on the inside. 1 broken bolt, one thread completed rusted and came out. When I tried drilling out the broken bolt to save the thread, that one fell out too because of rust. So I will use the great info from HOW TO: Weber Frame Cross Member repair - and purchase a thread insert.

cross member.jpg

What I thought was a quick job ended up with all these pieces and piles of rust from inside the frame:

rusted frame.jpg

But other than the cross member bar, everything else looks like in decent shape, just have to sand off the rust, use rust reformer.
misc frame.jpg

I may have to put this frame on hold for now, and just use one of my other frames to build out my work bench.

If anyone is looking for a bench vise, Blain's Farm and Fleet (not sure if they are only in Wisconsin), has them on sale right now: 6" Machinist Vise, which I plan to add to my bench.
 
I was able to put some work in over the weekend and finally have a place to work now. The plywood just sits on the frame, and have 2x4's screwed on the underside against the frame so it doesn't move. The vice is pretty heavy, and at this point don't see the need to bolt it down just yet.

finished table.jpg table side table.jpg

  • I put in a removable side table, just because.

I started to work on the handle and looks like it is salvageable:

Before:
before handle.jpg before handle 2.jpg

After: I put some wood glue to try to close some of the cracks. Not the prettiest, but will sand it down and will have that part on the back so you can't see it. Now just to find a stain that I want to put on.

handle taped.jpg after handle.jpg


Tried to start putting together the bottom shelves for the 3000 and see the condition of the Z-brackets, and I think the rust is just too bad and I may have to order new ones. :(

bottom shelf rusty.jpg

And to top off the weekend, had to make a trip to Urgent care this weekend because of this Weberitis. I had tilted the bbq on it's side to get the caster wheels off, and while I was trying to set it back down, because of the weight it came crashing down, right onto my toe in flip flops. I tried grabbing the bbq, but ended up grabbing the side table instead of the frame. Lost my nail and wouldn't stop bleeding.

IMG_20200816_163849.jpg
 
Just keep in mind when you put on the stain, the stain will not take to the glue.

Thanks Bruce. The glue was to fill in the big cracks when the handle was facing the front side, and to prevent the cracks from getting bigger. I'm flipping that part to the back, so I'm ok that the stain won't be uniform on the backside.

Hopefully I sand down the otherside, so the stain will adhere to all of the handle. We will see.


Back
Top