You are using an out of date browser. It may not display this or other websites correctly.
You should upgrade or use an alternative browser.
You should upgrade or use an alternative browser.
Weber Performer Deluxe “Burner Tube” Cleaning
- Thread starter Richard Garcia
- Start date
Kevin L (NKY)
TVWBB Diamond Member
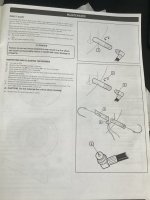
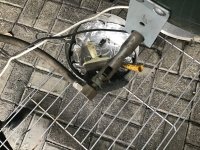
Pat has got it right noting fancy, if you have the Weber tool like in the diagram, just remove the gas hose by taking off the C clip and then run the tool in and out of the burner tube taking it all the way out to see how much junk is on the tool. If you a air compressor you can blow out the tube from inside the Kettle out . If no air source you can use a shop vac. then reassemble and cook your next meal. Enjoy.
Mike-GA
TVWBB Pro
I remove the C-clamp, then remove gas hose but I don’t bother with any other disassembly. I don’t have an air compressor so I scrape biggest gunk out of flame tube with the included Weber wire tool and then just spray water in tube using a garden hose. Just make sure you let it dry throughly to prevent rusting.
Dave Mazz
TVWBB Super Fan
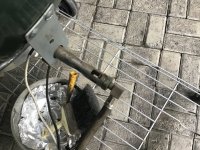
I removed the screws that secure the table to the frame. Then lifted the table off the frame and that gave me direct access. Pulled the clip and pulled the gas line out of the tube. Used a tube-shaped wire brush and canned air to clean the tube and a brass brush to clean the deposits on the end of the fitting. Put it all back together. Took ten minutes. Works great.
Richard Garcia
TVWBB Wizard
Thanx for the reply and I plan on replacing the Weber screws with stainless steel screws. What are the size of these screws or are they Weber proprietary screws?I removed the screws that secure the table to the frame. Then lifted the table off the frame and that gave me direct access. Pulled the clip and pulled the gas line out of the tube. Used a tube-shaped wire brush and canned air to clean the tube and a brass brush to clean the deposits on the end of the fitting. Put it all back together. Took ten minutes. Works great.
Dave Mazz
TVWBB Super Fan
Stainless works. I don't know the sizes. When I bought my Performer, I took the hardware and recorded the sizes, types, and quantities. Then went to boltdepot.com and ordered everything. I did not have any problems finding everything in stainless.Thanx for the reply and I plan on replacing the Weber screws with stainless steel screws. What are the size of these screws or are they Weber proprietary screws?
timothy
TVWBB 1-Star Olympian
Take one to a hardware store like Ace or Home depot and check it against one of these they have on the shelf.What are the size of these screws or are they Weber proprietary screws?

Richard Garcia
TVWBB Wizard
What is “anti-seize”?Just remember that the inserts are brass so if you do go the SS version you should buy some anti-seize
timothy
TVWBB 1-Star Olympian
What is “anti-seize”?
What is Anti-Seize? - ROCOL
Want to know more about anti-seize and how to use it? This is the read for you.

Richard Garcia
TVWBB Wizard
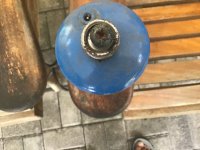
Might have a problem encountering this in Costa Rica,so, a few squirts of WD-40 into the brass inserts will suffice? Thanx for this information!What is Anti-Seize? - ROCOL
Want to know more about anti-seize and how to use it? This is the read for you.www.rocol.com
View attachment 77906
Bob Farace
TVWBB Member
Might have a problem encountering this in Costa Rica,so, a few squirts of WD-40 into the brass inserts will suffice? Thanx for this information!
I would think anti seize would be found in any auto parts store around the world. It’s commonly used, especially on aluminum engines. I find very little use for WD-40; it’s not good at most of the things people use it for, and people don’t use it so much for what it was designed for (water displacement). It’s actually pretty lousy as a penetrating oil or as a lubricant.
Richard Garcia
TVWBB Wizard
This morning I took the Weber screw to 3 hardware stores here in Ticoland in which all did not have these 1/4x1/2 screws. One store did have this screw with a measurement of 1/4x3/4 which may work? i am in no hurry and will visit more hardware stores or purchase over the internet.Stainless works. I don't know the sizes. When I bought my Performer, I took the hardware and recorded the sizes, types, and quantities. Then went to boltdepot.com and ordered everything. I did not have any problems finding everything in stainless.
.
Attachments

Last edited:
Richard Garcia
TVWBB Wizard
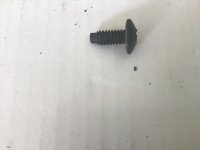
The Weber screw was measured 1/4x1/2 this morning and many thanx.Take one to a hardware store like Ace or Home depot and check it against one of these they have on the shelf.
View attachment 77889
Attachments
Richard Garcia
TVWBB Wizard
Ok and thanx!The insert is bottomless so a slightly longer one will still work.
Richard Garcia
TVWBB Wizard
Thanx for tip in removing the metal table. Question, what is the best way to remove the “orifice clip” to remove the hose Fitting as I don’t want to bust it if I put too munch plier pressure?I removed the screws that secure the table to the frame. Then lifted the table off the frame and that gave me direct access. Pulled the clip and pulled the gas line out of the tube. Used a tube-shaped wire brush and canned air to clean the tube and a brass brush to clean the deposits on the end of the fitting. Put it all back together. Took ten minutes. Works great.
Attachments

Richard Garcia
TVWBB Wizard
All done and fired-up quickly. Thanx to all who replied to this thread.