Weber Genesis Silver B 2000 rehab - Update: Restored


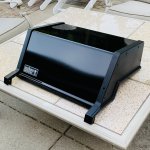
I got the end caps off. The right one came off pretty easy, unfortunately the left one broke in the process. So I’ll probably have to come up with a mod to replace it.

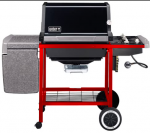
I picked up some rustoleum ultra high heat black to paint the exterior of the fire box and the end caps for the lid (not the porcelain). I was considering painting the frame forest green in a gloss/semi gloss, but the only high heat forest green I can find comes in matte . Does anyone know of one?

You might want to just topcoat with high heat clear gloss paint.
 
Simple Green though is NOT good paint prep. You will always have soap/water residue left that will cause adhesion issues. Prep with a good solvent (not mineral spirits). Lacquer thinner, prep sol, even brake parts cleaner are better than anything else
 
Simple Green though is NOT good paint prep. You will always have soap/water residue left that will cause adhesion issues. Prep with a good solvent (not mineral spirits). Lacquer thinner, prep sol, even brake parts cleaner are better than anything else
Noted, I'll hit the parts with some brake cleaner before I bust out the paint.
 
Rather than painting the end caps black, you might want to first give a try to dye-ing them instead.

Folks on here have dyed Weber plastic handles and knobs successfully. Link below. So you'd think the end caps could be done as well. If it doesn't work, then just paint them.

Back when I was a lacrosse Dad, the kids frequently used my turkey fryer as the vat to dye their white/gray plastic lacrosse heads into all kinds of color combos and patterns. Doing plain all black (or all dark green) would be pretty simple. But maybe you should go bigger and do tiger stripes or tie dye in your school colors.

If you just want the gray plastic cleaned up, the bleach/0000 steel wool is like magic.

 
Last edited:
I am going to try the dying process when i get some down time. I will report back.
 
Rather than painting the end caps black, you might want to first give a try to dye-ing them instead.

Folks on here have dyed Weber plastic handles and knobs successfully. Link below. So you'd think the end caps could be done as well. If it doesn't work, then just paint them.

Back when I was a lacrosse Dad, the kids frequently used my turkey fryer as the vat to dye their white/gray plastic lacrosse heads into all kinds of color combos and patterns. Doing plain all black (or all dark green) would be pretty simple. But maybe you should go bigger and do tiger stripes or tie dye in your school colors.

If you just want the gray plastic cleaned up, the bleach/0000 steel wool is like magic.

What type of dye are we talking about? Ritz dye like we used to use to make tie dye shirts? Will be following!
 
Progress update. Painted the end caps, cook box, frame basket with high heat ultra with and buffed the lid enamel up with compound and polish. Nice to see it starting to come back to together. Still debating what to do with the frame, considering either forest green or red with a high heat clear coat. I assume I'll need to use a high heat primer over the black either way.
 

Attachments

  • IMG_3943.jpg
    IMG_3943.jpg
    206.9 KB · Views: 78
  • Screen Shot 2020-06-07 at 9.31.43 PM.png
    Screen Shot 2020-06-07 at 9.31.43 PM.png
    129.1 KB · Views: 78
  • IMG_3940.JPG
    IMG_3940.JPG
    309.7 KB · Views: 73
The lid is beautiful. I am going to have to explore the process of buffing the lids.
 
Progress update. Painted the end caps, cook box, frame basket with high heat ultra with and buffed the lid enamel up with compound and polish. Nice to see it starting to come back to together. Still debating what to do with the frame, considering either forest green or red with a high heat clear coat. I assume I'll need to use a high heat primer over the black either way.

Pat, what compound did you use when buffing that lid. It looks Great! 👍😀
 
Pat, what compound did you use when buffing that lid. It looks Great! 👍😀
I was pretty pleased with how it came out, it'll be interesting to see how long it lasts once I get it all back together and introduce heat. Here's a link to the compound/polish I used. Turtlewax seemed to be the most cost effective route.

https://www.amazon.com/exec/obidos/ASIN/B072Q5MYYY/tvwb-20

I just used a one coat of compound and a 2 coats of polish, used an polisher adapter bit on a drill to apply and buffed it out with with a microfiber towel.
 

Attachments

  • IMG_3951.jpg
    IMG_3951.jpg
    131.2 KB · Views: 34
Hey Pat, you need to cut your grass!
Haha, my wife took the kids (4 and 20 months) up to her parents for the afternoon, I had 3 consecutive free hours to myself for the first time since March. I had to prioritize between the lawn/grill project. Tough decisions.
 
I was pretty pleased with how it came out, it'll be interesting to see how long it lasts once I get it all back together and introduce heat. Here's a link to the compound/polish I used. Turtlewax seemed to be the most cost effective route.

https://www.amazon.com/exec/obidos/ASIN/B072Q5MYYY/tvwb-20

I just used a one coat of compound and a 2 coats of polish, used an polisher adapter bit on a drill to apply and buffed it out with with a microfiber towel.

Thanks Pat! I have some of that compound but will have to get some polish. That really made it shine. 👍😀
 
I ended up going with green for the frame. I know it's not a purist restoration but I figured if I was going through the trouble of dismantling and painting the frame, I may as well customize it. The first 2 cans of high heat green I picked up were defective, must have been a bad batch since both cans had the same intermittent clogging issues and gray/green color. I was pretty disappointed on how the color was going on and figured something was a miss. Took a few minutes on hold but Rusto-leum refunded me and I picked up a few more cans. The second attempt went 100x better. I put a few coats of the high heat green on and have one coat of high heat gloss clear coat on it at the moment, plan to put one more coat of clear on before i start to reassemble.
 

Attachments

  • IMG_4103.JPG
    IMG_4103.JPG
    278.8 KB · Views: 28
I love to see customization on personal grills. Love it. I will be looking forward to the final product too.
I got a couple cans of bad rusto paint from Home Depot last year. I returned them and went to Walmart to replace them. I figured it was a whole batch that had problems and I wanted to stay away from the batch that Home Depot had.
 
Got it pulled back together. Thanks to Bruce for coming through on replacement for the end cap I snapped in the break down process and everyone for the tips. Aside from the thumb prints I put on the badge clear coat which I found out wasn't 100% set while putting pressure on it to glue it to the lid ( after I took these pics), I'm pretty pleased with how it came out. It was a little more sweat equity than I anticipated but I think it came out pretty solid. I may try to redo the badge, but I don't know how easily that high temp RTV and I'm fresh out of high temp clear coat. New burner tubes/ Flavorizer bars/grates and followed the manifold cleaning and greasing instructions posted on the forum, the grill functions like its brand new and I guess that's what really matters.IMG_4178.jpgIMG_4185.jpgIMG_4186.jpgIMG_4187.jpgIMG_4189.jpgIMG_4191.jpg


Back
Top