so how are you attaching your blower to the smoker


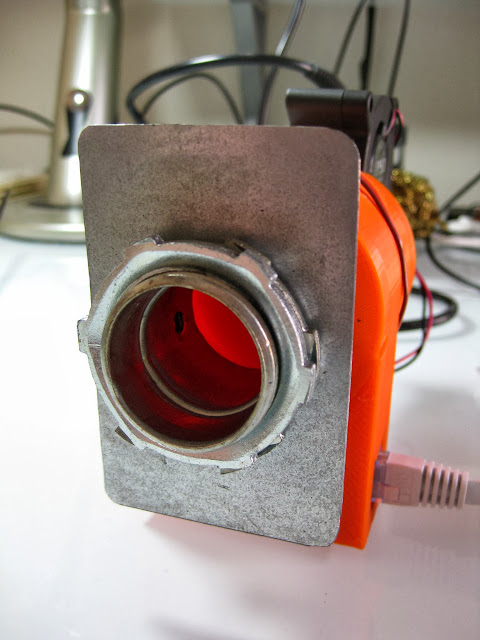
I cut my mounting plate out of a piece of sheet metal that I had been trying to turn into a blower housing before we all got 3D printers. Just a pair of aviation snips to cut the rectangle, then cut the circle and rounded off the edges with a dremel.

The second one I used a conduit punch that I had from building my brewery which (not surprisingly) made a perfect hole for the 1" conduit connector. The connector is technically called an "EMT" (Electrical Metallic Tubing) set screw connector and is in with all the electrical boxes and parts rather than plumbing. They make them bigger but I only had the 1" punch and the punches are shockingly expensive.
 
Ah, you had the punch for the brewery project, I had wondered why you had that punch handy knowing how expensive they are... I used a step drill bit from Amazon to make the hole on my adapter. It worked great and was pretty cheap, added bonus you can cut lots of different size holes with it...
 
Well I do prefer a ball valve to make sure it's stays off. I remove everything when I am not smoking. I had an old roommate that was drunk and he tried to run my UDS when I was not home, one night. The end result was fire brick going through the deck. Luckily my other roommate woke up and saw the fire and quickly put it out. I have also had it stay smoldering for a weekend even with all air inlets closed. Now I keep the hm going until I see the temp gets close to ambient temperature before turning everything off.

I guess I understand it from that shut down point of view, but a ball valve shouldn't be needed for the cook. The roto damper should close down pretty damn tight, not quite as tight as a ball valve but it does shut down pretty solid. I usually just set my pit temp down to below the expected outdoor temp and let the roto damper do its thing, at that point you could pull the CAT5 cable to make sure it stays that way, but I tend to leave mine up and running to stress test the roto damper and HM. I have a cap that I can put in place when I remove the roto damper which will also choke out the fire if need be, but I could see how the ball valve would be nice if you are removing the damper regularly.
 
Brass gas line fittings would work fine too, as qyou obviously know, though probably a bit more expensive. These fittings will be found in the electrical isle with all the conduit fittings.....

Expensive is under statement lol. That retro from half inch to 3/4 cost over hundred bucks. 60 for the pipes and other parts. At the time, I was thinking of what I was looking for and was even thinking of electrical stuff but never looked
 
Expensive is under statement lol. That retro from half inch to 3/4 cost over hundred bucks. 60 for the pipes and other parts. At the time, I was thinking of what I was looking for and was even thinking of electrical stuff but never looked

Yikes! You gotta be kidding??? The conduit connector costs $2....
 
I think just the two 6 inch pipes were 11 bucks each and the connector I used to attach it to the UDS was 13 and the other two were about 8 bucks each. At first I bought a 1 3/8 hole saw but I realized that was not meant to go on a hand drill, so I then had to fork over 50 for a step drill that would get me to 1 3/8 hole diameter for the connector used. It does look nice though and now I can plug the other auxiliary holes, I probably won't use now as the inlet is much bigger. This summer I'm going to either repaint the UDS or get a new drum. And just use that drum as a backup, if needed for ribs I do once a year or so for work
 
Bryan, what are your dimensions on that plate? Do you have the Large BGE?
I do have a Large BGE and my plate is 79.5mm x 51.5mm. When I made it I just took a rough measurement and cut the plate 85mm x (at least 50mm). Then I went out and snipped one end off a little at a time until it would fit.

As others have noted and it is important to point out, you have to put the TOP in first then the bottom. The top recess is way larger than the bottom and is kinda what makes the whole thing work without having to slide it on from the side. I didn't realize this myself at first and tried several "slide on" designs which were a real pain to get on.
 
Thanks Bryan, Auber says their large BGE plate is 77mmX74mm. I assume your 79.5 is their 77, which is the height of the vent, and the other dimension is the width?
 
Installed! Weber OTG Kettle

After much hesitation, I finally bit the bullet and mangled my OTG kettle with a hole saw this past weekend.

I mostly took Ralph's "airburner" as inspiration. It's a copper water-heater supply line bent to sit right under my Smokenator coal box. I drilled several holes in it, on the underside to keep them from getting clogged with ash.

The hole drilling wasn't bad, but it did tear up the enamel worse than I had hoped.

UlUe8fpl.jpg


9C5q6nnl.jpg


I put a 3/4 male threaded fitting in the hole and fit the "burner" in it. Lacking a blowtorch, I just squashed the fittings slightly to make everything fit relatively tightly. Since I actually want it to leak on the inside, it works fine.

I also used this high temperature gasket, which makes a pretty good seal. It's twisted in this photo, but I cut it so that it fits perfectly inside the range of the OTG fins.

oc8CCbsl.jpg


A brass locknut keeps it on.

TZolyMTl.jpg


And a brass cap seals it when not in use.

wXuyFjgl.jpg


Here's the airburner. Of course I forgot to take a picture of it installed, but it sits right under the charcoal grate, above the range of the OTG fin, and all within the footprint of the Smokenator.

i9VbPccl.jpg


My temporary setup. Blower is taped to a 3/4 nipple, screwed into another water-heater supply line and that's screwed onto the fitting. None of it ever got too hot to touch.


crscXmXl.jpg


I'm pretty happy with it. I did a test burn with, I think, outstanding results, but I'll get a separate post about that ready a little later. I'm planning to do some real cooking this weekend.

Thanks to everyone for all the prior experience and inspiration. Kettle grill installs don't seem as common as WSMs and ceramics, so I hope maybe someone else will find this useful and maybe we can come up with some better ideas (as long as they don't involve me having to drill another hole).

EDIT: And here's my graph from the test burn: http://tvwbb.com/showthread.php?42779-Post-your-HeaterMeter-graphs&p=565243#post565243
 
Last edited:
Awesome implementation of the "air burner" in your kettle! I get really great results from my air burner in my water smoker too, it's always right on the setpoint, never lets me down... and fires up like magic from just a small piece of burning paper....
 
While constricting the air burner for a 14.5" WSM, I was going back and forth between 1/2" and 3/4" copper pipe. After a few hours of standing in the plumbing aisle at Home Depot, I went with 3/4" copper pipe which I now regret after having done a test burn. The large diameter pipe is allowing way too much air in when the fan isn't running making it nearly impossible to regain control after the lid is opened. Manual intervention is required to keep temps from shooting up to 300° after the lid has been opened. However, once the pit is back under control, the air burner does a fantastic job of holding 225° on the nose.

I'm incredibly impressed with the air burner, but disappointed by my selection of 3/4" pipe. I guess I'll call this a successful failure. I'm going to look into building some sort of butterfly valve to finally put a use to some spare servos and possibly purchase some gaskets for the lower/upper sections and door as they seemed to be leaking a fair amount.
 
Actually, if you sealed off the other vents and leaks, and sealed off where your air burner pipe enters the smoker, the amount of air delivered has more to do with the size and number of holes you drill in the air burner than the size of the pipe... Fewer/smaller holes will allow less natural draft and help choke out overshoot, when the blower kicks on it will blow little air jets on the fire and stoke it real good...
I got lucky with mine I guess, cause it worked just right first time out of the gate... But you may try plugging some holes with screws or something or just starting from scratch with less and/or smaller holes... And make sure all other air leaks are sealed off, I use aluminum tape on my vents to seal them off....
 
the amount of air delivered has more to do with the size and number of holes you drill in the air burner than the size of the pipe... Fewer/smaller holes will allow less natural draft and help choke out overshoot, when the blower kicks on it will blow little air jets on the fire and stoke it real good...

I suppose that was my error. I have 19 holes at 3/16"--probably too many and too big. I'll try another air burner build in the next few days and start with a 9/64" bit and step up to a 5/32" bit if needed.
 
Attempt #2 has proven to be much, much better. I definitely had the holes way too big. I switched to 1/8" holes. Result:

j8EOHQj.png
 
So some time ago I had this amazing idea about putting a camping stove gas burner into the bottom of my WSM to control airflow, then I saw this thread and Ralph's air burner and liked it a lot better. My main aim was to automate temperature control so that I could actually go to bed and get some sleep when I've got a brisket and/or pork shoulder in. Usually I find myself having to get up every couple of hours to poke and prod it, which means I'm tired next day when everyone is round for the BBQ.

This is my final prototype, it's had a few revisions. Initially I only had one 15mm input pipe (so that I didn't have to mod the WSM) with the main ring being 22mm, I couldn't get temperature above 100c so I made the holes bigger, then I made them bigger again (and added a few more) and I could get 120C stable but the fan had to stay on full pretty much all the time. I figured the bottleneck was the 15mm pipe so I added another and now it gets to temperature quickly and holds it perfectly. I haven't seen what I can push it up to yet as I wanted to do some actual cooking last Sunday.

https://www.dropbox.com/sc/752f2fyg3n96v9h/AADUFDAewn7jujo-agIVwGs0a

Some pictures in this album, the temperatures were rock steady so long as I wasn't tampering with it. Now I just need to think about the best way to stack up the charcoal.
 
Awesome man, glad to see my ideas helping others. Kinda funny you mention the camping stove gas burner, cause initially I had thought of going that route with one of those cast iron burners hoping to have the option to use charcoal or gas in the smoker (pushing air or gas through the burner). I ended up going with the copper tubing cause I had it on hand and after I started cooking with lump coal and the Heater Meter I said screw the gas, we don't need no stinking gas! LOL In fact, since I have had the heater meter, a smoker and my Fauxmado I haven't lit up my nice vintage natural gas Weber Genesis B gas grill once, other than to burn the BBQ sauce off of my smoker grates!
 
So some time ago I had this amazing idea about putting a camping stove gas burner into the bottom of my WSM to control airflow, then I saw this thread and Ralph's air burner and liked it a lot better. My main aim was to automate temperature control so that I could actually go to bed and get some sleep when I've got a brisket and/or pork shoulder in. Usually I find myself having to get up every couple of hours to poke and prod it, which means I'm tired next day when everyone is round for the BBQ.

This is my final prototype, it's had a few revisions. Initially I only had one 15mm input pipe (so that I didn't have to mod the WSM) with the main ring being 22mm, I couldn't get temperature above 100c so I made the holes bigger, then I made them bigger again (and added a few more) and I could get 120C stable but the fan had to stay on full pretty much all the time. I figured the bottleneck was the 15mm pipe so I added another and now it gets to temperature quickly and holds it perfectly. I haven't seen what I can push it up to yet as I wanted to do some actual cooking last Sunday.

https://www.dropbox.com/sc/752f2fyg3n96v9h/AADUFDAewn7jujo-agIVwGs0a

Some pictures in this album, the temperatures were rock steady so long as I wasn't tampering with it. Now I just need to think about the best way to stack up the charcoal.

Question on the burner, what size holes did you drill, and the number or spacing?
 
Question on the burner, what size holes did you drill, and the number or spacing?

I don't have a direct answer for you, but I can say it is better to start off with fewer smaller holes than a lot of big ones. I recall someone built an air burner and initially had problems with overshoot. Looking at his setup I suggest he use fewer smaller holes, which he did and got great results the second time around. If you have too many/too large holes it may allow too much natural draft through them. If you have fewer smaller holes it limits the natural draft and when the blower kicks on it has no problem pushing air through the smaller holes, in fact I think it creates a nice air jet effect that stokes the fire more directly and gives you great control. So my thinking is you can always drill more holes and make holes larger, but you can't make them smaller, so might as well start small and go from there if you don't get enough flow.

I'm also thinking that setup would probably work just as well with only one (flexible) tube running from the fan, that's all I use in my water smoker and I never have a problem hitting temps.
 
Last edited:


Back
Top