so how are you attaching your blower to the smoker


Yeah Matt is a real master whiz with the 3D modeling, a level of expertise I still haven't come close to. It is good to have a project to work on though to get some experience with it.

No doubt... My 3D modeling skills were so basic that one of the first projects I took on was L-Brackets to mount my 3D printer. I was having a hard time accomplishing the most basic of tasks, I figured I would learn a lot about the design software in the process, and I was right. It was a good first exercise in learning...

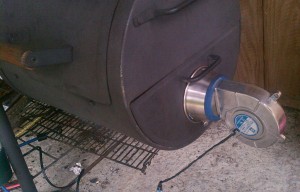
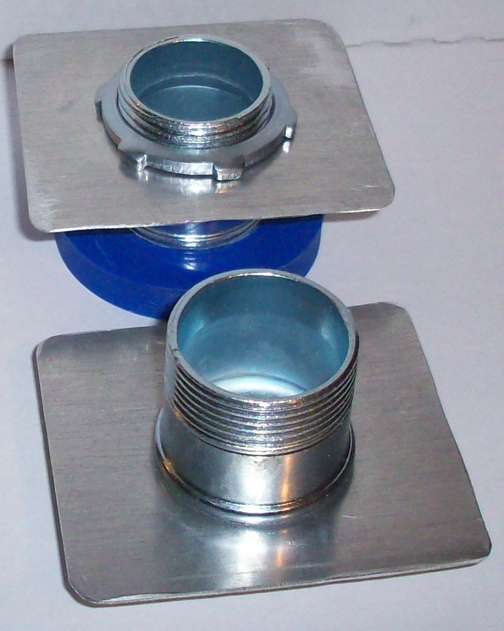
Since then I have progressed quite a bit, I was really happy with myself when I sat down to design my servo damper... I sketched out some basic details/dimensions on paper, then opened 123D (beta) and put it together in pretty quick order.... and it even worked! LOL... but my skills are still a mere fraction of what Matt and Tom are working with... It does give me a really great feeling to be able to sit down and materialize an idea like that, it's kind of a bit like playing music...
 
This is on my Chargriller Smokin' Pro, which I don't really use for smoking much any more .. I think it was a dog bowl from Walmart.


pidcontrol-007-300x192.jpg


On the UDS.. this is how I originally set it up, and too lazy to re-configure it yet, but I will. This is my old PID, the blower is inside, so, just send over the air with some bilge hose. It's a little too stiff, have to find something more flexible (silicone maybe)

12vpid-008-274x300.jpg
 
I did something a little different than most...


Time to dredge this thread back up ...

Specifically I want to ask Ralph, are you still using and/or happy with the 3/4 copper line and distribution system? Anything you'd do different?

I flirted briefly with finding a no-drill solution for my Weber OTG kettle, but I'm now thinking I should just drill, put in a 3/4 threaded nipple and use that same copper water heater line that I can screw on and off, replacing with a steel cap when not using the HM. I'm imagining I can bend it around to mount the blower/servo housing and maybe the HM on one of the grill legs for a pretty clean installation.
 
KellyMc, I used the "air burner" on my water smoker for about a year and it worked wonderfully. Since then I have acquired a Kamado grill and have been using that for the most part, but the air burner is still intact, and I have had a hankering to fire it up and do some ribs lately. It really came together nicely and there isn't anything I can think of that I would have done differently...
 
Your mention of my "air burner" grill (water smoker) today inspired me to fire it up for some St. Louis style ribs. I still love this setup! Fired right up, then when I filled the water bowl I didn't realize it had rusted through over the winter, so when I came out with the second jug of water there was water pouring out of the HM blower! DOH! I quick pulled the blower, pulled out the water pan and tipped the grill to let the water out of the burn pan... the coals were soaked but still smoldering. So I put the blower back in and what do you know, it revived the fire in no time! The Air Burner RULES! LOL Quick improvisation placed a cheap stainless steel bowl inside the leaky water pan and we are ready to roll, again... The air burner stoked the pit right up to 225 and stopped on a dime, has been holding rock solid since! What's not to like about that....
 
Thanks to Ralph for making custom fit-to for my blower, I just finished installing it to my UDS. I went bigger on the intake from my old setup using a ball valve and went with 3/4 inch pipes. It turned into a little expensive project to get a 1 3/8 hole drilled into the drum for the coupling I used to attach the pipes, needed a step bit.

291p4ls.jpg


A video
A tad messy from a long winter, lol. Needs a cleaning, well its called a UDS for a reason.
https://www.dropbox.com/s/brlvis7xx0u6ogy/20140503_145648.mp4

Oh, and Tom if you see the video don't freak when you see the case you made lol, its a work in progress type of thing. I was going to go with wood veneer, but its a tad hard to work with when you never worked with it before, so I am going to put some .005" or 36 gauge copper on it. Its a lot thinner and easier to work with.
 
Last edited:
Thanks to Ralph for making custom fit-to for my blower

John,
Looks like the blower fit into that custom mount pretty well, I love it when things work out like that!
I see from your pic that you kinda flipped the damper upside down so the body rotates instead of the barrel. Although it will work fine that way I think it is probably better if the body were to stay put and the barrel rotate, this way it puts less stress on the cable(s). You would need to put the blower mount cap on the barrel and the output cap on the body and flip the whole thing upside down....

Lol thanks, I kinda was trying to figure it out. It ran all night without issue. I had to shave a little off on the fans case to get it to fit but I would rather have had a tight fit then a loose one. Its going to take a few more smokes to get used to using the damper but, I like it. Thanks again
 
How do you have the HM setup to use the damper and blower? From you video it looks like you have the damper set to fully open/closed mode and the blower on all the time? You might try it the other way around with the servo working the entire range of motion and the blower still on all the time, or blower on at max only. Depending on your air flow needs one mode may work better than the other....
 
How do you have the HM setup to use the damper and blower? From you video it looks like you have the damper set to fully open/closed mode and the blower on all the time? You might try it the other way around with the servo working the entire range of motion and the blower still on all the time, or blower on at max only. Depending on your air flow needs one mode may work better than the other....

in the Video, I had the blower on Manual mode, just to show it functioning. I definitely don't need a even a quarter of the air flow now with the larger inlet I used for this setup. Im going to add a ball valve in the near future to be able to turn off the UDS and to be able to choke down the air flow more so that I can run the blower at more then the 10% I am with the Servo damper. Before with the same blower and the old ball valve (I think 1/2 inch) I would choke the valve to about 50% and I would run the blower at 30% for temps below 250.
 
in the Video, I had the blower on Manual mode, just to show it functioning. I definitely don't need a even a quarter of the air flow now with the larger inlet I used for this setup. Im going to add a ball valve in the near future to be able to turn off the UDS and to be able to choke down the air flow more so that I can run the blower at more then the 10% I am with the Servo damper. Before with the same blower and the old ball valve (I think 1/2 inch) I would choke the valve to about 50% and I would run the blower at 30% for temps below 250.

Why not use it in servo damper only mode, only letting the fan come on when the damper is 100% open.
 
Why not use it in servo damper only mode, only letting the fan come on when the damper is 100% open.

I agree with this, damper at full range and blower at 100% only if you have a low air flow requirement. I see no need whatsoever for a ball valve when you have a roto damper, the roto damper IS your valve! It can control the air flow from completely dead (to where it can actually choke out the fire in a Kamado) to a trickle flow through a tiny opening, to fully open full flow... and with the blower at 100% you can actually push air if need be...
 
anyone got any pictures, ideas, thoughts on how to attach Ralph's rotodamper to a BGE?

Bryan posted pics of his roto damper connected to his BGE in the roto damper thread... He used a conduit connector in a small metal plate similar to what I posted recently in some thread here (can't recall exactly which thread at the moment)

Edit:
I am reposting the pic of the mounting plate here....
VisionPlate.jpg
 
Last edited:
I made those there, was pretty simple, but they are for the Vision Kamado. Pretty easy to make if you have some basic tools?
 
I agree with this, damper at full range and blower at 100% only if you have a low air flow requirement. I see no need whatsoever for a ball valve when you have a roto damper, the roto damper IS your valve! It can control the air flow from completely dead (to where it can actually choke out the fire in a Kamado) to a trickle flow through a tiny opening, to fully open full flow... and with the blower at 100% you can actually push air if need be...
Well I do prefer a ball valve to make sure it's stays off. I remove everything when I am not smoking. I had an old roommate that was drunk and he tried to run my UDS when I was not home, one night. The end result was fire brick going through the deck. Luckily my other roommate woke up and saw the fire and quickly put it out. I have also had it stay smoldering for a weekend even with all air inlets closed. Now I keep the hm going until I see the temp gets close to ambient temperature before turning everything off.
 
Bryan posted pics of his roto damper connected to his BGE in the roto damper thread... He used a conduit connector in a small metal plate similar to what I posted recently in some thread here (can't recall exactly which thread at the moment)

Edit:
I am reposting the pic of the mounting plate here....
VisionPlate.jpg
I tried to find something like that at the local hardware store. I ended up getting brass fitting that are used for gas lines.
 
I tried to find something like that at the local hardware store. I ended up getting brass fitting that are used for gas lines.

Brass gas line fittings would work fine too, as you obviously know, though probably a bit more expensive. These fittings will be found in the electrical isle with all the conduit fittings.....


Back
Top