Jeff Hanson
New member
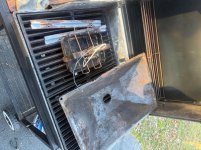
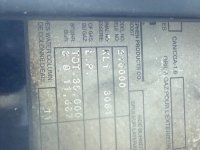
I started stripping and cleaning my Genesis 1000 today. The wire brush did a pretty good job inside but I’m leaning toward bringing a pile of metal parts to a sandblaster. I also took survey of all the replaceable parts and ordered some new ones.
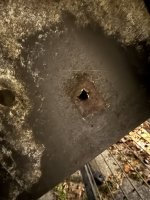
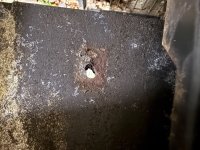
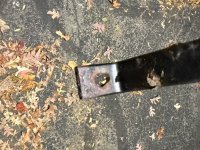
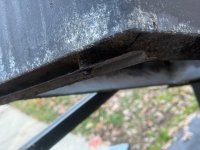
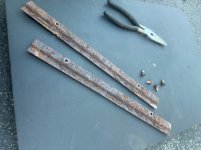
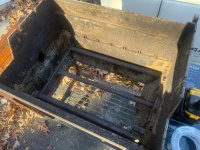
The rails for the slide out tray are pretty rusty but I was able to remove the screws without much effort on a small ratchet. The left side frame mounting screw looked like a rusty metal toothpick and the rusty hole in the cross bar where it was attached is big enough for a mouse to crawl in. I have seen the video on how to cut that out and replace with new stock, which I will do.
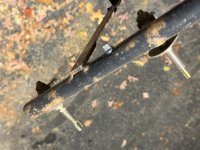
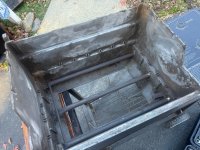
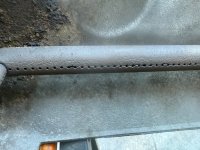
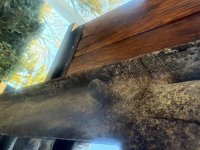
The drip pan and slide out tray and the flavor bars are all pretty beat up so I ordered new ones. The grill bars and hanging basket themselves are meh serviceable but I ordered some new ones anyway. The burners are rusty but ok except the rear one has a crack thru about 1/3-1/2 of the holes on the forward facing side, which explains the extreme hot spot in that back left corner, so I ordered some new pipes too.
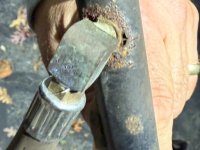
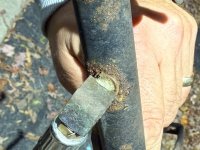
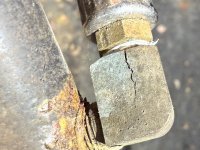
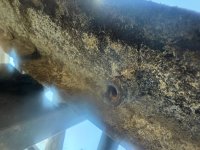
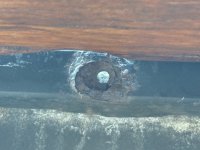
The problem I am having is removing the screws attaching the brackets on the manifold to the fire box. They are size 5 metric hex head bolts, and I tried to break them free but am a little scared I’ll either strip them or crack the box.
Does anyone have any advice on how to free them up? Should I use penetrating oil, or maybe some heat? I have a heat gun but I could just fire up the grill too I guess. Pics of all this attached
The rails for the slide out tray are pretty rusty but I was able to remove the screws without much effort on a small ratchet. The left side frame mounting screw looked like a rusty metal toothpick and the rusty hole in the cross bar where it was attached is big enough for a mouse to crawl in. I have seen the video on how to cut that out and replace with new stock, which I will do.
The drip pan and slide out tray and the flavor bars are all pretty beat up so I ordered new ones. The grill bars and hanging basket themselves are meh serviceable but I ordered some new ones anyway. The burners are rusty but ok except the rear one has a crack thru about 1/3-1/2 of the holes on the forward facing side, which explains the extreme hot spot in that back left corner, so I ordered some new pipes too.
The problem I am having is removing the screws attaching the brackets on the manifold to the fire box. They are size 5 metric hex head bolts, and I tried to break them free but am a little scared I’ll either strip them or crack the box.
Does anyone have any advice on how to free them up? Should I use penetrating oil, or maybe some heat? I have a heat gun but I could just fire up the grill too I guess. Pics of all this attached
Attachments
-
 IMG_5724.jpeg358.2 KB · Views: 7
 -
 IMG_5725.jpeg355.5 KB · Views: 8
 -
 IMG_5729.jpeg244.3 KB · Views: 8
 -
 IMG_5731.jpeg142 KB · Views: 8
 -
 IMG_5732.jpeg154.2 KB · Views: 9
 -
 IMG_5734.jpeg165.8 KB · Views: 9
 -
 IMG_5737.jpeg181.4 KB · Views: 10
 -
 IMG_5738.jpeg168.4 KB · Views: 10
 -
 IMG_5739.jpeg202.8 KB · Views: 9
 -
 IMG_5745.jpeg209.7 KB · Views: 7
 -
 IMG_5749.jpeg148.8 KB · Views: 7
 -
 IMG_5723.jpeg366.4 KB · Views: 7