New (to me) Genesis 1000 project


Cam Sullivan

New member
Hey guys,

A little backstory,

A couple of years ago my father bought a new spirit and gave me his old genesis 1. He quickly came to regret the decision as I fixed up and restored the old genesis and it's working like new. It was certainly not a perfect restoration and I learned a lot from it, but it still turned out really well. Ever since I've felt a little guilty for taking what I knew was the better choice, so I've been keeping an eye out for the right candidate for a replacement for him.

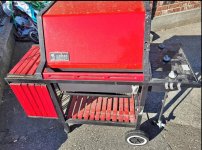
Well I found one, a real beauty at that. A 1998 Genesis 1000 readhead for $25? I couldn't pass that up!

It seems to be in pretty good shape and I plan on doing a complete teardown and resto of it.
I will try my best to take pictures and keep you updated on the progress. I'm pretty excited about it!

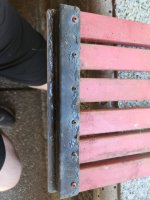
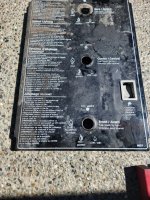
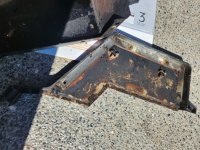
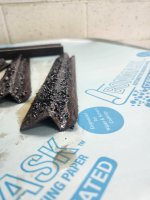
So far It's just teardown and I've just started to strip some old paint and deal with the corrosion. Here's some pictures for your viewing pleasure.

Also, I'm wondering if the red painted wood was ever original, I don't think it was but there's a lot more knowledge here about these than what I possess. A few of the screws seem to have the heads painted red as well which I have a hard time believing someone else went through the trouble of doing.

Happy Grilling!
-Cam
 

Attachments

  • 20230611_151219.jpg
    20230611_151219.jpg
    133.9 KB · Views: 58
  • 20230611_151237.jpg
    20230611_151237.jpg
    291.2 KB · Views: 51
  • 20230611_155753.jpg
    20230611_155753.jpg
    243.9 KB · Views: 50
  • 20230611_164747.jpg
    20230611_164747.jpg
    221.4 KB · Views: 45
  • 20230612_155711.jpg
    20230612_155711.jpg
    196.8 KB · Views: 47
  • 20230612_155726.jpg
    20230612_155726.jpg
    101.3 KB · Views: 54
  • Screenshot_20230612_184119_Facebook_2.jpg
    Screenshot_20230612_184119_Facebook_2.jpg
    266.7 KB · Views: 57
That will be a nice one when it's done. Yeah, someone decided to paint it red, it's not original. It looks like at least some of the slats have been replaced as well judging by the poor spacing. I would do all new wood for that grill if it were mine. Also, be very careful with the z bars and brackets for the flip up table. I can see there is rust on them and they will need to be stripped and repainted. They will bend easily if you don't keep them supported while sanding them or stripping them with a wire wheel. The control panel in English and French is interesting, I've never seen one before.
 
Take your time and do that one right, I’ve never seen a bilingual unit before either! But, you are in Canada where that’s not so uncommon. You’ve got good wood sources out your way in BC so, find something nice and make that old girl sing!😁
 
Last edited:
Like said above, it will take some work, but it will be worth it in the end.
I have a 98 gen 1000 I bought new in 1998. About 5 years ago I upgraded it to a 2000 by replacing the frame.
25 years of service and it's still going strong.
Looking forward to seeing the completed project.
DSCN2765.JPG
 
My first bit of progress has been done. It's going to be a slow process since I'm only working on it during my breaks at work but here's what I've gotten to so far.

Old vs new z-brackets for the wood slats, I think I will still paint the new stainless ones black yet to match the rest of the frame.20230615_143216.jpg20230615_143208.jpg20230621_185553.jpg
End caps stripped down, sand blasted and re-painted.20230620_155046.jpg20230620_101113.jpg20230621_185727.jpg
The control panel and lid cleaning up nicely and will look good as new when all together.20230614_182700.jpg20230621_185509.jpg

More to come as I make progress.
 
Looking really good so far! Nice work(y) You will have one beautiful classic grill that will beat many costing way more than you will have invested. Plus the satisfaction of shepherding the whole process.

I am one of the few here, I think, who would also paint the stainless Z-bars black to keep the original look - but without the original propensity to rust. I would suggest you find some primer that works on stainless and do that first, because it is really easy for the black paint to scratch off. Ask me how I know:rolleyes:...
 
My first bit of progress has been done. It's going to be a slow process since I'm only working on it during my breaks at work but here's what I've gotten to so far.

Old vs new z-brackets for the wood slats, I think I will still paint the new stainless ones black yet to match the rest of the frame.View attachment 73147View attachment 73148View attachment 73149
End caps stripped down, sand blasted and re-painted.View attachment 73150View attachment 73151View attachment 73152
The control panel and lid cleaning up nicely and will look good as new when all together.View attachment 73153View attachment 73155

More to come as I make progress.
Hi Cam , I have 2 questions for you if you don't mind, I have a Genesise redhead 1000 also with wood slats made of maple and curious where did you purchase the stainless Z brackets , and how did you get the control panel looking so good mine has a fade and tried with no success to give it a nice sheen. Good luck on your project, looks like you are off to a great start.
 
Looking really good so far! Nice work(y) You will have one beautiful classic grill that will beat many costing way more than you will have invested. Plus the satisfaction of shepherding the whole process.

I am one of the few here, I think, who would also paint the stainless Z-bars black to keep the original look - but without the original propensity to rust. I would suggest you find some primer that works on stainless and do that first, because it is really easy for the black paint to scratch off. Ask me how I know:rolleyes:...
That's why I didn't even bother to try painting my stainless z brackets, I just didn't think the paint would stick. I'm sure powder coating them would work but that's an extra step and expense.16874689152545361819063603751588.jpg
 
I would not paint the SS Z Brackets. Re, paint not sticking. It will. A cool thing you can do to SS is it can be anodized like aluminum. But, I think the SS look will be WAY cool factor
 
Hi Cam , I have 2 questions for you if you don't mind, I have a Genesise redhead 1000 also with wood slats made of maple and curious where did you purchase the stainless Z brackets , and how did you get the control panel looking so good mine has a fade and tried with no success to give it a nice sheen. Good luck on your project, looks like you are off to a great start.
Hey Bill,

Thanks for the interest! The z-brackets I actually made myself with .032" 301 stainless.
I've heard there's someone that makes and ships them for a reasonable price if contacted. Although i doubt the shipping costs to Canada would be worth it.(rcplanebuilder I think he goes by?) Maybe someone here thats more familiar with his products can chime in if they see this..

The control panel I just cleaned up with a magic eraser, I think I'm just lucky and found one that had been kept covered and out of the sun for the majority of its life, keeping it in good shape. My other genesis 1 is faded quite a bit too and I haven't been able to clean it up nearly as nice.
 
My 1998 Genesis sat outside uncovered for most of it's life. The control panel was extremely faded, not much you can do about it and I found a nicer one to replace it with. The black lid, on the other hand, was still nearly perfect. Go figure. The picture I posted above has the stainless steel z bars that I bought from RcPlanebuyer. I think the ones you made are just as nice as those are and wouldn't bother.
 
Hey Bill,

Thanks for the interest! The z-brackets I actually made myself with .032" 301 stainless.
I've heard there's someone that makes and ships them for a reasonable price if contacted. Although i doubt the shipping costs to Canada would be worth it.(rcplanebuilder I think he goes by?) Maybe someone here thats more familiar with his products can chime in if they see this..
Yes, it is RCPlanebuyer that makes the stainless Z bars. I don't know if he ships to Canada or not however.
 
Slow progress lately as life has been hectic, as always, but progress none the less.

Tackled the bottom cross members of the frame recently. I'm sure a lot of you know the threaded inserts don't seem to last, I had one disintegrate during removal and one bolt break clean in it so I needed to find an option to fix.
20230711_095200.jpg
Looked into ordering new inserts but the shipping up here to Canada was insane for them. ($35+ just for shipping) Quickly ruled that out, on to plan B, make some plugs, weld them in, drill some holes and tap some threads.

I made the plugs from 1/4" steel plate, fit snug, doesn't have to be perfect at this step, and welded up the edges. Ground the ends flat, smooth and square then drilled center with a #3 drill bit and cut threads with a 1/4-28 tap. (fine thread bolts are what I have readily available to me, as opposed to the coarse thread weber originally uses)

Here's some photos of the work. Remember I'm not a professional welder, just good enough to make two pieces of metal stick together! All finished up with frame repairs and ready for some paint!20230711_095134.jpg20230711_095130.jpg20230711_095921.jpg20230711_171737.jpg20230712_095115.jpg20230712_123237.jpg
 
Nice skill set there Cam!
I have no such fabricating talent. the “weld drill and tap treatment of the cross members is really a step up! Smart and definitely more durable!
Strong work!
 
Yah, that is a better weld than I could do. However, you could have just welded the crossmembers directly to the frame. But you look you definitely have some fabrication/machinist skills under your belt.
 
Yah, that is a better weld than I could do. However, you could have just welded the crossmembers directly to the frame. But you look you definitely have some fabrication/machinist skills under your belt.
As for welding the cross members to the frame, I like the idea of being able to take the whole frame apart and have it lay flat, even if i may never do so again. I had some scrap material around that worked for the ends and it gave me an opportunity (excuse) to practice some welding, cutting, grinding etc.

as for my experience of fabrication, I wouldn't consider myself a fabricator or machinist by any means, but I do enjoy it, love to learn and most importantly I have access to some quality welders and machinery that most don't. As I was first taught, if you don't have the skill or knowledge to weld well, a good welder will help hide that.

Projects like this are all about learning, trying new things and honing any skills you have or are new to! We all have to learn at some point, I personally love that part more than anything else.
All good points. What I was told about welding is that a grinder is a Welder's best friend. LOL.


Back
Top