My "Weber" Restoration (Spoiler: HappyCooker)


Kalibos M.

TVWBB Member
I purchased this Kettle thinking it was an old Weber of some sort. I joined the forums looking for some insight to what I had just bought and well...
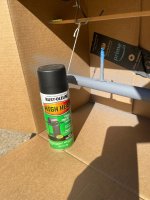
As you all can see, it's NOT a Weber. I decided to go ahead and clean it up replace any parts I could which has proven to be a bit of a headache.

I asked the original owner how long she had had it and she went inside and got the receipt. It was a wedding gift from 1978. She had the original receipt but asked me not to photo it because her late husband's name was on it and she was keeping it for sentimental reasons. It was a receipt from a Sears Roebuck's in Chicago, IL, where she and her husband were originally from, but it only said "portable grill - BROWN" with a five digit number next it. "07629" and had a "DELIVERED" stamped in red with the date 08/08/78 written in blue ink on the line under it and the initials "C.B."next to the date. That's all I can remember about the receipt.

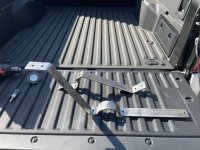
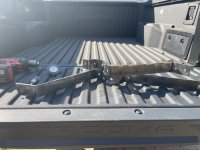
I'll post more pictures of the process later on. Right now I'm trying to figure out how to get wheels to fit on it and what I can do about a riser for the front.

462190788_1639832759898790_1883615274163136480_n.jpg450508190_1087284262824820_1815005423289163064_n.jpg461488155_1052693946115054_7369776985396410347_n.jpg
 
Happy Cookers are interesting grills, and the ability to raise and lower the cooking grate is a neat feature. But, they simply do not have the devoted following that Webers do. It should have an internal ash pan, which can be used in a 22" Weber.

I rehabbed a Happy Cooker in 2020 and had a hard time finding a taker for it. Here's the link to my rehab: Happy Cooker Rehab and a link to my Google album: Happy Cooker Album Mine came with its original wheels, but I had to fab up a riser for the front. (I cut off a T-shaped piece from an old Genesis frame that I had lying around).

Good luck!
 
Last edited by a moderator:
Happy Cookers are interesting grills, and the ability to raise and lower the cooking grate is a neat feature. But, they simply do not have the devoted following that Webers do. It should have an internal ash pan, which can be used in a 22" Weber.

I rehabbed a Happy Cooker in 2020 and had a hard time finding a taker for it. Here's the link to my rehab: Happy Cooker Rehab and a link to my Google album: Happy Cooker Album Mine came with its original wheels, but I had to fab up a riser for the front. (I cut off a T-shaped piece from an old Genesis frame that I had lying around).

Good luck!

It does have an ash pan! I was trying to figure out what that was, thank you! At first I thought it was for putting coals into but then I was like, "... but there's a small grate for coals to sit on."

IMG_8872a.jpgIMG_8873.jpgIMG_8871.jpg
 
Got it taken apart to clean it. I didn't think to take progress pictures until after I reached this step. I had already been cleaning it for about 30 minutes at this point. The only tools I used were a dish sponge, a plastic paint scraper and Dawn Dish Soap and paper towels.

IMG_8807.JPG

IMG_8809a.jpg

Originally, the inside of the kettle looked much, much worse.

IMG_8813.jpg

IMG_8814.JPG

The clean spot is where I soaked the lid while cleaning the kettle, then gave it a once over with the dish sponge.
It didn't take much elbow grease, but I did take my time, letting it soak on new areas before going back at it.

IMG_8808.jpg

IMG_8815.jpg

The lid shined up really well, you can see that Big Texas Sky in it.

IMG_8812.JPG

IMG_8811.jpg

The inside of the kettle looks brand new, I can't believe this thing is 46 years old!

More pics to come.
 
Last edited by a moderator:
Here's a look at the hardware I took out. This was after the first round of cleaning. I was able to source replacement hardware in Stainless Steel.

The two C brackets and 5/16"-18 double male 2.5 inch rod were completely covered in rust. I soaked them in vinegar for 24 hours, every 8 hours or so I took a brass brush to them and removed a layer of rust and put them back to soak. They came out pretty clean. Unfortunately, the front handle separated in soapy water and the laminate slid right off.

The post cap that's sitting off by itself didn't have a match on the other side so I'm not going to be able to reuse it.

Everything except those two brackets and the double male post was able to be replaced 1:1 with new hardware. No special parts or anything.

IMG_8880.jpgIMG_8882.jpgIMG_8892.jpg

This is the lid hinge. It was in really good shape to begin with so it wasn't too hard to clean.

IMG_8883.jpgIMG_8885.jpg

The hinge bracket came clean pretty easily in Dawn dish soap.

IMG_8884.jpgIMG_8886.jpgIMG_8888.jpg

I decided to paint up the leg stand but forgot to take a good picture of the "before", I'm happy with the "after" but the best example I have of that part is here.

IMG_8881.jpg

The brackets and double male post came out of that rusted post sitting next to the hinge bracket and were that level of rusted. It's hard to see in the picture, but the leg post is rusted from the base up to about three inches and the rust has penetrated underneath the enamel. I sanded, primed and painted it to prevent further rust breaching.

I'll post the "after" pics in my next update.

The two parts that look like black plastic geometric were attached to each other at one point, but it looks like they dry rotted and broke apart years ago. I took the remainder off the front foot. I'm going to need to source or 3D print some sort of replacement. I'm stumped about it for the moment, I'm going to need to put wheels on it before I can take measurements so I know I can get it level to the ground.

That's it for now.
 
Last edited:
This is the post that connects to the base of the ash pan.

IMG_8881c1.png

I got it stripped down, primed and painted.

IMG_8918.jpg
IMG_8924.jpgIMG_8938.jpgIMG_8929.jpgIMG_8933.jpg

These are the brackets that hold it in place. They got the same treatment.

IMG_8920.jpg
IMG_8930.jpgIMG_8931.jpg

I think they came out pretty good.

Here's a look at how the C-Brackets fit in the Kettle Leg. And how the post couples with the ash pan.

IMG_8942.jpgIMG_8943.jpg

The rust on the base of the Kettle Leg was seeping into the enamel, so I had to purge and paint to keep it from spreading further.

IMG_8947.jpgIMG_8948.jpg
IMG_8949.jpgIMG_8950.jpg

That's all I got for now. I'll keep posting my progress pics if anyone is interested. I'm waiting for the paint to cure on the Kettle Leg before I do some fittings to it.


``
 

Attachments

  • IMG_8923.jpg
    IMG_8923.jpg
    104.9 KB · Views: 3
  • IMG_8926.jpg
    IMG_8926.jpg
    162.7 KB · Views: 3
Went to work on the "triangle". Don't know what else to call it. Maybe just the "base". It breaks down into two parts.

450508190_1087284262824820_1815005423289163064_nx.jpgBase1.png

I soaked it in vinegar to remove the surface rust, but I think I mixed it a little too acidic because it took most of the paint off with it. The parts were still pretty rusty so I went ahead and hit them with the table grinder and hand brush.

Once I was satisfied that I could prime them I got them primed and am waiting for them to cure.

IMG_8955.jpgIMG_8958.jpgIMG_8959.jpg

Here's how the leg post turned out, the lines are pretty crisp, but I think I won't have anymore wandering rust. It was a decision I had to make, "Keep it original or prevent further corrosion?" I went with the latter. The results aren't terrible.

IMG_8964.jpgIMG_8966.jpg

This is the coupler that connects the stand to the kettle:

coupler.pngIMG_8962.jpg

It's not in too bad of shape. It's porcelain coated, but the exterior was corroded pretty heavily, as you can see in the above post. So I went ahead and primed and painted that too.

IMG_8960.jpgIMG_8961.jpgIMG_8963.jpg

Here it is doing it's job:

IMG_8965.jpgIMG_8969.jpg

This last photo is the finished Base Triangle Thingy, but it's unassembled.

IMG_8970.jpg

That's all I got for today. It's coming together nicely, if I do say so myself.
 

Attachments

  • IMG_8953.jpg
    IMG_8953.jpg
    210.2 KB · Views: 4
  • IMG_8954.jpg
    IMG_8954.jpg
    139.8 KB · Views: 4
Great job. This really does seem like it could be the perfect kettle. The 2 features I would like to see in a weber is a flip up lid (they tried this with a Mastertouch and the hinge did not work great) and being able to move the charcoal higher and lower for searing / smoking. The one thing I am not clear on is ash management and bottom vents. When you get the chance could you provide some details on those please?
 
Great job. This really does seem like it could be the perfect kettle. The 2 features I would like to see in a weber is a flip up lid (they tried this with a Mastertouch and the hinge did not work great) and being able to move the charcoal higher and lower for searing / smoking. The one thing I am not clear on is ash management and bottom vents. When you get the chance could you provide some details on those please?

Thanks!

So, this thing has an ash pan that fits atop the height adjuster.

IMG_8943.jpg

The base of the ash pan adjusts all the way down when the lever is in the bottom position and sits flush on it like a cap. I THINK that chokes off the air flow from underneath.

IMG_8971.jpgIMG_8968.jpg

Here's a handy dandy illustration:

Grill Function.png


The original coal grate is trashed, it's rusted and warped so I'm going to replace it. It sits inside that flat edge on the ash pan and there's airflow vents all around that part of the ash pan.

The coals sit on the grate, the grate sits on the ash pan, the as pan sits on the height adjuster. The height adjuster has little depressions in the end and the ash pan has a notch in it. So you give it a little twist and it locks it into place on the height adjuster. When it's all cool, I imagine you just take the grate off with the unspent coals and lift out the ash pan and empty it.

There's a vent on the hood, it's a little smaller than the Weber ones but it has a little catch that stops it from spinning 360 degrees. But otherwise it's basically the same.

Hopefully it works that way and there's no surprises later on.
 
Last edited:
Thanks!

So, this thing has an ash pan that fits atop the height adjuster.

View attachment 103441

The base of the ash pan adjusts all the way down when the lever is in the bottom position and sits flush on it like a cap. I THINK that chokes off the air flow from underneath.

View attachment 103439View attachment 103440

Here's a handy dandy illustration:

View attachment 103444


The original coal grate is trashed, it's rusted and warped so I'm going to replace it. It sits inside that flat edge on the ash pan and there's airflow vents all around that part of the ash pan.

The coals sit on the grate, the grate sits on the ash pan, the as pan sits on the height adjuster. The height adjuster has little depressions in the end and the ash pan has a notch in it. So you give it a little twist and it locks it into place on the height adjuster. When it's all cool, I imagine you just take the grate off with the unspent coals and lift out the ash pan and empty it.

There's a vent on the hood, it's a little smaller than the Weber ones but it has a little catch that stops it from spinning 360 degrees. But otherwise it's basically the same.

Hopefully it works that way and there's no surprises later on.
Thanks - Very helpful explanation. What a fun grill.


Back
Top