INTRODUCING: the "Roto Damper"


Yah, most probes drop off as the temp starts to go low, that's pretty normal...
When I cook in the winter the probes always start out too cold to register, so when I lite the fire I set the HM to manual fan mode then set it at 100% until the pit probe registers....
 
So i have a weird issue i noticed last night.... i turned on the heater meter with attached roto damper and the pit probe would go from detected to "no pit probe" this was with ambient temp around 34 degrees.... once the pit heated then it seemed to operate normally.... i was also able to duplicate this plugged directly into the heater meter with no roto-damper attached any thoughts.... ? I also just brought the HM in to the house and the issue has not happened could this be related to the low temp?

Well looks like it does it when the cat 5 cable is more the 3 ft.....
 
I've been running mine over a 50Ft CAT5 cable for months now, the cable and roto-damper have been out in the fall/winter weather all the while and it works fine. Maybe re-crimp your cable?
 
Ralph..... all three cables 3ft....12ft and 25 ft are pre-made cables... i didn't have this issue until last night. I was/am able to recreate it now at will it seams the longer the cable the more frequent the probe drops out. i even swapped to a new probe.
 
at what temperature?
The probes are resistance probes... the connectors, the wire, the probe jacks all effect the resistance slightly. The probes drop off at low temperatures naturally, a long cable may make them drop off at low temperature more "reliably", however, if the probe is warmed up a bit it will read fine..
 
Ralph,

How do you have the servo wire exit the Rotodamper? I still need to pick up my ethernet parts but the rest is ready to go.
 
I just drill a hole in the back side of the bottom and push the wire through (with the end cut off). Align the valve so it is half open then mark/drill in the center back near the control cavity.
 
If you are a HMv4.0 (or older) owner you do not have a CAT5 jack or a proper servo jack (or even header) on your unit. I modified my case to fit a CAT5 jack and wired it directly to the board to connect the servo the blower and 2 probes. I had asked for a CAT5 or phone jack to be added to the HM V4.1 board, Bryan was reluctant at first, eventually he came around and did include a CAT5 jack option for the I/O on the HMv4.1 board, so if you have a HMv4.1 board you're all set. Tom did create a version of the HMv4.0 case that included a slot to mount the "aftermarket" CAT5 jack as well. Below is an edited re-post from when I added the CAT5 jack to my HMv4.0 board/case, I thought it might be useful to some so I am posting it here in this thread...


The way I setup this CAT5 jack it is not "mounted" to the case, so If I need to remove the HM board(s) from the case for any reason the CAT5 jack will come right out with it, no problem... it was pretty easy to do with a hack saw blade and some super glue (to mount the plastic for the latch). FYI, I am using the case for the larger 4-line display, which I believe is a tiny bit larger than the case for the standard 2-line display. I am not 100% sure it will work the same in the smaller case, because I haven't done it, but I have looked at it and I am reasonably sure it should work out the same

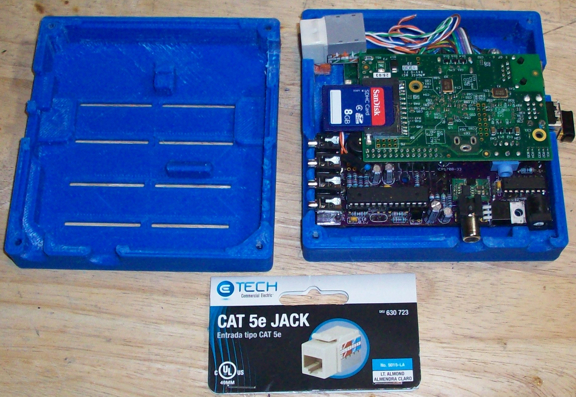
I opened up my case and shot some pics of the inside today in case anyone was interested in doing it themselves. I got the CAT5 jack from Home Depot (you can see the label in the picture), it is the type where you just punch down the wires and it snaps into a standard wall plate. I inspected the wall plate at the store to get an idea how to make a mount for it, I didn't end up mounting it exactly the same as the wall plate in the end. I just made sure the hole was tight to the jack on all sides and used the latch to prevent forward and backward motion. One piece of plastic glued in was all it needed, I used a piece that had an L-shape cause it was easier to position while gluing (and I had scraps handy), but you could actually use the piece of plastic you cut from the case glued in place to do the same job. (BTW, I just cut straight down with a hack saw blade on both sides then snapped the plastic out with some pliers. I cut down about 6mm on the top and 10mm on the bottom. The cuts need to be about 15mm apart)

Here are the pics:

CAT5_Inside.jpg


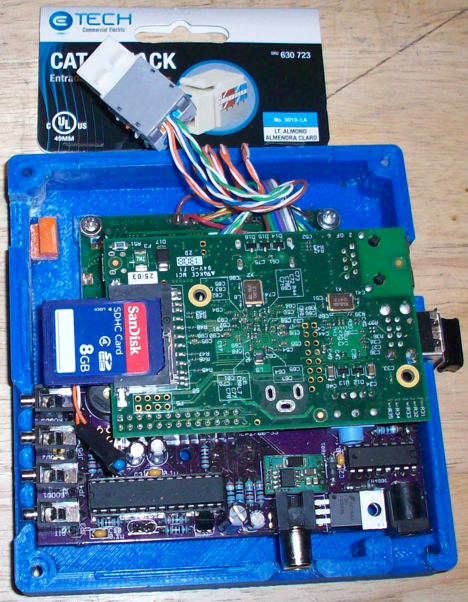
And here is a pic showing the piece of plastic I glued inside for the latch. I used an orange plastic scrap so it would be easy to see what I added...
CAT5_Mount.jpg


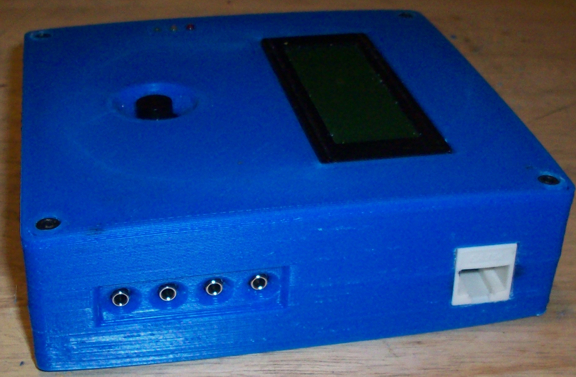
...and a pic of the whole thing assembled to make this post more comprehensive...
HM_CAT5.jpg


The CAT5 jack would have fit on either side, I chose the same side where the probes connect so all the wires would be on the same side. The Home Depot Website shows the CAT5 jacks available in color(s), it would have been nice to have a blue jack but I didn't even think of that when I was brainstorming this at the time.....
 
Hello i come from Germany
where i can order the Rotor Dumper V2 case ?
and where the Points on HM4.0 PCB to solder the CAT5 jack ?

i order soon the case from Tom and want make same i see here !
what Parts all i need for servo and the Roto Dumper case ?

sorry for my english !

Thanks
Mario
 
Mario, if you are building a new HeaterMeter and use the V4.1 circuit board it has the CAT5 jack built onto the board and the case Tom prints will be made to fit it. If you are building on a HMv4.0 circuit board you will have to wire in the CAT5 jack manually but Tom does have a case that includes the mount for the CAT5 jack. As for wiring the CAT5 jack to the HM, it is pretty straight forward. Just piggyback solder the wires to the appropriate points for the two blower wires, the servo connections are detailed in the thread about servo support elsewhere in the forum, the probe jacks connect just like you connect the ambient temperature thermistor (which is covered in the wiki). I will try to put together a wiring diagram to post that has all the connections shown in one place sometime in the future...
 
Ralph, thanks for the repost. With the 4.0 case with 2 line display I'm having trouble fitting it. I think I'm going to need to mount it sideways and between the two boards to get it to actually work. I might just make a 4.1 once it's finalized and call it good.
 
Mario was also asking about availability of roto damper parts. I have asked the same question. Others have also asked. I realize you are still modifying the design but some of like to play with new stuff!

Have you posted design or stl files? Are you planning to? Inquiring minds want to know!
 
Ralph thank you , i have HM4.0 PCB and i order already case from Tom
i order soon rest on mouser.com, i hope i have all soon tigether to start !

Barton yes i want Roto Dumper too , but i can wait when not finished now no problem !
i hope i can see soon PIC or other where to solder the CAT5 jack on HM4.0 PCB.

or better order a blowerset from auberins.com ?
 
In case anybody wants feedback, I got my hands on one of Ralphs Roto dampers. Works fantastically! It does a very good job of providing fine intake control on the egg. I hooked mine to the bbq guru intake.
 
In case anybody wants feedback, I got my hands on one of Ralphs Roto dampers. Works fantastically! It does a very good job of providing fine intake control on the egg. I hooked mine to the bbq guru intake.

Thanks for the feedback and compliment. How did it go hooking up to the guru intake? I can't recall, did I make a custom cap for that? I know quite a few people have that intake so I should make sure I know how to interface it....
 
Pondering the right angle output that would be more convenient for some grills like the BGE I decided to give a go at a 3D printed solution. I've been working on tuning bridging on my printer and also wanted to try and push my 3D modeling skills a bit further so I threw together the right angle cap shown below.

Introducing: Starship Damperprise, "may the smoke be with you..." lol I sense a theme developing although it is entirely unintentional.
RotoDamperRightAngle2.jpg


The metal part is a 3/4" conduit connector (similar to the 1" unit Bryan is using), I decided to scale down the size a little so the rise on the part can be less. The hole where the conduit connector screws in turned out a little small, had to scrape it out a bit. I can tweak that, no biggie. The unit fits tight and holds together well, I don't think it will have any support issues. However, I'm not sure if this is a feasible solution because this cap takes a good deal of time to print. I can do a square part that plugs into an existing cap much quicker and easier, but it wont look as cool as this one...

At any rate, I'm pretty happy my modeling skills are coming along and am very happy with the results I am getting from my printer. I'm printing these parts with the larger .5mm hotend sliced at .3mm, so it is coarse detail but the parts turned out pretty good.
 
Last edited:
Thanks for the feedback and compliment. How did it go hooking up to the guru intake? I can't recall, did I make a custom cap for that? I know quite a few people have that intake so I should make sure I know how to interface it....
It went ok. The fitting needed sanding/scraping so I got the knife out. The Guru measured at 35mm OD and you made the plastic at 34mm ID. It seems to hold firmly which is the best I can ask for.


Back
Top