Robert McGee
TVWBB Gold Member
I have been successfully grilling pizza on my Performers for some time. Further, I LOVE grilled pizza. I, early on, learned that just simply putting a pizza stone on the grill's food grate ended up with the bottom of the pizza done and the top of the pizza underdone. Or, conversely, the bottom burned and the top finally properly cooked. Just didn't work for me.
I reasoned that we needed to raise the stone up toward the dome to use the higher temps in the dome of the grill to cook the top faster so it would be done when the bottom was done.
My solution was to simply put the stone on a couple of fire bricks. It works well, actually, but I believe that the bricks absorb heat from the fire and it takes longer to heat the stone than it should. My son, Shannon, has long had a pizza rack made from a couple of grates bolted together. That properly raises the stone up into the dome, the pizza cooks evenly (top is done at the same time as the bottom). This method insures that nothing is absorbing heat that doesn't need to.
At any rate, I decide to build myself a similar rack. I happened to have a left over food grate from my Mini-Smoker project and had bought another Smokey Joe grill on Craigslist (new in the box) for small change. I merely took the food grate I had (also from a Smokey Joe) and set out to find some 4" STAINLESS bolts, nuts, and fender washers to complete the little project. The Stainless hardware proved a lot harder to find than I expected. Finally, after checking out Lowes, Home Depot, and another hardware store, I found what I needed at Fastenal's. We have a Fastenal not far from my home. The hardware was not cheap but I prefer stainless when dealing with foodstuffs at high temperatures for possible health concerns. Remember, I want to run close to 700 degrees, if possible.
At any rate, you will need four 4" (1/4" x 20 tpi) bolts (I found Phillips head screws threaded all the way to the head - that's critical), 12 matching nuts, and 16 fender washers (1/4" inside diameter x 1" outside diameter).
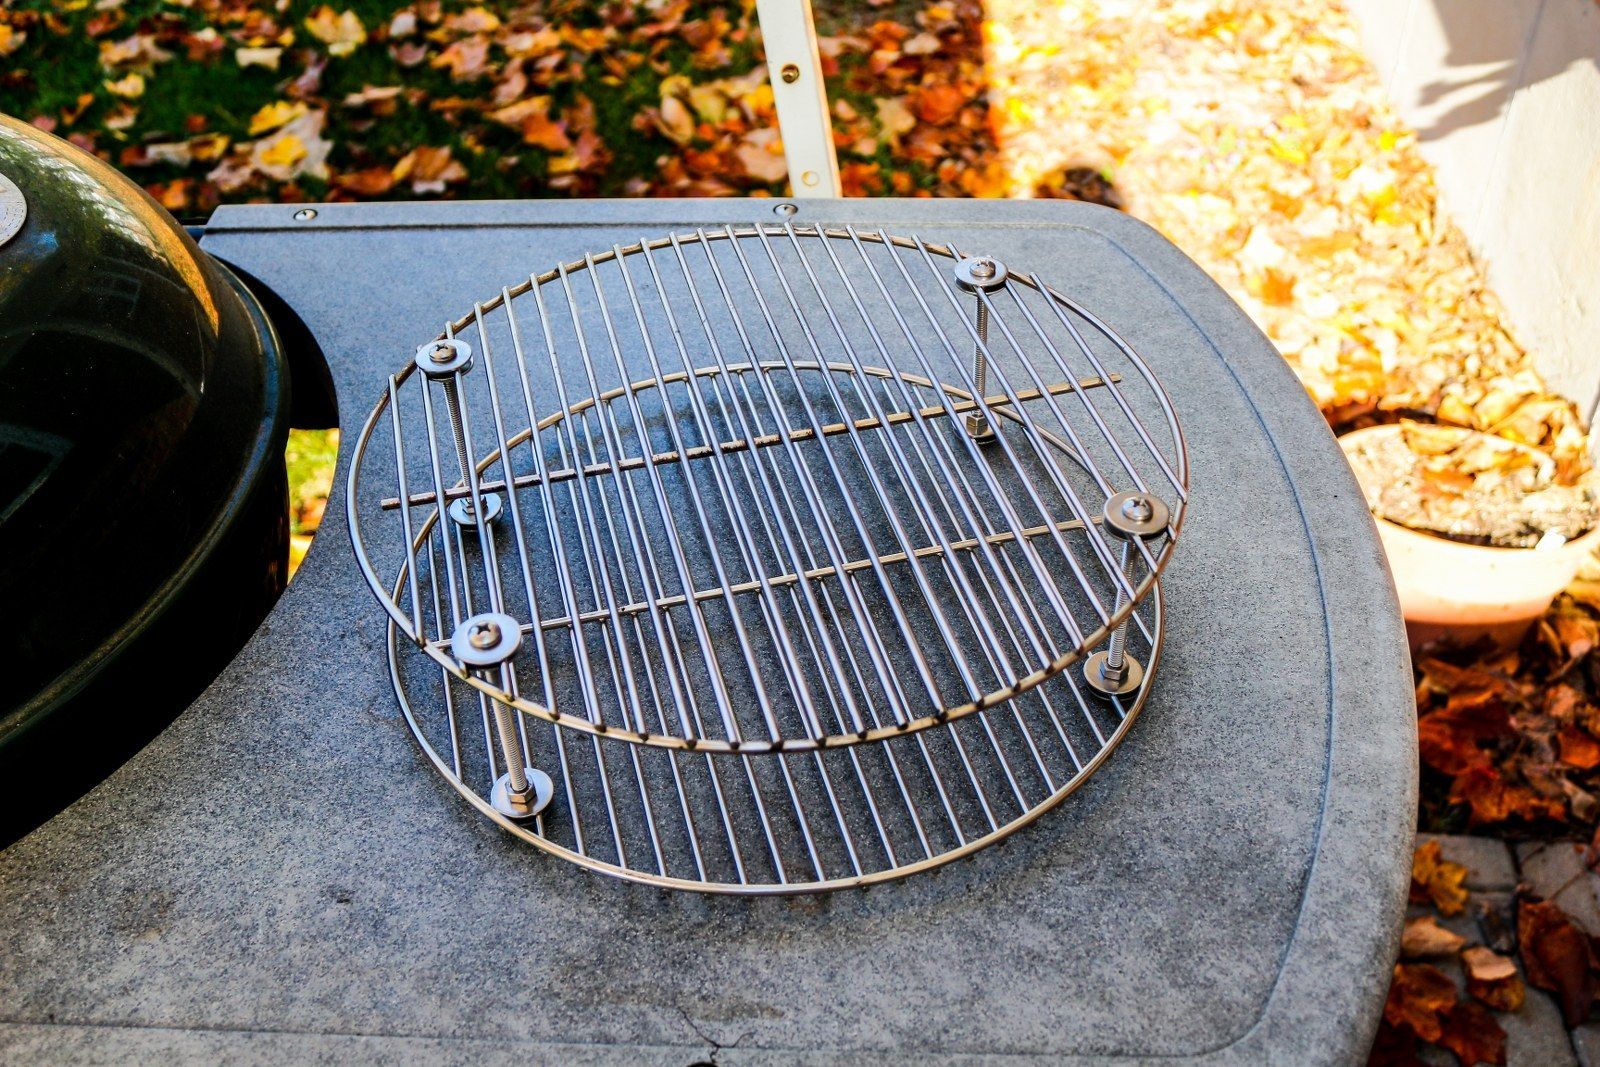
Here are the pics of the finished rack:
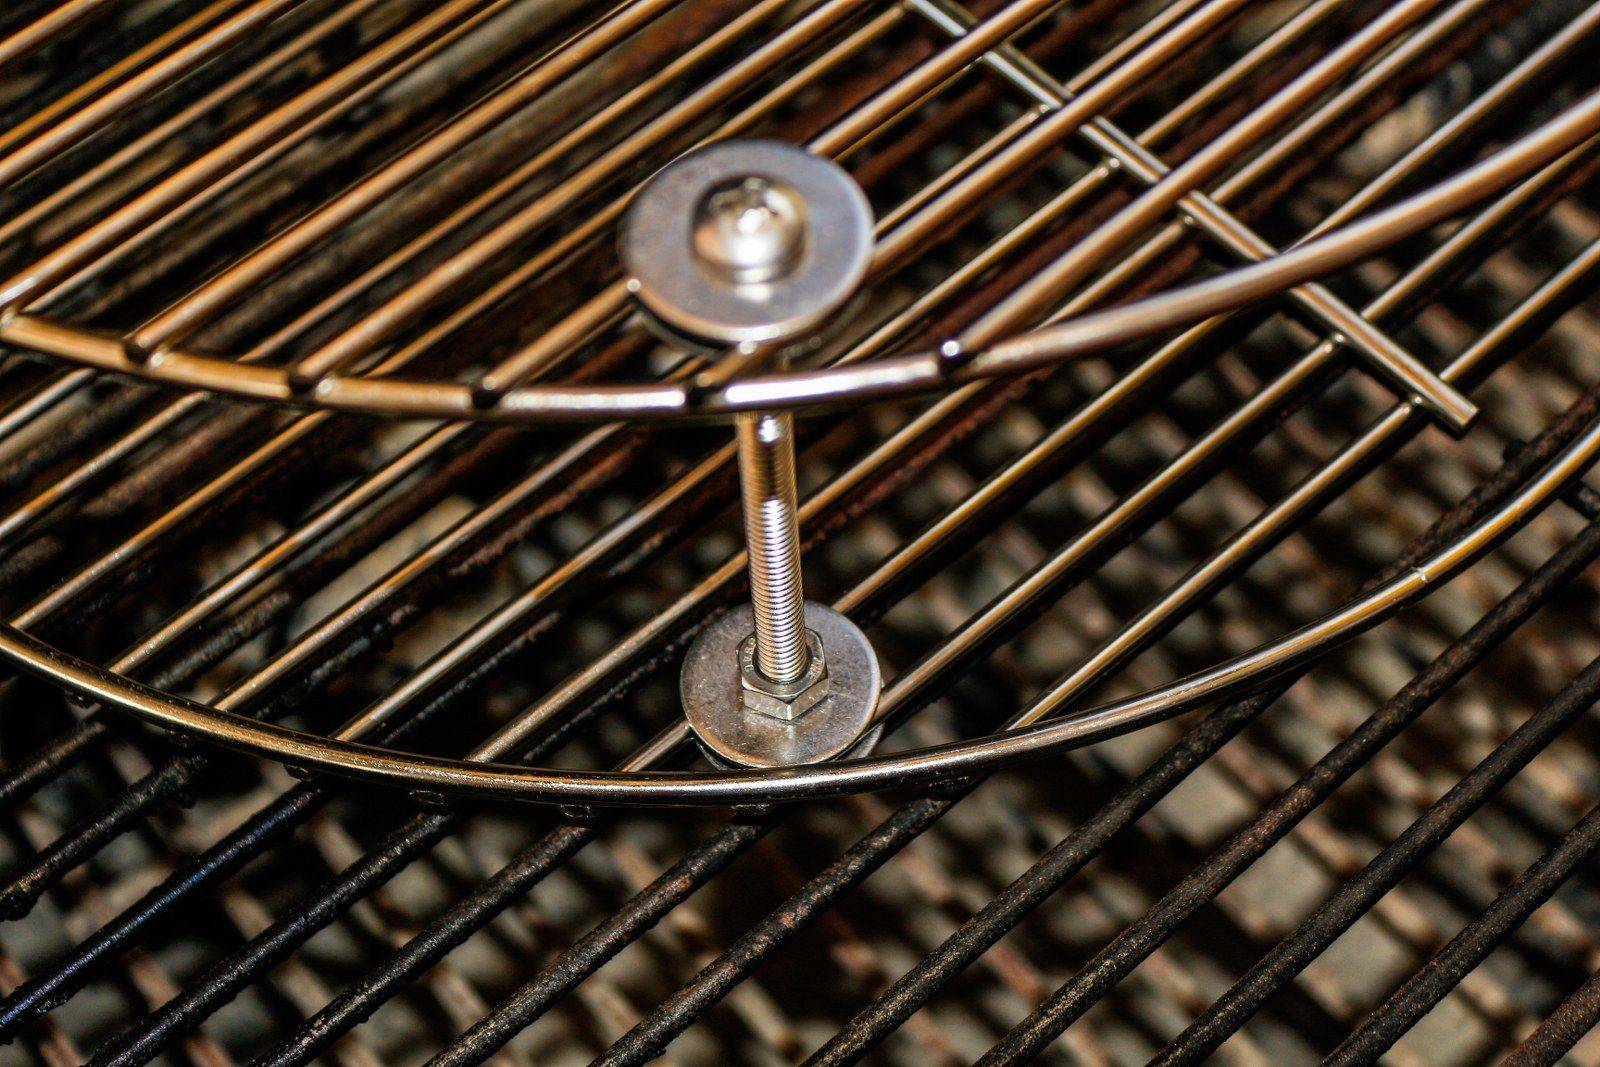
Here is a close-up of the bottom of the bolts showing the washer against the outer ring of the grate (this positions it properly);
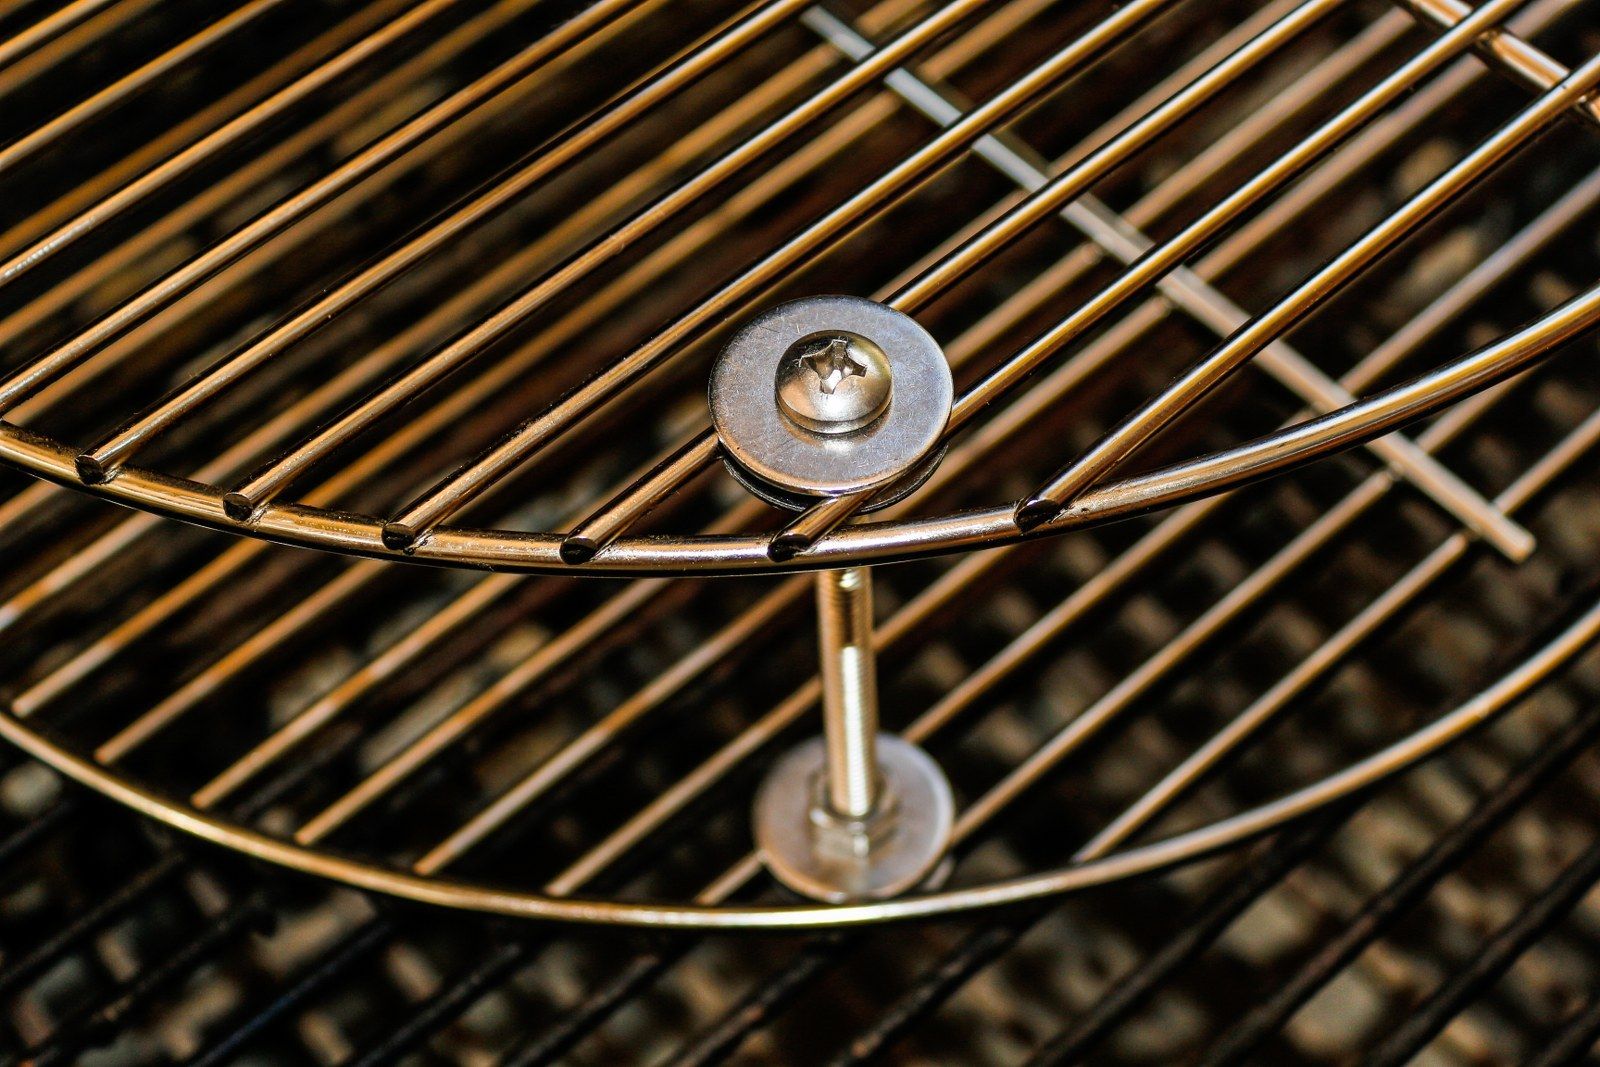
This next photo is focused on the top of the screw showing the relationship of the washer, there. Put the top of the screw on first with a washer under the head, as shown, then tighten the nut forcing the next washer up against the grate. When you have all four screws fastened then do the bottom. I put the bottom nuts even with the end of the screw to give myself the maximum spacing between the two grates.
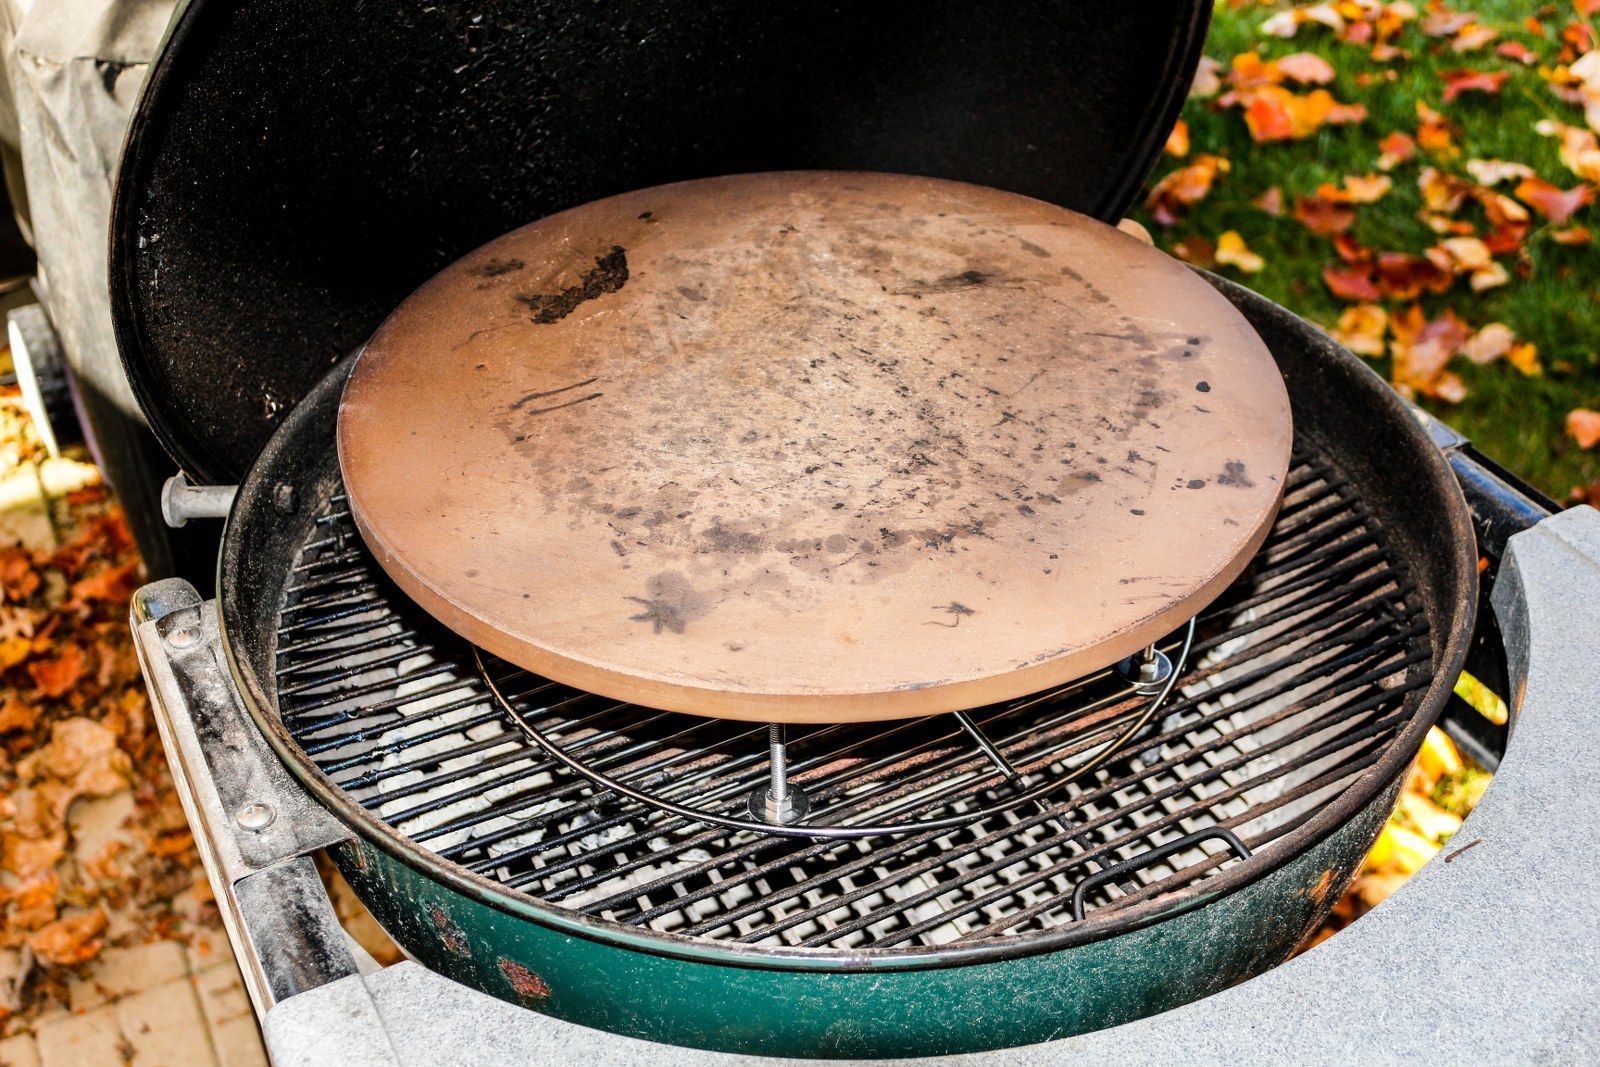
Here is the rack evenly spaced side to side and "north and south" in the grill;
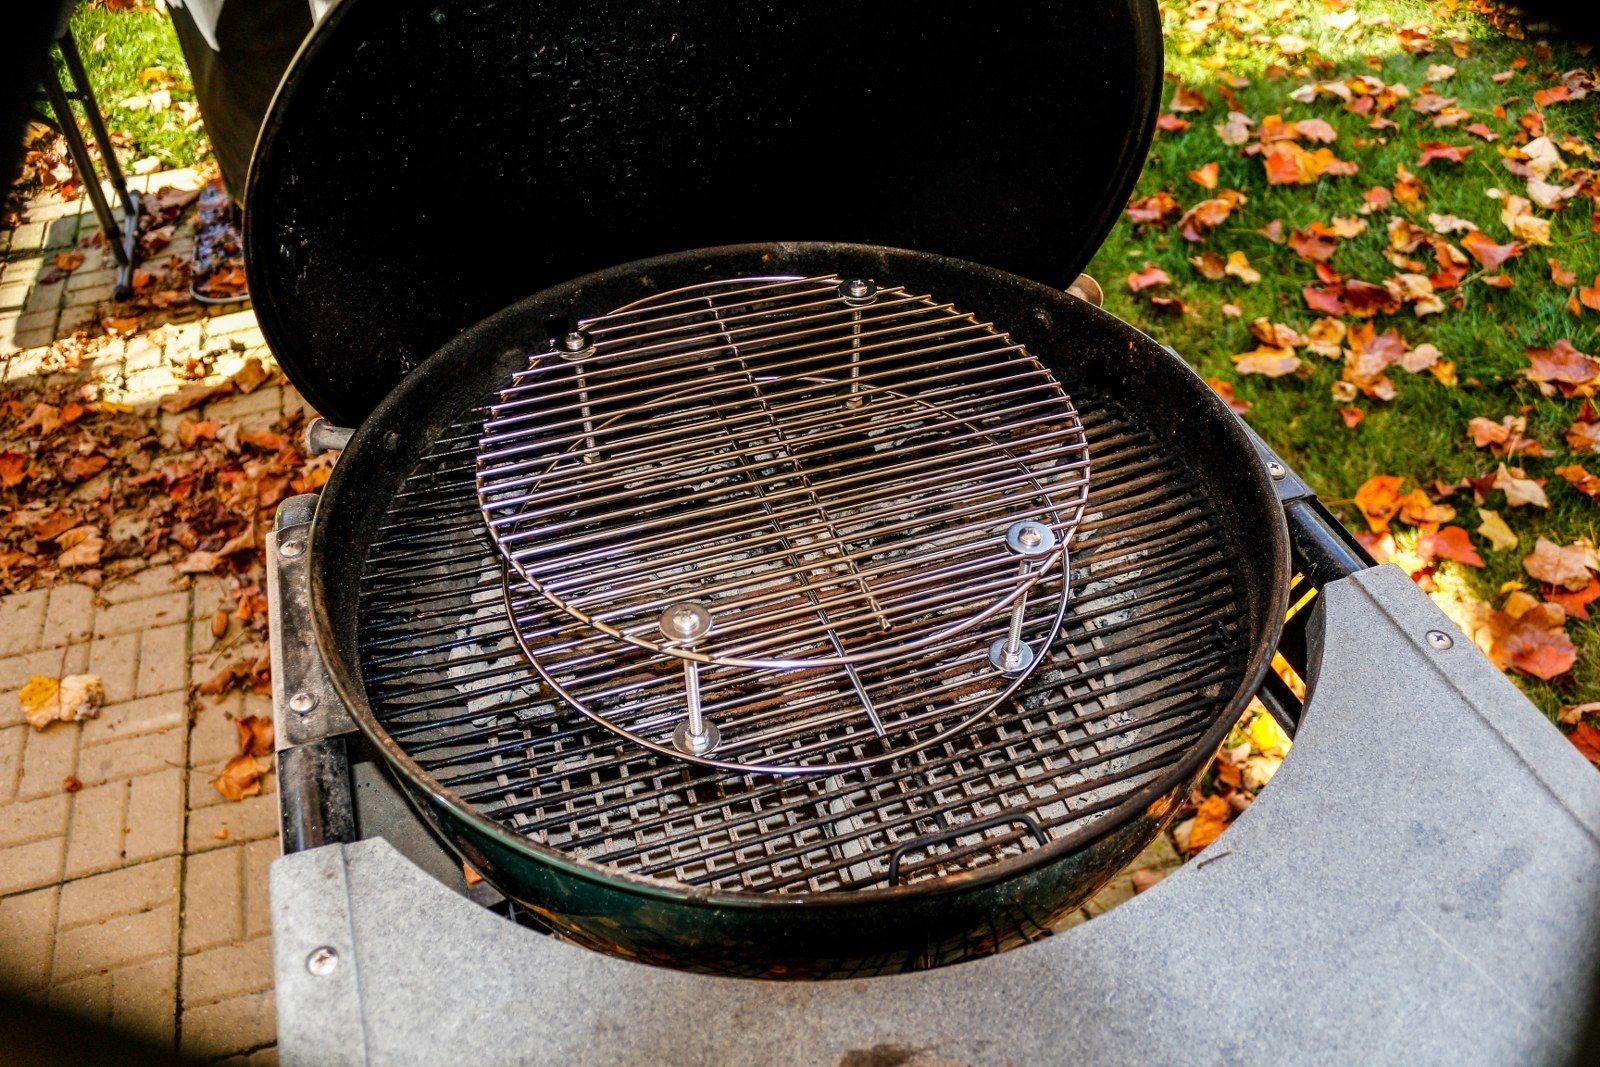
When you place the stone on the rack see that it is centered.
Note:
When I dump my lit charcoal (one full Weber large chimney of lit and one small Weber chimney of lit) I spread it evenly over the entire bottom. I let the stone heat up at least thirty minutes. Then you can do several pizzas, one right after another. I believe the most I have done is five, one after the other.
This is a very stable platform for the stone. The bottom nuts of the bottom of the rack actually fit in between the Performer grate holding it quite stable. That is an improvement over the fire bricks (although that was NOT a bad way to go - this way is just better") .
.
There is nothing magical about my choice of grates for this project. I just happened to have those on hand. Charcoal grates would work fine, also. You may be able to find them "end of season" for discount prices.
Soon, I will try adding a couple of wood splits to the charcoal to add some additional "wood fired" heat and flavor to my pizza. Further reports to follow...
Thank you for listening and remember that famous old quote, " I don't need no stinkin' wood fired pizza oven!" I've got a PERFORMER!
Keep on smokin',
Dale53
I reasoned that we needed to raise the stone up toward the dome to use the higher temps in the dome of the grill to cook the top faster so it would be done when the bottom was done.
My solution was to simply put the stone on a couple of fire bricks. It works well, actually, but I believe that the bricks absorb heat from the fire and it takes longer to heat the stone than it should. My son, Shannon, has long had a pizza rack made from a couple of grates bolted together. That properly raises the stone up into the dome, the pizza cooks evenly (top is done at the same time as the bottom). This method insures that nothing is absorbing heat that doesn't need to.
At any rate, I decide to build myself a similar rack. I happened to have a left over food grate from my Mini-Smoker project and had bought another Smokey Joe grill on Craigslist (new in the box) for small change. I merely took the food grate I had (also from a Smokey Joe) and set out to find some 4" STAINLESS bolts, nuts, and fender washers to complete the little project. The Stainless hardware proved a lot harder to find than I expected. Finally, after checking out Lowes, Home Depot, and another hardware store, I found what I needed at Fastenal's. We have a Fastenal not far from my home. The hardware was not cheap but I prefer stainless when dealing with foodstuffs at high temperatures for possible health concerns. Remember, I want to run close to 700 degrees, if possible.
At any rate, you will need four 4" (1/4" x 20 tpi) bolts (I found Phillips head screws threaded all the way to the head - that's critical), 12 matching nuts, and 16 fender washers (1/4" inside diameter x 1" outside diameter).
Here are the pics of the finished rack:

Here is a close-up of the bottom of the bolts showing the washer against the outer ring of the grate (this positions it properly);

This next photo is focused on the top of the screw showing the relationship of the washer, there. Put the top of the screw on first with a washer under the head, as shown, then tighten the nut forcing the next washer up against the grate. When you have all four screws fastened then do the bottom. I put the bottom nuts even with the end of the screw to give myself the maximum spacing between the two grates.

Here is the rack evenly spaced side to side and "north and south" in the grill;

When you place the stone on the rack see that it is centered.

Note:
When I dump my lit charcoal (one full Weber large chimney of lit and one small Weber chimney of lit) I spread it evenly over the entire bottom. I let the stone heat up at least thirty minutes. Then you can do several pizzas, one right after another. I believe the most I have done is five, one after the other.
This is a very stable platform for the stone. The bottom nuts of the bottom of the rack actually fit in between the Performer grate holding it quite stable. That is an improvement over the fire bricks (although that was NOT a bad way to go - this way is just better
.There is nothing magical about my choice of grates for this project. I just happened to have those on hand. Charcoal grates would work fine, also. You may be able to find them "end of season" for discount prices.
Soon, I will try adding a couple of wood splits to the charcoal to add some additional "wood fired" heat and flavor to my pizza. Further reports to follow...
Thank you for listening and remember that famous old quote, " I don't need no stinkin' wood fired pizza oven!" I've got a PERFORMER!
Keep on smokin',
Dale53
Last edited:

 ...
...
")