Blue Sky Stepper Damper thread - Breakout from RaspberryPi + LinkMeter blue sky


The same thing happened to me on the version I uploaded to my rPi, the HeaterMeter just locked up. It is stuck in soooome sort of loop somewhere, but I haven't been able to figure out where because it has only done it once. I'll keep an eye on it to try and figure out a solution.
 
I still haven't been able to reproduce the lockup, but it occurred to me that it might be something on the lmremote side, not the HeaterMeter side. I'd changed the code to start trying to sync the receiver to only be active during around when it expects a transmission so I've pushed that code github if you want to see if it helps with the lockup. Good news is now it should only have the receiver active 16ms out of every second which should be great for battery life.

Eventually I'm going to move the fan transmit to only happen every 5 seconds too, once I've got it all working perfectly.
 
It has been running for the last 4 hours or so without hanging.

I do see a couple things.

1. the servo is very chatty now, as it actually changes, even when it shouldn't. Basically I have it set at 100%, but it changes slightly every 3-4 updates. This never happened before. I don't think it will impact performance, but it will increase power consumption.
2. With the smaller update window it takes 3-4 cycles to go from 100% to 0%. When we finalize things I think we should make sure the time allotted is large enough to close the servo in a single go. Will be helpful when going into open lid mode.

Next is to try another charcoal run to see if I can get the PID parameters dialed in.

thanks,
dave
 
Well at least it isn't locking up the HeaterMeter, I'm still not sure what caused that.

You can increase the minimum awake time by adjusting the MIN_RECV_WIN, which should fix #2. Eventually the receive and read will be decoupled so that they don't have to use the same period (1s currently). Working out a better solution before then is pointless.

I don't know what would cause #1 to happen.
 
OK trying to tune again today. Even though it is in the 40's outside :)

What I've found is that it is tracking as good as I could expect in proportional mode only. P=100 everything else is 0. Maybe because it is just cold outside?

dave
 
Just ordered the parts for 2 HM 4.0s....except for the fans. I'd like to use only air vent control as you're discussing here. Right now I'm thinking of a wired solution. 1 pin, the servo library, and a hobby servo controlling a slide vent. I think all I'll need to add to the board is a few wires out to a servo connector on the side of the box.

It would be very cool if there was 1 control solution for the 3 possible situations (fan only, damper only, fan + damper). I could see how a fan + damper would have benefits (faster response from fan, with "base level" and shutdown control from damper). However, it seems to me that having both might require a completely different treatment (the damper would control how much the fan works, rather than the temperature). Think there's an elegant way to do this without a completely separate treatment for the fan + damper case?

PS - Can't wait to get this up and running. Thanks a ton for all the work to Bryan and all the other contributors.
 
I think you've brought up the start of the key point right there, when you say there are 3 ways it could work. The fan control is a relatively straight forward thing that HeaterMeter does (incorrectly) and it works. However, a damper can be controlled by a number of different methods, a servo, a stepper motor, a solenoid, an electric ball valve. Each of these has slightly different somewhat-but-not compatible drive requirements. I think that even beyond that, things branch further as folks use supplies they have on hand or devices that work better with their grills.

So I'm not so sure it can be handled in a general case, and considering how small code storage on the CPU is, it makes it near impossible to create a "one code fits all" solution. Building different versions creates a tremendous amount of annoying work on me so that's not something I want to do. I think that most people will just roll their own solutions, as the PCB doesn't favor any specific solution.

I'd be interested to hear what you think though, and what your plans are for the physical unit that you'll be using for your damper.
 
Different versions of the code for different setups is definitely out. I think that everyone greatly appreciates all the time you put into development/improvements/features, and it shouldn't be wasted on maintenance nightmares.

I don't have anything laying around to repurpose, so hobby servos seem like a no-brainer for me. Ten bucks and an already developed arduino library that can use an available pin (not 100% sure there, but I think that's correct).

As far as what kind of signal is output for a damper, I think that it would just have to be an up front (perhaps rather arbitrary) decision, and then the person putting the system together makes it work for their hardware. Probably just DC or PWM. Are there any analog out pins available? That might make the decision easy. I could suggest a 50 Hz rectangular wave with 1-2 millisecond pulse width, but that might be a bit biased.

I think that determining output signal levels could be the harder problem. I don't know how all of the special cases work and interact (anti-windup, lid open, etc..), so I'm not sure if a generic PID routine could be used. Then, to do it right, there would have to be some way to discover what is attached (blower, vent, or both). If you could do both of those, I think that the only change for the blower + vent case would be that there are 2 PID loops, and the input for the vent controller is the output of the blower.

Now that I think about it, doing this should be a piece of cake :)

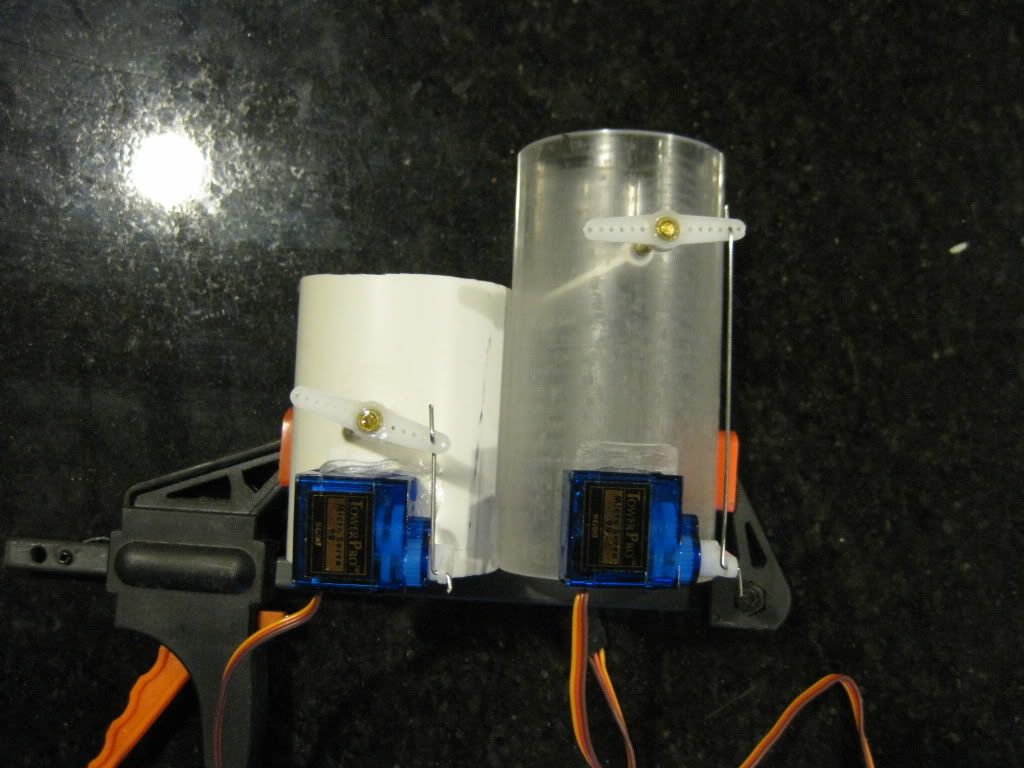
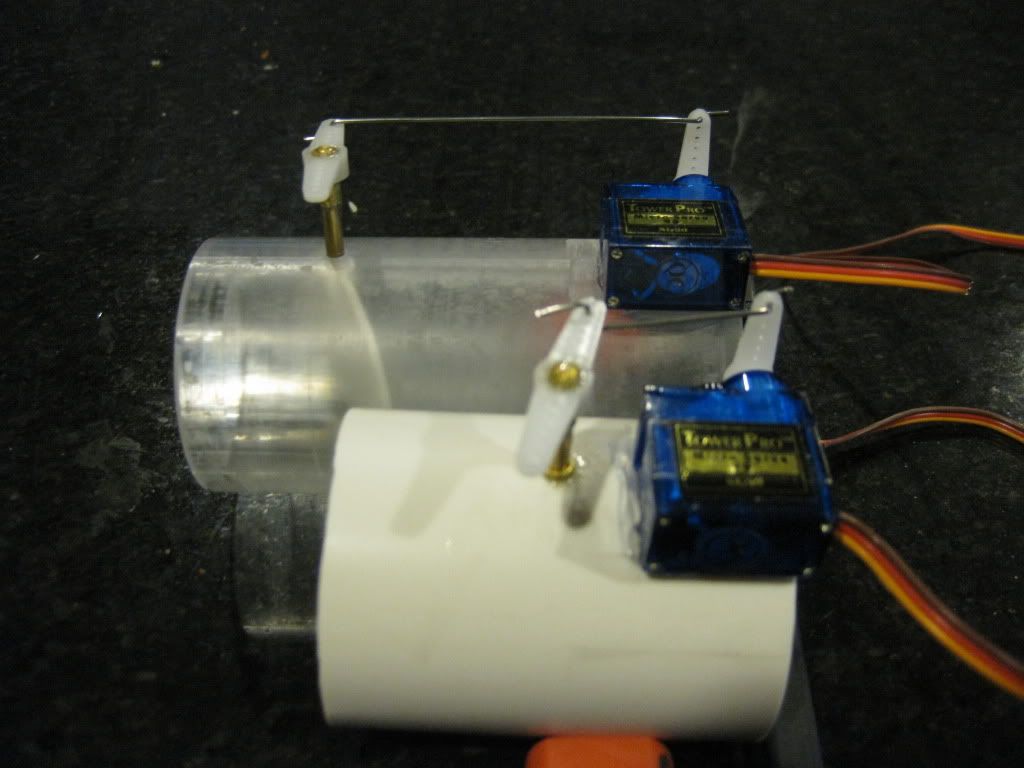
Oh....the vent I'm planning on using is just a simple slider. Probably a flat plate sliding over another flat plate with a circular cutout. A lever arm from the servo moves the plate. I might change opening shapes for more sensitive open area vs. position, I'm not sure yet. Well-flattened plates and a bit of spring force to hold the sliding plate snug. If you orient it right you could probably just use gravity and avoid the spring force requirement. Easy to construct and avoids the "hard stops" that some valves have (potential bad juju for servo motor). Phase II might add a daisywheel on the smoker outlet, but that's a ways down the road....

Hmmmmm......sorry for the long-winded post.
 
There's really only 1 analog input remaining and no digital pins. Technically digital PIN_SOFTRESET(7) and PIN_LCD_DATA(8) are available in v4.0 boards, but they're used on the v3.0 boards and I'd rather not re-purpose them. They're not PWM anyway so I'm not sure how much use they would be. It might be best to just make a second board that drives the servo and uses the existing PWM as input.

That aside I don't see what the benefit of running the fan PID output into a second PID. No matter what damper PID does it can't directly affect the input variable; it use the temperature as input. I'd think it would be a simple map of fan speed to damper position. Not that this would be in any way useful because there's no pin we can drive with the result.
 
I got my tuning results completed well enough to try smoking some pork shoulder. So next week I is pulled pork time. If the weather isn't too cold I'll use the no-fan mode, if not I'll be hooking up the fan.

My tuning resulted in:
b=0, p=50, I=0.075, D=10

I still had some oscillations, but I'm hoping those smooth out when I get some meat in the smoker.

dave
 
That aside I don't see what the benefit of running the fan PID output into a second PID. No matter what damper PID does it can't directly affect the input variable; it use the temperature as input. I'd think it would be a simple map of fan speed to damper position. Not that this would be in any way useful because there's no pin we can drive with the result.

That's funny. I hadn't really even thought about a direct map. That should avoid the "no fan and still too hot" problem and also allow shutdown. Gets interesting at the low end of the blower range (when you have periods of fan completely off). Seems like a reasonable solution, just not my preferred one.

W/R/T the second PID, think of it this way: At a given steady operating point, what is the ideal damper position? In my estimation, it's the amount of flow restriction that keeps the fan working a little, but not too much. The "set point" for the damper then is a target blower speed, not temperature. That's my ideal blower + damper setup.

That said, I kind of doubt that I'll want anything more than a vent. I'm still putting everything for the fan on the PCB, though. It's nice to have a proven plan B if things don't work out....
 
If your damper is a second PID with the fan speed is an input, that means that the damper is attempting to control the fan speed. The fan speed is a function of the temperature though, as an example, the temperature is too low so the fan speed is cranking up and the damper wants the fan speed to be lower so it is closing. They're essentially driven from the same input, the temperature, but are against each other in how to respond to it. What you'll see mathematically is an amplification of any error caused by the fan introduced by the second order control of the damper.

The reason for having a damper is to restrict airflow when too much air is getting to the fire. When used in conjunction with a fan, if the fan is on and there "too much air"... lower the fan speed. There's no need to damper a running fan because you're already asserting control, just reduce your control output. The damper does come into play once the output wants to go below the control range of the fan, to reduce leakage and air drawn in via convection. I just don't think there's any practical gains from trying to actuate two air restrictors in their control range at once.
 
The system you're describing is definitely the simpler approach. The fan can even be taken out of the control equation entirely. Just run it at constant speed and have a leak path for the airflow when the damper is fully closed. Kind of a brute-force approach, but highly attractive for its simplicity.

In the cascaded system I'm thinking of the fan doesn't know or care about the temperature. Say the pit temperature is stable and at its set point, but the fan speed is above its set point. The defined response of the damper for high fan speed is to OPEN (slowly). When that happens, the temperature wants to creep up but the fan slows down to counter a rise in temperature. Exactly the desired response. The damper just has to act at a time scale significantly longer than the system response to the fan (ballpark of 3 times or more).

Our relatively slow-responding eggs are perfect candidates for a cascaded control system. Necessary? Nope. And I'm not sure that it's interesting enough for the effort and added complexity.
 
Almost done with my first two "real" dampers. I made one of clear plastic, and one of white PVC. I had the clear plastic made by a friend who turned it on his lathe to see if a more precise inner diameter would help. Turns out that for all practical purposes the off the shelf PVC is more than adequate. I do like the transparent nature of the clear plastic. I do find, when testing, I have to get down on my knees to see how far open the valve is. Wish I had started with the transparent one first!

You can buy 1.5" clear PVC pipe, and if I make any more that is what I think I'd go with.

IMG_56971.jpg


IMG_56981.jpg


What do ya'll think?
dave
 
Pretty sweet! Is the servo just hot-glued in place? What holds the 3D printed part onto the rod?

And more importantly, how well does it work? What temperature range can you maintain? You may have noticed that the latest checked in HeaterMeter (20121224B) doesn't transmit any longer. I had 2 more lockups with it so I've commented out the define that enables it until I figure out how it is going wrong. It is at the top of rfmanager.h though when you need to turn it back on.
 
The rod is held on by a 4-40 screw and nut. I place a washer on either side and it clamps it in place.

The servo is attached with 100% silicone adhesive (aquarium silicone). It works really well, and is removable if necessary.

I was able to maintain 225F, but didn't try anything less than that. It would go lower, but I didn't push it.

I just need to run them through the paces to make sure the servo holds up and they are good to go. I think the total cost will be < $20 if anyone else wants to make one. I've got lots of pictures while I was building them. I'll post something later if others are interested.

dave
 
I just got a gas smoker for Christmas and am thinking this may be an easy adaption for me to control the gas regulator valve. I've got a lot of other stuff going on right now but will be watching the progress.
 
Do gas smokers really need that much tweaking? I'd assume if you had a needle valve and you set it right that there isn't much mucking about to be done.
 
Do gas smokers really need that much tweaking? I'd assume if you had a needle valve and you set it right that there isn't much mucking about to be done.

Not a lot but when doing a 16+ hour cook there can be a bit of variance from changes in ambient air temperature and from changes in what is in the smoker like when I add ribs about 5 hours before I think the shoulder or brisket will be done.
 
Ok, it seems like I've been asleep, as I started this thread, but I woke up a few nights ago with a thought...

Instead of coding any changes to Bryan's magnificent effort to drive a damper, work around the problem of limited pins/forking by:

1) capturing the blower_pin out of the UNO (pin 5, blower) and lead it to a daughterboard uno on the motor mount
2) have the daughterboard uno monitor via interrupt the blower activity direct from pin 5, and have it drive changes to a stepper motor for damping.

Thoughts? I like it a lot, as it avoids any code changes. Downside, you have to add +5v, pin 5, ground lines running to the blower motor, on top of +12v and blower out. (5 lines instead of 2). But that's a hack of a lot more manageable than forking code (shudder).


Back
Top