Blue Sky Stepper Damper thread - Breakout from RaspberryPi + LinkMeter blue sky


I've thought about the same thing too. I think you can just get by with 5V, GND, and the existing 2 lines with the PWM signal running through an RC filter to get an analog voltage back out into the servo microcontroller. That might not even be needed though, I still think that having both the blower and the damper with proportional control doesn't provide any benefit-- the damper should just be open when the blower runs, and closed when it isn't.

Dave sent me a damper to test with, but I haven't had any time to get it wired up and mounted yet. I think we'll know more about what's needed once there's more data on the table.
 
daughterboard damper controlling code

Here's code that will activate a servo on pin 9 of a daughterboard damper uno.

I just tested it with my heatermeter, routing pin 5 of the heatermeter atmega to pin 2 of the daughterboard damper uno. It routes the servo between 0 and 180.

Next step, building damper housing.

***

copyright 2013 David Casazza, All rights reserved

#include <Servo.h>

// the servo
Servo myservo;

// the servo setup, pin 9, open position is 0 deg, closed is 179 deg
int Servopin = 9;
int Servoopenpos = 0;
int Servoclosepos = 179;

// this is set up for uno and mega
int LEDpin = 13; // led pin for testing
int inPin = 2; // also interrupt 0 on uno and mega
volatile int open = false; // open = damper open
volatile unsigned long time; // millisecs time measurement

void setup()
{
myservo.attach(Servopin);

pinMode(LEDpin, OUTPUT); // set up writing to led
pinMode(inPin, INPUT); // set up reading from interrupt 0
attachInterrupt(0, change, CHANGE); // set up interrupt 0
if (digitalRead(inPin)) open = true; // if we are starting up and inPin is high, then damper should be open (should handle situation when daughterboard damper board starts up with heatermeter PWM=100% on
}

void loop()
{

// code to flash led
if (open)
{
digitalWrite(LEDpin, HIGH);
if (myservo.read() != Servoopenpos)
{
myservo.write( Servoopenpos);
delay(15);
}
}
else
{
digitalWrite(LEDpin, LOW);
if (myservo.read() != Servoclosepos)
{
myservo.write( Servoclosepos);
delay(15);
}
}

// turn off damper if no activity over 6 seconds and inPin is low - turn off interrupts if reading volatile variables
// 5 seconds is the amount of time PWM is 0% when doing pulsing blower at 5%, e.g. 5 seconds at 10%, 5 seconds at 0 %
// so picked 6 seconds as threshold
noInterrupts();
if (millis()-time > 6000 && not digitalRead(inPin)) open = false;
interrupts();
}

void change()
{
// hey, something changed, so open damper, and start timer (reset timer every time something changes)
open = true;
time = millis();
}
 
Using a daughter UNO board is essentially what I did, and used Bryan's wireless daughter board sketch. This allows me to send the control data wirelessly to the daughter card, and bypasses the need for routing pin 5 to the card.

I currently have it set to open the damper based on the blower fan speed %. I just scale the fan speed of 0-100 to 0-90 degrees on the servo. You could just as easily set the servo position (open, close) based on the 0 and 100 blower speed. That way it just opens/closes.

To do this, I would have to change my servo build a little so that it can be placed in series with the fan, today it is just a replacement for the fan. You can see that in where the servo is mounted. I would need to make the PVC pipe extend beyond the servo. Pretty easy fix, the entire damper system is only 2-3/8" long.

dave
 
EDIT: Nevermind, I found the code. Now off to see how well it work with a pan of water.

dave

Bryan,
I updated my AVR firmware to the latest to get the alarms working. My ribs just came off, and I have enough charcoal left to play around with the damper. However, I can't get it to work any longer. Its been long enough I can't remember if you gave me a special firmware to send the output control signals to the lmremote. I'm thinking that was the case and I just over wrote them.

Ideas?
dave
 
Last edited:
I'm not sure if anyone is interested in getting one of the valves that I used to make the damper for myself and Brian. I have a credit at shapeways and could order some of these valves. They cost $4.85, but with shipping end up being close to $11. I don't mind using my credit to order 8 or so of them and I could then get them out to people for the $.85 + shipping. They only weigh a few grams so I don't think shipping will be the $7 shapeways charges. If there is interest I'll order some and have them for people here that are interested.

They fit inside a 1-1/2" PVC SCH-40 pipe that you get at Lowes/HD. To make the entire valve, you need a micro servo, about 2" of 1/8" brass rod (also bought from Lowes), and a 4" piece of guitar/piano wire. I'll post some instructions and pictures this weekend on how to put it all together. You do need a drill press or a really steady hand :)

Let me know if there is interest in the valves and I can order them. Or if you prefer just ordering directly from Shapeway, or if one of the 3D printer guys want to print some up I can get the stl files out there. What ever works.

dave
 
And bigger too! The 1.5" was open 30-40% to maintain 225F on my egg. I am looking forward to trying it at other temperatures as well to see what temperatures work before it runs out of "open".
 
Would a 2" piece of PVC work better?

It is easy to draw one up. You take the inner diameter of whatever PVC pipe you want to use, make a disc 1/8" thick with that diameter. Put a hole through it, I put two, then trim it with a sphere to get rounded edges.

I can draw up a 2" one if there is interest.

On my UDS I get to 325F with the 1.5" all the way open, which was hot enough. I run 20-30% open for 225.

dave

And bigger too! The 1.5" was open 30-40% to maintain 225F on my egg. I am looking forward to trying it at other temperatures as well to see what temperatures work before it runs out of "open".
 
I'm not sure if anyone is interested in getting one of the valves that I used to make the damper for myself and Brian. I have a credit at shapeways and could order some of these valves. They cost $4.85, but with shipping end up being close to $11. I don't mind using my credit to order 8 or so of them and I could then get them out to people for the $.85 + shipping. They only weigh a few grams so I don't think shipping will be the $7 shapeways charges. If there is interest I'll order some and have them for people here that are interested.

They fit inside a 1-1/2" PVC SCH-40 pipe that you get at Lowes/HD. To make the entire valve, you need a micro servo, about 2" of 1/8" brass rod (also bought from Lowes), and a 4" piece of guitar/piano wire. I'll post some instructions and pictures this weekend on how to put it all together. You do need a drill press or a really steady hand :)

Let me know if there is interest in the valves and I can order them. Or if you prefer just ordering directly from Shapeway, or if one of the 3D printer guys want to print some up I can get the stl files out there. What ever works.

dave

I would like to get one valve from you.
PM with details on how to get payment to you

Dale
 
OK, if I get this right, you are using a servo to adjust a damper to control the temperature in the smoker instead of using a blower? This is more like automating the manual method of heat control, which results in a more desired lighter flow of smoke through the smoker than when using the blower to regulate the temperature? The only drawback seems to be that it takes much longer to stoke the fire and get the pit up to initial cooking temperature....

I am wondering if the HeaterMeter has any remaining capability that could be used to simply switch on a blower (not speed controlled) during the initial warm-up of the pit and turn it off when the pit first hits the target temp, and let the servo damper take it from there?

If that is an impossibility you could achieve pretty much the same result by putting a switch on the blower that is activated by the servo damper when it is fully opened, and power the blower with plain old DC voltage. This would be a more simple mechanical approach to adding a fan to the servo damper system so you get the best from both methods...
 
Last edited:
OK, if I get this right, you are using a servo to adjust a damper to control the temperature in the smoker instead of using a blower? This is more like automating the manual method of heat control, which results in a more desired lighter flow of smoke through the smoker than when using the blower to regulate the temperature? The only drawback seems to be that it takes much longer to stoke the fire and get the pit up to initial cooking temperature....

I am wondering if the HeaterMeter has any remaining capability that could be used to simply switch on a blower (not speed controlled) during the initial warm-up of the pit and turn it off when the pit first hits the target temp, and let the servo damper take it from there?

If that is an impossibility you could achieve pretty much the same result by putting a switch on the blower that is activated by the servo damper when it is fully opened, and power the blower with plain old DC voltage. This would be a more simple mechanical approach to adding a fan to the servo damper system so you get the best from both methods...

You don't want to do this. You will get significant over shoot. What kind of grill / bbq do you have?

If you start out with the blower at 100 percent, you are going to be moving a LOT of air. It takes a lot of energy (wood/coals burning) to heat that much air to 300 F (or whatever temperature you're shooting for). If you are running at 300 F and then all the sudden when you turn your blower off, you're going to have a lot of fuel burning and not much air movement / heat load. This is going to cause your temperature to go way up and it will take time to come back down.

Just let the PID do the work. It typically can do just as good a job as a person, if not better. The PID is constantly looking at the error (which is the difference between the setpoint and the actual value) and adjusting based upon how big the error is, how fast the error is changing, and how long things have been away from setpoint.

Well, correct me if I am wrong, but if the standard fan driven HM initially stokes the pit up to temperature much faster than the natural convection air flow with the servo damper (or manual) system, isn't that system doing the same thing you warn against? Since my HM parts wont arrive until Wed I still have to work from what I read and theory unfortunately... If the HM doesn't run the fan at 100% for initial startup couldn't you figure out about how much air the HM blower is moving at that time and get a fan that moves about that amount of air? (instead of the full capacity of the blower in the HM kit) If the initial blower speed varies pit to pit you could fashion a fan with a (stand alone) speed control that you could tune to your pit to match what the standard fan driven HM does?

It just seems if the blower driven HM heats the pit up faster initially then it must be doing something similar to what you warn against? I have to assume the fan starts out blowing pretty good and when the pit temp starts to rise near the target temp the fan speed ramps down, and at points turns off completely? You could code the servo dampered HM to move the damper away from fully open when the pit hits XX% of target temperature and that would open the switch and turn the fan off a little early to avoid the over shoot.

Just thinking, you know... I was reading talk in this thread about the HM or rPi not having capacity left to control a servo AND a blower and just brainstorming ways to get it done. A fan with a stand alone speed control that was switched off when the damper moved away from fully open, and code that would move the damper away from fully open when the pit was XX% of target temp would give you a pretty tunable system to stoke your pit up to temp fast I would think. Maybe I'm crazy, but at least I'm thinkin'.....

PS ...and you could put a manual on/off switch on the fan that would prevent it from coming on again during the cook if you run low on fuel and the damper opens all the way up....
 
Last edited:
It just seems if the blower driven HM heats the pit up faster initially then it must be doing something similar to what you warn against?

If the PID is tuned properly it will actually start throttling things back before it gets to setpoint. It shouldn't run at 100 percent until it hits setpoint if it's working properly.

The other thing that people do (including myself) is limit how fast the fan will go. With my Char Griller Komodo, 35 percent is as much air as I will ever need, and so in the configuration I set that as the max. Very similar to went you were saying about having a fan "tuned" that only moves so much air. The other thing some people do is block off part of the fan inlet to cut back the capacity of the fan.

Here's a screen shot of a 12 hour brisket cook I did last weekend. The fan on is the light blue curve on the bottom. It's off most of the time and it never goes above 35 percent. Just some MINOR airleaks were enough to keep things going for the most part. I ran out of fuel near the end, which is why things started jumping around near the end, but that's after almost 12 hours of cooking.

Unless you are doing a high temperature cook (300-450F), getting enough air shouldn't be a problem.


Edit: At the beginning of this cook I didn't have my ash pan completely latched and didn't notice it. The temperature climbed quite a bit while I was inside prepping the food.
 
Last edited:
Thanks for the feedback...
I just got my HM wired up yesterday and did my first cook so I have a better idea what's going on.
From that experience I think what I had proposed would work and would be an appropriate way to aid the initial warm up of the smoker.

Here's some info on what I have setup here so I can explain myself.

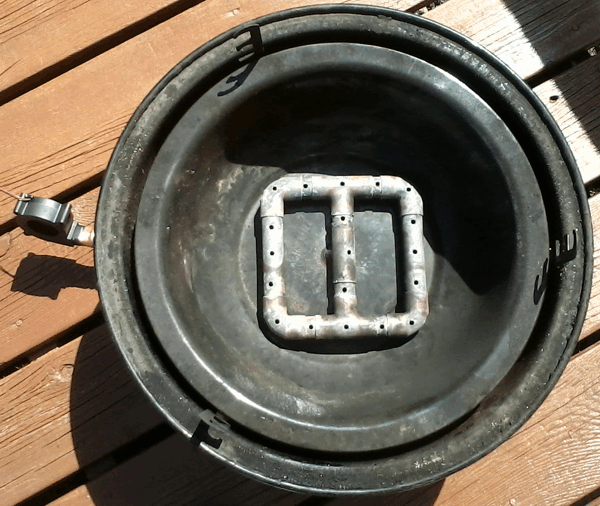
Right now I have a Char Broil H2O Smoker Deluxe that I got at a garage sale. (a bigger DIY pit is in my near future) It is a rather bogus design without even one adjustable vent and no vents in the lid. There is a coal pan that sits in the base, the coal pan only has a 1" hole in the bottom, the base has 3 larger holes in it.

What I did to integrate the HM into this smoker was first I used Aluminum tape to cover over two of three holes in the base. Then I used 3/4" copper tubing to make what looks kinda like burners in a gas grill which sit in the bottom of the coal pan, flexible copper comes out of the hole in the coal pan and goes out through the one hole in the base that I didn't tape over, then the blower connects to the end of the flexible tube. I drilled holes in the copper tubes in the coal pan so the air is distributed evenly through the coal pan. This choked off most of the natural convection flow of air through the smoker allowing the HM to regulate the fire better by controlling the air flow more completely.

When I fired up the smoker I hit the coals with torch for a few and powered up the HM, the fan ran at 100% initially. The fan stoked the fire nicely to get it up to temperature (as is my goal with the above suggestion to add a fan for the initial warm up in the servo system). Once I put the body on the smoker and pit probe in place the temp started to rise, as expected when the temperature started rising toward the set point the fan ramped down and the temp settled nicely at the set point (no over shoot). During the cook the fan ran roughly between 0 to 13% capacity oscillating up and down in a natural almost sine wave looking graph. The pit temperature however stayed ROCK SOLID, the graph of pit temperature sat right on top of the red line and barely deviated at all, the line was much more flat than the line I see in the graph you posted from your cook.

I experimented a bit and changed the set point from 250 to 275, the fan ramped up and the pit temp went right up to 275 in no time and held it perfectly (no overshoot). I set it back to 250 and the fan turned off, the pit dropped right to 250 and stopped on a dime and resumed the near perfect temperature control in the pit. Even when I opened the lid, right after the lid open mode ended the fan stoked the pit right back to perfect temperature in no time! Great design on this thing I tell ya!

IMHO (from reading through the forum) some HM users are not choking off the natural convection air flow enough to allow the HM to do its job. If you let too much air flow on its own the HM is helpless to choke off the fire and overshoot is going to happen as a result. If you do limit the amount of convection flow the HM fan can do its job of providing just the right amount of air to stoke the fire to the desired temperature, and if the temp is heading too high it has the ability to choke it off and control it.

I really wish I had grabbed a screen shot of the graph before I powered down the rPi, the pit temp was a rock solid flat line right across the target temperature, pretty amazing! I guess I can get that done next cook....

Back to the servo setup. From my experiment above I think my suggested method of using a fan to stoke the pit up to temperature would work out great. The set point where the fan kicks off does not have to be <100%, you could tune that by adjusting the switch that activates the fan, using the arm from the servo damper to actuate the switch. I guess it would not be "required" for operation, but if you are used to the HM fan stoking up your coals for you it might take some getting used to waiting for the passive servo system to get your pit up to temperature initially.

At least these are my observations thus far....

Thanks to everyone who put hard work into this project to make it happen, and to everyone who shares info and tries to help people out in the forum. Thanks to you all I have accomplished my goal of a WiFi enabled smoker controller at a fraction of the cost of the products available on the market today....

EDIT:
Here is a picture of the air delivery system I made for my smoker, I guess I'll call it the "air burner". With the convection vents all closed off the HM controls the air flow and holds the temp like a good oven! I'll post more pics of the whole smoker in the thread I made about my initial powerup of my HM.
AirBurner.jpg
 
Last edited:
Sounds great! That's exactly how it is supposed to work, so it always pleases me when I hear someone else's system works as flawlessly as mine does.

I completely agree with you about how nice it is to have a fan to help with the startup time. The only problem is there's just not anywhere to put it. Theoretically, people with HeaterMeter Rev B hardware (v3.2, and v4.0) have 2 extra output pins, but that doesn't solve the problem of needing a MOSFET to drive the fan and a place to plug it in. At that point, you could just wire it (the mosfet) to one of the LEDs and set the LED function to "Fan at Max Speed".

Well, my idea for the adding the fan to the servo system does not require the fan to connect to the HM or the rPi at all. You just need to connect the fan to 12V with a leaf switch in the line that would be activated by the damper when it opens wide. (use the lever on the damper to push the switch and turn on the fan) You could adjust the position of the switch so it will activate the fan when the damper is fully open or whatever percent open you like.

This way the fan works on its own at full speed just until the fire gets rolling, when the damper moves the fan turns off. If the damper has to open wide enough to engage the fan during the cook (but you don't want the fan to come on) you could just put another manual switch on the fan that you could flip off after the fire is stoked....


Back
Top