Sonia Piecki
New member
Tremclad rust paint gloss black for the frameWhat kind/color of paint are you using?
Tremclad rust paint gloss black for the frameWhat kind/color of paint are you using?
Tremclad rust paint gloss black for the frameWhat kind/color of paint are you using?
I'll have to wait till later on tomorrow to post pictures but coming soon. Not done yet but might be doing the full assembly tomorrow.Now that the pollen seems to have stopped trying to get my project finished.
Removed the old wheels
Quick sand all over the frame. Tapped off the parts I don't want to paint and first layer of spray paint app

 www.grillspot.ca
![20220618_152740[1].jpg](/data/attachments/53/53385-d9af682f4fcd053bdae871acdd031ff8.jpg?hash=2a9oL0_NBT)
![20220621_064315[1].jpg](/data/attachments/53/53391-373138781586505cbfa0d8565ab6e2cf.jpg?hash=NzE4eBWGUF)
![20220621_064311[1].jpg](/data/attachments/53/53390-ef33f4aba8f9bf8453e504ad2c7830e0.jpg?hash=7zP0q6j5v4)
![20220621_064254[1].jpg](/data/attachments/53/53389-1df9477c76665986903e046591aa858f.jpg?hash=HflHfHZmWY)
![20220620_202905[1].jpg](/data/attachments/53/53388-1baa12647110d91e491b704625640b1a.jpg?hash=G6oSZHEQ2R)
![20220620_194325[1].jpg](/data/attachments/53/53387-4050f32d1d277b18b23eeaeb95e68123.jpg?hash=QFDzLR0nex)
![20220620_194008[1].jpg](/data/attachments/53/53386-0b5910fe20abc87b71d3b7b81559a16c.jpg?hash=C1kQ_iCryH)
Thank you Jon!Wow, Sonia! You are way ahead of me. It's great to see one of these very special grills get a life extension. That's a creative fix on the porcelain plated metal front and back. Mine isn't horrible, but the rust has started. If I don't come up with a fix for it, there is no point putting it all back together. I am still holding out for some kind of stainless-steel plates, but I will be very interested to hear how your easier - and way less costly - fix works out.
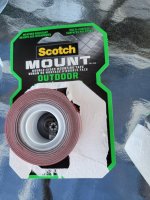
My Summit had those same "pads" where the firebox rested on the frame. I was trying to figure out what they originally were. They almost looked like folded sandpaper. I suppose they were trying to put some insulation so that metal wasn't scratching metal. I haven't decided what I am doing when I put mine on. I would like to know more about the foam tape you used. Do you think it will be ok with the high heat? I had thought of using high heat felt but worried it would drink up water and cause more rust. Maybe Nomex instead?
p.s. Your fuel gauge decal looks like it is fine, but if you need a new one, send me a PM. I have replica decals for this Summit as well as early Genesis 1-5 and x000 Genesis grills - even for the Jr.!
I'll test it out tonight and take some pictures after using it for a bit.Those oven liners are interesting, but if they are exposed to high heat, they may not be thick enough to withstand melting such as right around the burners.
Another aluminum option that would be a bit thicker would be some aluminum flashing. It usually comes in rolls.
Absolutely and if the concept itself turns out successful I do want to make actual inserts eventually. The reason I think these should last at least a while for me is that they are actually fairly thick and these are made to stay in a home stove for months enduring potentially constant cooking and baking while catching any grease that gets thrown at them. They are also not in actual contact with the flames themselves, sure if there is extra grease that falls on them they would have some fire contact but it should be somewhat limitedContinue to test. At the very least it will give some hope to using a stainless steel sandwich as Jon has described using on the one he got from me. But, honestly glorified aluminum foil is not what I would put my faith in. Hope it goes well for you though
Yeah it's not really actual "exposure" to flames that will do them in. But exposure to high heat in the presence of corrosive drippings as well. That will make short work of them But, what I like is they're "proving concept". If they hold up (even for as few as 5 cooks) to me it's proved the validity of my original thought and that Jon also is following. Then if some enterprising individual with ability to work stainless steel sheet metal uses this as a template. Winner Winner Ribeye Dinner!Absolutely and if the concept itself turns out successful I do want to make actual inserts eventually. The reason I think these should last at least a while for me is that they are actually fairly thick and these are made to stay in a home stove for months enduring potentially constant cooking and baking while catching any grease that gets thrown at them. They are also not in actual contact with the flames themselves, sure if there is extra grease that falls on them they would have some fire contact but it should be somewhat limited

Trust me my friend you WILL see one! And the steaks will be PRIME!If I pull this off, Larry, I will be looking for an invite for the Ribeye Dinner!

 tvwbb.com
![20220618_133904[1].jpg](/data/attachments/53/53375-0b175fb7cb461fb58257ff2a5677c37b.jpg?hash=Cxdft8tGH7)
![20220618_151931[1].jpg](/data/attachments/53/53376-d9deafc34f0af653d575bda36c255a34.jpg?hash=2d6vw08K9l)
![20220620_192354[1].jpg](/data/attachments/53/53377-2e30a6667dbd7cd6ccc3527242444060.jpg?hash=LjCmZn29fN)
![20220620_193000[1].jpg](/data/attachments/53/53378-81faf321d3aaf7f6c379add371421eb7.jpg?hash=gfrzIdOq9_)
![20220618_123604[1].jpg](/data/attachments/53/53374-66935fa6beccf622ace85bdc14726f16.jpg?hash=ZpNfpr7M9i)
![20220618_145422[1].jpg](/data/attachments/53/53379-f0b4cf45a83de37634d45fea7893d75b.jpg?hash=8LTPRag943)
![20220618_145433[1].jpg](/data/attachments/53/53380-0bd127a3f6c8f7f2e6f37275a7e78a8c.jpg?hash=C9Eno_bI9_)
![20220618_152344[1].jpg](/data/attachments/53/53381-98633790c8adbac3b7d0670d952a383f.jpg?hash=mGM3kMitus)
![20220618_164845[1].jpg](/data/attachments/53/53382-1c61f17e684f16c6bb35f9e4a25ace21.jpg?hash=HGHxfmhPFs)
![20220620_202909[1].jpg](/data/attachments/53/53383-d8a32f3525b4c6235cb1508390433c81.jpg?hash=2KMvNSW0xi)
![20220620_202913[1].jpg](/data/attachments/53/53384-bf30cbf0107dd7ff8b33ac3d4cbcf4d1.jpg?hash=vzDL8BB91_)
![20220621_181247[1].jpg](/data/attachments/53/53483-fda8c1aba15abd4494964ad346ed4584.jpg?hash=_ajBq6FavU)
![20220622_063413[1].jpg](/data/attachments/53/53484-23ffdad9f979d37a9868c0d53fa4ab00.jpg?hash=I__a2fl503)
![20220622_063419[1].jpg](/data/attachments/53/53485-22b87105441604c78dc07e96e3b05ab2.jpg?hash=IrhxBUQWBM)
![20220622_063513[1].jpg](/data/attachments/53/53486-6af9cfda0d23a1702cf929d89b1b8e30.jpg?hash=avnP2g0joX)